About This Gnome - organizer Amigurumi Pattern
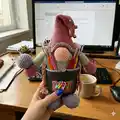
This pattern creates a practical and decorative gnome organizer that holds tools and notions. You will make a standing gnome with a removable hat, pockets, pigtails and a needle ball accessory. The design combines amigurumi shaping with functional pocket details for a lovable, useful finished piece.

Clear, photo-supported instructions are included for every round and assembly step. The finished organizer measures approximately 25 cm / 10 in depending on yarn and tension.
Why You'll Love This Gnome - organizer Amigurumi Pattern
I absolutely love this pattern because it turns a sweet amigurumi gnome into a functional organizer that you can actually use on your desk. I enjoy the combination of shaping techniques that create a stable base and a roomy body for storage. The pockets and needle ball make it a practical crafters' companion, while the hat and pigtails add personality. I feel proud sharing a design that is both decorative and useful, and I hope you will enjoy making one as much as I do.
Switch Things Up
I love how easy it is to customize this gnome organizer by changing yarn colors to match your decor or gifting occasion.
I often swap the pastel palette for earthy tones to create a woodland gnome version with a rustic feel.
If you want a sturdier organizer, I recommend using a slightly thicker yarn and a larger hook for a chunkier look.
To make a mini keychain version, use fingering weight yarn and a 1.75–2.0 mm hook for a tiny, portable gnome.
I sometimes add embroidered patterns to the pants or hat for extra personality and detail.
Try substituting small beads or coins for the glass balls if you prefer a quieter interior weight option.
I like to create matching accessories like a tiny crocheted pin cushion or miniature crochet tools to tuck into the pockets.
You can change the length of the pigtails easily by adjusting the yarn lengths used for the braids to create whatever hairstyle you like.
For a festive touch, add a small felt heart or a tiny bell to the hat for seasonal decorations.
I encourage you to experiment with different stitch textures (BLO or FLO rows) to give the pants or hat a ribbed or scalloped edge.
If you want the hat to be removable, leave the base of the hat slightly larger and use a hidden stitch to secure it so it can be taken off and put back on.
Common Mistakes & How to Fix Them
✗ Skipping the cardboard or plastic circle for the base leads to an unstable organizer; cut a circle the same size as the crocheted circle and insert it before stuffing to ensure stability.
✗ Forgetting to add glass balls at the bottom will cause the gnome to tip over; add 5 to 10 glass balls into the base before stuffing to help it stand firmly.
✗ Overstuffing the body distorts the silhouette and makes sewing difficult; stuff gradually, adding filler as you crochet and shaping gently to maintain the intended profile.
✗ Not working BLO when instructed for the pants or hand cuff will change the fabric edge; work back loops only exactly where specified to get the correct edge and fit.
✗ Failing to weave in ends and break yarn where noted creates messy joins; break yarn and weave in ends at the indicated rounds for a neat finish and to avoid loose tails.