🧢 Beautiful ✨ Detailed πŸ’ Adorable

Gingham Blanket Pattern

Gingham Blanket Pattern
4.5β˜… Rating
12-15 Hours Time Needed
4.1K Made This
βœ‚οΈ

Intermediate Level

Ideal for those with basic crochet experience, featuring slightly more advanced stitches and techniques to expand your skills.

⏱️

Multi-Day Project

A rewarding 12+ hour journeyβ€”perfect for dedicated crafters who love detailed work.

πŸ€—

Soft Hug

Gentle, plush, and full of warmth, creating a sense of comfort and coziness wherever they find a home.

About This Gingham Blanket Pattern

This pattern creates a modern gingham crochet blanket worked in alternating colour panels using Front Post and Back Post double crochet to build a textured ladder. The gingham checked pattern is formed with surface slip stitches worked afterwards, and the blanket is finished with neat tassels for a professional look. The pattern is written for a medium size blanket and includes colour-change guidance and stitch photos to help you master the technique.

Gingham Blanket Pattern crochet pattern - detailed view of completed project

Worked in DK/light worsted weight yarn with two hook sizes, the design is versatile and easy to adapt to different widths or lengths using the included tables. This is a great project to practise FPdc and BPdc and to make a lasting handmade gift.

Why You'll Love This Gingham Blanket Pattern

I absolutely love this pattern because it combines simple repeated rows with just enough technique to keep things interesting, so you always make progress while learning. The texture created by front- and back-post stitches gives the blanket a woven, sophisticated look I find irresistible. I enjoy the colour-play β€” swapping the three colors lets me create very different moods from the same pattern. The surface slip-stitch gingham overlay is one of my favourite finishing touches because it transforms the whole blanket and feels like a rewarding final flourish.

Gingham Blanket Pattern step 1 - construction progress Gingham Blanket Pattern step 2 - assembly progress Gingham Blanket Pattern step 3 - details and accessories Gingham Blanket Pattern step 4 - final assembly and finishing

Switch Things Up

I love how easy it is to customise this design by changing the colour palette β€” try pastel tones for a nursery blanket or bold contrasting shades for a modern look.

To make a larger blanket, increase your starting chains by any multiple of 20 plus 2 and add more colour panels from Table 1 to reach the desired width.

If you want a smaller lap blanket or baby blanket, reduce the number of repeating colour panels and shorten the total rows β€” Table 2 gives good length references.

Swap the yarn weight and choose an appropriately larger or smaller hook to change the finished drape: bulky yarn with a large hook will create a cosy chunky throw while finer yarn gives a lightweight, delicate blanket.

Try different tassel styles: longer tassels, grouped tassel clusters, or braided tassels for a different edge treatment that complements your colours.

For a more subtle gingham effect, use tonal shades of the same colour family for A, B and C so the checks are understated but textured.

Practice the FPdc and BPdc on a small swatch first and experiment with how tight or loose you make the posts β€” tighter posts give denser texture while looser posts give softer vertical ribs.

I sometimes embroider small motifs on top of the surface slip-stitch checks for a personalised finish β€” small initials or simple shapes look charming on one corner.

You can omit surface crochet entirely for a simpler striped, textured throw β€” the main body still looks beautiful without the overlay.

For gifts, try coordinating tassel colours with a crocheted band or a sewn label to make your blanket feel extra special and handmade-ready.

Common Mistakes & How to Fix Them

βœ— Starting with the wrong number of chains will change your blanket width significantly; always chain the exact number specified (multiples of 20 plus 2) or consult Table 1 to adjust correctly. βœ— Changing colour incorrectly can leave visible knots at the edge; change colour in the last stitch of the previous row and carry tails neatly or weave them into tassels later. βœ— Not keeping consistent tension during FPdc and BPdc makes vertical ladders uneven; practise the post stitches on a swatch and maintain the same tension as your foundation rows. βœ— Skipping stitch counts when repeating rows leads to mismatched panels and a skewed blanket; count FPdc columns after Row 2 to confirm you have the correct number for colour sequencing.

Gingham Blanket Pattern

Make a soft, modern gingham blanket using front- and back-post double crochet and surface slip stitch for the checked effect. This pattern walks you through colour changes, special stitches, and finishing with tassels so you can create a polished blanket. Perfect as a baby gift or a cozy throw, the instructions are clear and carefully photographed to guide you.

Intermediate 12-15 Hours

Materials Needed for Gingham Blanket Pattern

β€” Main Fabric

  • 01
    Ouma Ralie Feels Like Cashmere DK from Kismet Yarns: 3 x 100g Frosty White (A)
  • 02
    Ouma Ralie Feels Like Cashmere DK from Kismet Yarns: 4 x 100g Bubblegum Blue (B - light blue)
  • 03
    Ouma Ralie Feels Like Cashmere DK from Kismet Yarns: 4 x 100g Beach House Blue (C - dark blue)
  • 04
    Yarn specs / substitutes: Light (3) yarn / DK, approx 273 yards / 250 meters per 100g, 100% Acrylic
  • 05
    Suggested substitutes: Rico Essentials Acrylic Antipilling DK, King Cole Cherished Baby DK, Stylecraft Bambino DK, Lion Brand Jeans or Jamie, Scheepjes Softfun

β€” Tools Required

  • 01
    Crochet hook size 5.0mm (H) for main work
  • 02
    Crochet hook size 7.0mm for surface slip stitch and tassel work
  • 03
    Scissors
  • 04
    Yarn/tapestry needle for weaving ends and sewing tassels
  • 05
    Stitch markers (optional, useful for marking repeats)
  • 06
    Measuring tape to check gauge
  • 07
    Pins for blocking (optional)

Progress Tracker

0% Complete

β€” Special Stitches & Techniques :

Info :

Surface crochet: Slip stitches are worked on the surface of the finished blanket to form the gingham pattern (photos 25-33).

Info :

Front Post and Back Post double crochet: These stitches are made around the post of the indicated stitch rather than in the top of the previous row's stitches to form vertical ladder columns.

Instructions for Front Post double crochet (FPdc) :

YOH (photo 2), insert H FROM THE FRONT towards the back, move the H behind the post of the indicated st and let the H come out in front again, YOH (photo 3), pull up a loop at the front of your work (3 loops on H), YOH (photo 4) and pull through 2 loops (photo 5), YOH and pull through last 2 loops (photo 6, 7-11).

Instructions for Back Post double crochet (BPdc) :

YOH (photo 14), insert H FROM THE BACK towards the front, move the H in front of the post of the indicated st (photo 15) and let the H come out in the back again, YOH, pull up a loop at the back of your work (3 loops on H), YOH (photo 16) and pull through 2 loops, YOH and pull through last 2 loops (photos 17-18).

β€” Instructions :

Info :

Instructions are written for a medium size blanket, consult Table 1 on page 3 for number of starting chains for smaller or bigger blanket sizes. This pattern tends to curl in the beginning, don't worry when that happens, the surface crochet stitches added at the end will flatten it out.

Row 0 :

Ch 182 with colour A and 5mm H

Row 1 :

hdc in fourth ch from H, ch 1, skip 1 st, *hdc in next st, ch 1, skip 1 st, rep from * to end of row, end with a hdc in last ch, turn (photo 1 shows the first few hdc's)

Row 2 :

(WS) ch 3, skip first st, *FPdc around next st, ch 1, rep from * to end of row, hdc around ch3-tc, turn (see photos 2-11 for FPdc, photos 12-13 for last hdc - you should now have 89 FPdc and one hdc at the end of your row)

Row 3 :

(RS) ch 3, skip first st, *BPdc around next st, ch 1, rep from * to end of row, hdc around ch3-tc, turn (see photos 14-18)

Row 4 :

(WS) ch 3, skip first st, *FPdc around next st, ch 1, rep from * to end of row, hdc around ch3-tc, turn

Rows 5-10 :

rep rows 3-4 another 3 times

Rows 11-20 :

Change to colour B (photos 20-21, do this in the last st of row 10), rep rows 3-4 five times

Rows 21-30 :

Change to colour C, rep rows 3-4 five times

Rows 31-40 :

Change to colour B, rep rows 3-4 five times

Rows 41-50 :

Change to colour A, rep rows 3-4 five times

Rows 51-60 :

Change to colour B, rep rows 3-4 five times

Rows 61-70 :

Change to colour C, rep rows 3-4 five times

Rows 71-80 :

Change to colour B, rep rows 3-4 five times

Rows 81-90 :

Change to colour A, rep rows 3-4 five times

Rows 91-100 :

Change to colour B, rep rows 3-4 five times

Rows 101-110 :

Change to colour C, rep rows 3-4 five times

Rows 111-120 :

Change to colour B, rep rows 3-4 five times

Rows 121-130 :

Change to colour A, rep rows 3-4 five times. Fasten Off.

β€” Surface Crochet :

Info :

Turn the blanket so that the WS is facing you. The BPdc and FPdc form vertical rows (photo 22), while the RS has horizontal rows (photo 23). When the WS is facing you, these horizontal rows almost look like the rungs of a ladder behind the BPdc and FPdc vertical rows (photo 24). The surface slip stitches are worked around these "rungs" of the ladder, with the WS facing you.

Surface Step 1 :

Make a slipknot with colour C and place it around the 7mm crochet hook (make sure you leave a long yarn tail, you are not going to work your yarn ends away, you can leave these tails in the tassels you are going to add). Join colour C with a slip stitch on the right side of the first "vertical row" formed by the BPdc and FPdc, around the first bottom horizontal row (photo 25-26). Make sure that your working yarn is BEHIND the blanket.

Surface Step 2 :

Make a slip stitch around the next horizontal row right above the bottom row. Keep making slip stitches around the horizontal rows (photo 27) until you reach the top and fasten off (remember to leave a long yarn tail, photo 32 = wrong side, photo 33 = right side).

Surface Step 3 :

Begin the second vertical row by making slip stitches between the next two rows of BPdc and FPdc (remember to keep your working yarn BEHIND the blanket). Fasten off. Make 10 such slip stitch-rows in colour C. Continue making 10 slip stitch rows in each colour (see photo 28-31 for first row in colour B), following the same colour sequence: First with C, then B, A, B, C, B, A, B, C.

β€” Finishing :

Finishing Step 1 :

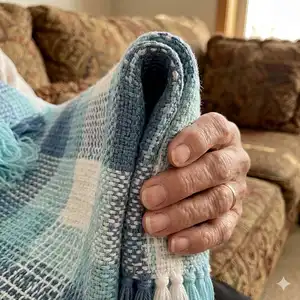
Use your hook to pull the yarn tail of every second row into the adjacent space, where you will add your tassel (photo 34). Make 20 tassels of each colour and tie five at the bottom and five at the top of each of the vertical slip stitch columns in the same colour as the vertical slip stitches (one tassel every second row).

Finishing Step 2 :

Use your hook to pull the mid-section of your tassel through the same space as your 2 yarn tails (photo 35), open it a bit wide with your fingers and pull the tail end of the tassel through (photo 36). Once you've added all the tassels, trim them to an even length.

Assembly Instructions

  • Add surface slip-stitches after completing the main fabric: join colour C at the first vertical column and work slip stitches up each horizontal rung, following the colour sequence specified, then fasten off and repeat for each vertical column.
  • Attach tassels by pulling the yarn tail of every second row into the adjacent vertical space and adding 20 tassels per colour; secure five tassels at the bottom and five at the top of each vertical slip-stitch column.
  • When changing colours between panels, change in the last stitch of the previous row to create a neat transition and carry tails toward the edge so they can be hidden in tassels.
  • Weave in ends using a yarn needle and, if desired, pin the blanket lightly and steam or block to even out the fabric before adding surface crochet and tassels.
  • Trim and neaten all tassels to an even length after attaching, and check the blanket edges for consistent stitch tension before final finishing.

Important Notes

  • πŸ’‘The pattern is written in US terminology; check abbreviations carefully before you start.
  • πŸ’‘Make a gauge swatch to ensure your tension matches the specified tension for the best finished size results.
  • πŸ’‘Use stitch markers or count FPdc columns after Row 2 to verify the correct number of repeats and colour panel placement.
  • πŸ’‘Leave long yarn tails when joining surface slip-stitch colours β€” these tails are used for tassels and are not worked away.

This gingham blanket pattern combines textured post stitches with surface slip-stitch checks for a beautiful woven look. Whether you make it in the original three-colour palette or customise your own hues, it creates a statement throw for any room. Perfect for gifting or keeping cozy at home β€” enjoy every step of the handmade process. 🧢✨

You ask,

we answer.

FAQs

What size will the finished piece be?

The finished blanket in the pattern measures approximately 33.7 inches x 38.4 inches (85.5cm x 97.5cm) using the specified yarn and hook sizes.

Can I change the size of the blanket?

Yes β€” the pattern works in multiples of 20 plus 2 chains for the foundation; consult Table 1 for alternate starting chain options and Table 2 for row counts to adjust the width and length.

Do I need to know Front Post and Back Post double crochet?

You should be comfortable with FPdc and BPdc to complete the pattern; the pattern includes step-by-step written instructions and photos for both stitches to help you learn.

How long does this project typically take to complete?

Most crafters will spend around 12-15 hours on this project, depending on experience, speed, and whether you include surface crochet and tassel finishing time.

What yarn weight and hook sizes should I use?

Use a Light (3) / DK yarn as specified; the pattern uses a 5.0mm hook for the main fabric and a 7.0mm hook for surface slip-stitch work. Yarn used is approx 273 yards / 250 meters per 100g.