🧢 Beautiful ✨ Detailed πŸ’ Adorable

Fox Hat Pattern

Fox Hat Pattern
4.5β˜… Rating
2-4 Hours Time Needed
3.0K Made This
βœ‚οΈ

Intermediate Level

Ideal for those with basic crochet experience, featuring slightly more advanced stitches and techniques to expand your skills.

⏱️

Bite-Sized Project

Finishes in 2-4 hoursβ€”perfect for an afternoon of creative relaxation.

🧣

Snug Essential

Everyday comfort with practical charm, designed for both functionality and style through changing seasons.

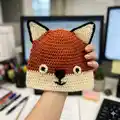
About This Fox Hat Pattern

This pattern creates a cute fox beanie with contrasting ear details and a little embroidered face. It includes full shaping rounds for four child sizes and complete ear, nose and eye pieces. The instructions use half-double crochet construction with optional color change for the brim.

Fox Hat Pattern crochet pattern - detailed view of completed project

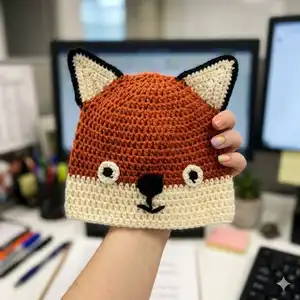
Youll find materials, gauge and clear size notes for 6/12 months to 6/8 years. The finishing section explains how to sew and embroider the facial features for a polished look.

Why You'll Love This Fox Hat Pattern

I absolutely love this pattern because it turns simple stitches into a charming animal hat that kids adore. I enjoy the mix of shaping rounds and small detail pieces that make the hat feel handmade and personal. I also love how customizable it is β€” a color change or yarn swap transforms the whole look. Sewing the ears and embroidering the mouth is satisfying and fun, and the finished piece makes a lovely gift that shows care and creativity.

Fox Hat Pattern step 1 - construction progress Fox Hat Pattern step 2 - assembly progress Fox Hat Pattern step 3 - details and accessories Fox Hat Pattern step 4 - final assembly and finishing

Switch Things Up

I love personalizing this hat by changing the color palette to create different characters or a gender-neutral look.

I sometimes use a sport weight yarn with a smaller hook to create a dainty mini version for photo props.

I also make a chunkier version using bulky yarn and a larger hook for a cozy toddler hat that works great for outdoor wear.

I like to add a removable pompom on top for extra fun; attach with a loop so it can be swapped or washed easily.

I often embroider different mouth expressions to change the personality of the fox from sweet to silly.

I recommend lining the hat for extra warmth in colder climates by sewing in a soft fleece circle in the crown.

I sometimes add safety eyes instead of crocheted eye circles for a different look β€” use securely fastened eyes for children's safety.

I enjoy making matching mittens or a scarf in the same colors to create a coordinated set for gifting.

For a playful twist, try stripes on the brim or a contrasting edge around the ears using the same ear join technique.

I also experiment with felt or small crocheted accessories, like a tiny bow or flower, to dress up the hat for special occasions.

Common Mistakes & How to Fix Them

βœ— Skipping the gauge check leads to a hat that is too small or too large; always make a swatch and adjust hook size to match the listed gauge before starting. βœ— Not counting stitches each round causes missed increases or extra stitches; count your stitches at the end of each increase round to make sure the totals match the pattern. βœ— Changing yarn or hook without adjusting pattern can change fit and drape; if you use a different weight yarn, change the hook and re-measure the gauge to get the intended size. βœ— Sewing ears in without pinning first can result in uneven placement; pin and compare both ears to the photo or measure to ensure symmetry before stitching. βœ— Pulling yarn too tightly when embroidering the mouth will pucker the fabric; use gentle tension and test on a spare swatch to get the look you want.

Fox Hat Pattern

Make a cozy fox hat with adorable pointy ears β€” perfect for babies and kids. This playful crochet hat uses half-double crochet shaping and easy pieces for the ears, nose and eyes. Youll get clear size options from 6/12 months up to 6/8 years so you can create a snug, stylish hat for little ones. Follow the step-by-step pattern and pictures to assemble a charming fox beanie that makes a great gift.

Intermediate 2-4 Hours

Materials Needed for Fox Hat Pattern

β€” Main Fabric

  • 01
    Caron Simply Soft (medium/worsted #4), 6 oz (170.1 g); 315 yds (288 m) per ball - Main Color (MC) Pumpkin (9765) - 1 ball
  • 02
    Caron Simply Soft Off White (Contrast A) (9702) - 1 ball for brim and inner ear
  • 03
    Caron Simply Soft Black (Contrast B) (9727) - 1 ball for nose and embroidery details

β€” Tools Required

  • 01
    Crochet hook U.S. G/6 (4 mm) - smaller hook for details
  • 02
    Crochet hook U.S. H/8 (5 mm) - larger hook for body to obtain gauge
  • 03
    Scissors
  • 04
    Tapestry/yarn needle for sewing pieces and weaving ends
  • 05
    Stitch markers to mark the beginning of rounds
  • 06
    Measuring tape to check gauge and finished measurements
  • 07
    Pins for positioning ears and facial features before sewing

Progress Tracker

0% Complete

β€” Hat :

Infos :

Sizes: To fit head circumference 6/12 mos 17" [43 cm]; 18/24 mos 18" [45.5 cm]; 4 yrs 19" [48 cm]; 6/8 yrs 192" [49.5 cm]. GAUGE: 13 hdc and 11 rows = 4" [10 cm] with larger hook. Note: Ch 2 at beg of rnds does not count as hdc.

Info :

With larger hook and MC, ch 4. Join with sl st to first ch to form a ring.

Round 1 :

Ch 2. 8 hdc in ring. Join with sl st to first hdc. (8 hdc)

Round 2 :

Ch 2. 2 hdc in first hdc. *2 hdc in next hdc. Rep from * around. Join with sl st to first hdc. (16 hdc)

Round 3 :

Ch 2. 2 hdc in first hdc. *1 hdc in next hdc. 2 hdc in next hdc. Rep from * around. Join with sl st to first hdc. (24 hdc)

Round 4 :

Ch 2. 2 hdc in first hdc. *1 hdc in each of next 2 hdc. 2 hdc in next hdc. Rep from * to last 2 hdc. 1 hdc in each of last 2 hdc. Join with sl st to first hdc. (32 hdc)

Round 5 :

Ch 2. 2 hdc in first hdc. *1 hdc in each of next 3 hdc. 2 hdc in next hdc. Rep from * to last 3 hdc. 1 hdc in each of last 3 hdc. Join with sl st to first hdc. (40 hdc)

Round 6 :

Ch 2. 2 hdc in first hdc. *1 hdc in each of next 4 hdc. 2 hdc in next hdc. Rep from * to last 4 hdc. 1 hdc in each of last 4 hdc. Join with sl st to first hdc. (48 hdc)

Round 7 (6/12 mos only) :

Ch 2. 2 hdc in first hdc. *1 hdc in each of next 11 hdc. 2 hdc in next hdc. Rep from * to last 11 hdc. 1 hdc in each of last 11 hdc. Join with sl st to first hdc. (52 hdc)

Round 7 (18/24 mos, 4 yrs and 6/8 yrs only) :

Ch 2. 2 hdc in first hdc. *1 hdc in each of next 5 hdc. 2 hdc in next hdc. Rep from * to last 5 hdc. 1 hdc in each of last 5 hdc. Join with sl st to first hdc. (56 hdc)

Round 8 (4 yrs and 6/8 yrs only) :

Ch 2. 2 hdc in first hdc. [1 hdc in each of next 27 (13) hdc. 2 hdc in next hdc] 1 (3) time(s). 1 hdc in each hdc to end of rnd. Join with sl st to first hdc. (58 (60) hdc)

Info :

All sizes: Next rnd: Ch 2. 1 hdc in each hdc around. Join with sl st to first hdc. Rep last rnd until Hat from beg measures 5 (52-52-6)" [12.5 (14-14-15) cm], joining A at end of last rnd. Break MC.

Info :

With A, rep last rnd until Hat from beg measures 7 (72-8-82)" [18 (19-20.5-21.5) cm]. Fasten off.

β€” Ears :

Inner Ear :

With smaller hook and A, ch 2. 1st row: (RS). 5 sc in 2nd ch from hook. Turn. 2nd row: Ch 1. 1 sc in each of first 2 sc. 3 sc in next sc. 1 sc in each of next 2 sc. Turn. 7 sc. 3rd row: Ch 1. 1 sc in each of first 3 sc. (1 sc. 1 hdc. 1 dc. 1 hdc. 1 sc) in next sc. 1 sc in each of next 3 sc. Turn. 4th row: Ch 1. 1 sc in each of next 5 sts. (1 sc. 1 hdc. 1 dc. 1 hdc. 1 sc) in next sc. 1 sc in each of next 5 sc. Turn. 5th row: Ch 1. 1 sc in each of next 7 sts. (1 sc. 1 hdc. 1 dc. 1 hdc. 1 sc) in next sc. 1 sc in each of next 7 sc. Turn. 6th row: Ch 1. 1 sc in each of next 9 sts. (1 sc. 1 hdc. 1 dc. 1 hdc. 1 sc) in next sc. 1 sc in each of next 9 sc. Fasten off.

Outer Ear :

With smaller hook and MC, make as given for Inner Ear.

Join Ears :

With WS of Inner Ear and Outer Ear facing each other, and RS of Inner Ear facing, using smaller hook join B with sl st to first sc. 1st row: Ch 1. Working through both thicknesses, 2 sc in first sc. 1 sc in each of next 10 sts. 3 sc in next sc. 1 sc in each of next 10 sts. 2 sc in last sc. Turn. 2nd row: Ch 1. 1 sc in each sc across. Turn. 3rd row: Ch 1. 1 sc in each of first 2 sc. 2 sc in next sc. 1 sc in each of next 10 sc. 2 sc in next 3 sc. 1 sc in each of next 10 sc. 2 sc in last sc. Turn. 4th row: Ch 1. 1 sc in each sc across. Fasten off, leaving long tail for sewing.

Nose :

With smaller hook and B, ch 2. 1st rnd: (3 sc. 1 hdc. 1 dc. 1 tr. 1 dc. 1 hdc. 3 sc) all in 2nd ch from hook. Join with sl st to first sc. Fasten off.

Eyes (make 2) :

With smaller hook and B, ch 2. 1st rnd: 6 sc in 2nd ch from hook. Join A with sl st to first sc. Break B. 2nd rnd: With A, ch 1. 2 sc in each sc around. Join with sl st to first sc. Fasten off.

Finishing :

Sew Eyes, Ears and Nose to Hat as shown in picture. With 2 strands of B, embroider mouth with straight stitch as shown in picture.

Assembly Instructions

  • Position the ears on top of the hat where the orange meets the off-white brim; pin both ears in place with WS facing and check symmetry before sewing.
  • Sew each ear securely through both ear layers and into the hat brim using the long tail left from joining; use small whipstitches and hide the sewn ends inside the hat.
  • Position the nose centrally on the face area between the eyes and brim, then sew through the nose piece and the hat using the tail to secure it flat and centered.
  • Place the eyes on either side of the nose spaced evenly; sew around the circles to secure, making sure both eyes match the placement shown in the photo.
  • With two strands of black (Contrast B), embroider a straight stitch mouth under the nose, and weave in all ends neatly on the inside of the hat.

Important Notes

  • πŸ’‘Check your gauge before starting; 13 hdc and 11 rows = 4" [10 cm] with the larger hook for correct sizing.
  • πŸ’‘Ch 2 at the beginning of rounds does not count as a hdc and should not be treated as a stitch when counting.
  • πŸ’‘Use stitch markers to mark the first stitch of each round to keep track of joins and avoid adding or missing stitches.
  • πŸ’‘Pin all parts in place and compare both sides for symmetry before sewing to achieve an even, professional finish.

This charming Fox Hat pattern is a delightful way to make a special handmade gift for little ones. It combines simple shaping with adorable ear and face details for a playful finish. Make one for photos, gift-giving, or everyday cozy fun. 🦊🧢

You ask,

we answer.

FAQs

What sizes are included in this pattern?

The pattern includes sizes to fit head circumferences for 6/12 months, 18/24 months, 4 years and 6/8 years with size-specific increase rounds shown in the instructions.

Can I use a different yarn weight for this hat?

Yes, you can substitute yarn weights, but this will change the finished size; always make a gauge swatch and adjust hook size to match the stated gauge for the desired fit.

Is this pattern suitable for beginners?

This pattern is rated intermediate due to shaping rounds and assembly of small pieces, so basic knowledge of hdc, sc and sewing pieces is recommended for best results.

How long does it typically take to complete the hat?

Most crocheters finish the hat in about 2-4 hours depending on size and experience, though assembly and finishing may add extra time.