🧢 Beautiful ✨ Detailed πŸ’ Adorable

Farm Finger Puppet Amigurumi Pattern

Farm Finger Puppet Amigurumi Pattern
4.3β˜… Rating
12-15 Hours Time Needed
1.8K Made This
βœ‚οΈ

Intermediate Level

Ideal for those with basic crochet experience, featuring slightly more advanced stitches and techniques to expand your skills.

⏱️

Multi-Day Project

A rewarding 12+ hour journeyβ€”perfect for dedicated crafters who love detailed work.

🧸

Cute Companion

An adorable friend to cherish, handcrafted with love to bring comfort and joy for years to come.

About This Farm Finger Puppet Amigurumi Pattern

This pattern teaches you how to crochet a full Farm Finger Puppet set β€” Old McDonald plus nine animal puppets. Each puppet is worked mostly in the back loop only (BLO) technique to create a flat, tidy shape that fits comfortably on a finger. You will learn small part construction (noses, ears, beaks, patches) and simple assembly to bring each character to life.

Farm Finger Puppet Amigurumi Pattern crochet pattern - detailed view of completed project

Clear step-by-step rounds are provided for every piece, with photos to guide placement and finishing. Ideal for gifting, storytelling props, or creating a little farm collection.

Why You'll Love This Farm Finger Puppet Amigurumi Pattern

I absolutely love this pattern because it turns simple stitches into a playful collection of characters you can hold in the palm of your hand. I enjoy designing small, satisfying projects that are fast to finish yet full of personality, and these puppets are perfect for that. The BLO technique keeps the shapes neat and uniform, which makes assembly and placement of eyes and noses very forgiving. I also love the variety β€” each animal uses the same basic body but with tiny details that give them unique charm. Making the set feels like putting together a tiny farm family, and I always smile when I see them lined up.

Farm Finger Puppet Amigurumi Pattern step 1 - construction progress Farm Finger Puppet Amigurumi Pattern step 2 - assembly progress Farm Finger Puppet Amigurumi Pattern step 3 - details and accessories Farm Finger Puppet Amigurumi Pattern step 4 - final assembly and finishing

Switch Things Up

I love how easy it is to customize these puppets β€” I often change yarn colors to create new characters and personalities.

I sometimes use a thicker yarn and a larger hook to make chunky, squishier puppets that are great for toddlers.

For a tiny keychain version I use thinner yarn and a smaller hook, then add a metal keyring to the top.

I like to add tiny felt accessories like hats or scarves for seasonal variations; they sew on quickly and add a lot of charm.

To change expressions, I adjust eye placement and the shape of the embroidered mouth; small shifts produce big personality differences.

I sometimes stuff the body very lightly to give a more 3D look, or leave it unstuffed for a flat, puppet-style finish for finger play.

I also experiment with embroidery colors for whiskers, moustaches, and beaks to personalize each puppet for a gift recipient.

For extra durability when making toys for children, I hand-sew beads and use strong sewing thread, or replace beads with embroidered eyes for safety.

I enjoy creating themed sets β€” try a seasonal farm set with tiny accessories like pumpkins, candy canes or party hats to celebrate occasions.

Adding wire to limbs is another way I make a posable version for display; wrap the wire with yarn before inserting to keep it comfortable and safe.

Common Mistakes & How to Fix Them

βœ— Skipping the back loop only (BLO) instruction will change the puppet shape and make the piece too round; always work BLO where indicated to get the flat puppet look. βœ— Forgetting to change colors exactly where noted creates uneven color bands; change yarn at the end of the indicated round and carry or fasten off neatly. βœ— Not using a stitch marker to mark the first stitch of rounds leads to miscounts on increases and decreases; use a marker and move it each round to maintain accuracy. βœ— Stuffing the nose or other small parts too firmly will distort their shape; use a small amount of toy stuffing and add gradually to maintain form and proportion. βœ— Sewing features without pinning first can result in asymmetry; pin or baste the nose, eyes and ears in place and check from all sides before securing.

Farm Finger Puppet Amigurumi Pattern

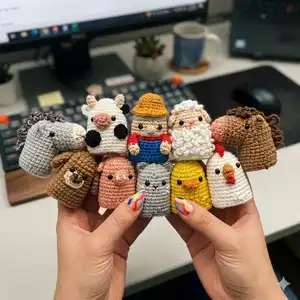
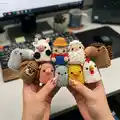
Create a charming set of 10 farm-themed finger puppets with this friendly crochet pattern. You will make Old McDonald and nine adorable animals using simple stitches and clear step-by-step instructions. The designs use back-loop-only (BLO) technique for a flat, neat finish, and each puppet is quick to make as a small project. Perfect for gifts, storytelling, or a playful handmade collection.

Intermediate 12-15 Hours

Materials Needed for Farm Finger Puppet Amigurumi Pattern

β€” Main Fabric

  • 01
    Cream yarn - small amounts for faces and details (approx 10-20g)
  • 02
    Grey yarn - small amounts for cat, donkey, and details (approx 10-20g)
  • 03
    Orange yarn - small amount for beaks and hat (approx 5-10g)
  • 04
    Red yarn - small amount for details and hat trim (approx 5-10g)
  • 05
    Blue yarn - small amount for Old McDonald body (approx 10-20g)
  • 06
    White yarn - small amounts for sheep, chicken, cow, and details (approx 10-20g)
  • 07
    Dark Grey yarn - small amount for donkey mane and details (approx 5-10g)
  • 08
    Pink yarn - small amounts for pig and nose details (approx 5-10g)
  • 09
    Black yarn - small amounts for spots and embroidery (approx 5-10g)
  • 10
    Brown yarn - small amounts for dog, horse, and details (approx 10-20g)
  • 11
    Dark brown yarn - small amount for mane and accents (approx 5-10g)
  • 12
    Yellow yarn - small amount for duck/chick body or accents (approx 5-10g)

β€” Tools Required

  • 01
    Crochet hook size 3.0 mm (no. 3)
  • 02
    Needle to sew (yarn needle)
  • 03
    Small black beads for eyes (pair per puppet)
  • 04
    Yarn for main pieces and details
  • 05
    Sewing thread (various colors for features)
  • 06
    Toy stuffing for small noses and optional filling
  • 07
    Scissors
  • 08
    Stitch markers
  • 09
    Pins for assembly
  • 10
    Embroidery needle for facial details

Progress Tracker

0% Complete

β€” Old McDonald :

Info :

Materials: Yarn (cream, grey, blue, red, orange). Sewing thread (black, orange, red). Crochet hook no. 3. Yarn needle. Needle to sew. 1 pair of small black beads for eyes

Info :

Start with grey yarn

Round 1 :

5 sc in a magic ring [5]

Round 2 :

inc x 5 [10]

Round 3 :

(sc, inc) x 5 [15]

Round 4 :

(sc 2, inc) x 5 [20]

Round 5 :

(sc 3, inc) x 5 [25]

Info :

Change to cream yarn

Round 6-8 :

sc around [25]

Info :

Change to red yarn

Round 9 :

sc around [25]

Info :

Change to blue yarn

Round 10-14 :

sc around [25]

Round 15 :

slst

Section :

Hands, make two

Info :

Start with cream yarn

Round 1 :

4 sc in a magic ring [4]

Round 2 :

inc, sc, inc, sc [6]

Info :

Change to red yarn

Round 3 :

sc 6 [6]

Round 4 :

sc 6 [6]

Round 5 :

slst

Section :

Hat

Info :

Start with orange yarn

Round 1 :

4 sc in a magic ring [4]

Round 2 :

inc x 4 [8]

Round 3 :

(sc, inc) x 4 [12]

Round 4 :

sc around [12]

Round 5 :

(sc 2, inc) x 4 [16]

Round 6 :

(sc 3, inc) x 4 [20]

Round 7 :

slst

Section :

Nose

Info :

Start with cream yarn

Round 1 :

4 sc in a magic ring [4]

Round 2 :

slst

β€” Assembling Old McDonald :

Info :

1. Sew the nose in the center, on the 7th round.

Info :

2. Sew the eyes, 7th round, 1 stitches apart from the nose.

Info :

3. Embroider the moustache with grey yarn.
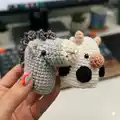
Info :

4. Sew both hands.

Info :

5. Sew the hat.

β€” Cow :

Info :

Materials: Yarn (white, black, cream, pink, brown). Sewing thread (black, pink, white). Crochet hook no. 3. Needle to sew. 1 pair of small black beads for eyes

Info :

Start with white yarn

Round 1 :

5 sc in a magic ring [5]

Round 2 :

inc x 5 [10]

Round 3 :

(sc, inc) x 5 [15]

Round 4 :

(sc 2, inc) x 5 [20]

Round 5 :

(sc 3, inc) x 5 [25]

Round 6-13 :

sc around [25]

Round 14 :

slst

Section :

Nose

Round 1 :

4 sc in a magic ring [4]

Round 2 :

inc x 4 [8]

Round 3 :

slst

Section :

Ears, make two

Info :

Ear 1: Start with white yarn. Make a chain [3], turn. Row 2: sc 2, slst.

Info :

Ear 2: Start with black yarn. Make a chain [3], turn. Row 2: sc 2, slst.

Section :

Horns, make two

Info :

Start with cream yarn

Round 1 :

3 sc in a magic ring [3]

Round 2 :

sc x 3 [3]

Round 3 :

sc x 3 [3]

Round 4 :

slst

Section :

Black patch, make two

Patch 1 - Round 1 :

Start with black yarn. 3 sc in a magic ring [3]

Patch 1 - Round 2 :

inc x 3 [6]

Patch 1 - Round 3 :

slst

Patch 2 - Round 1 :

Start with black yarn. 4 sc in a magic ring [4]

Patch 2 - Round 2 :

inc x 4 [8]

Patch 2 - Round 3 :

slst

β€” Assembling the Cow :

Info :

1. Make 2 vertical line on the nose with brown yarn. Sew it on 6th round.

Info :

2. Sew the eyes, between the nose.

Info :

3. Sew both ears and horns.

Info :

4. Sew both black patch.

β€” Chicken :

Info :

Materials: Yarn (white, orange, red). Sewing thread (red, black, orange). Crochet hook no. 3. Needle to sew. 1 pair of small black beads for eyes

Info :

Start with white yarn

Round 1 :

5 sc in a magic ring [5]

Round 2 :

inc x 5 [10]

Round 3 :

(sc, inc) x 5 [15]

Round 4 :

(sc 2, inc) x 5 [20]

Round 5 :

(sc 3, inc) x 5 [25]

Round 6-13 :

sc around [25]

Round 14 :

slst

Section :

Chicken beak

Info :

Start with orange yarn. Make a chain [4], turn.

Row 2 :

sc 2, inc, sc 2, slst

Section :

Chicken comb

Info :

Start with red yarn. Make a chain [6], turn.

Row 2 :

sc, dc, slst, dc, sc, slst

β€” Assembling the Chicken :

Info :

1. Sew the beak on 5th round.

Info :

2. Sew the eyes, between the beak.

Info :

3. Sew the wattle with red yarn.

Info :

4. Sew the comb in the centre of the head.

β€” Cat :

Info :

Materials: Yarn (grey, white). Sewing thread (black, grey). Crochet hook no. 3. Needle to sew. 1 pair of small black beads for eyes

Info :

Start with grey yarn

Round 1 :

5 sc in a magic ring [5]

Round 2 :

inc x 5 [10]

Round 3 :

(sc, inc) x 5 [15]

Round 4 :

(sc 2, inc) x 5 [20]

Round 5 :

(sc 3, inc) x 5 [25]

Round 6-13 :

sc around [25]

Round 14 :

slst

Section :

Ears, make two

Info :

Start with grey yarn. Make a chain [3], turn. Row 2: sc 2, slst

β€” Assembling the Cat :

Info :

1. Sew the eyes, 5th round, 4 stitches apart.

Info :

2. Sew the nose with red/black sewing thread.

Info :

3. Sew the whiskers beside the eyes.

Info :

4. Sew both ears.

β€” Duck :

Info :

Materials: Yarn (yellow, orange). Sewing thread (orange, black). Crochet hook no. 3. Needle to sew. 1 pair of small black beads for eyes

Info :

Start with yellow yarn

Round 1 :

5 sc in a magic ring [5]

Round 2 :

inc x 5 [10]

Round 3 :

(sc, inc) x 5 [15]

Round 4 :

(sc 2, inc) x 5 [20]

Round 5 :

(sc 3, inc) x 5 [25]

Round 6-13 :

sc around [25]

Round 14 :

slst

Section :

Beak

Info :

Start with orange yarn. Make a chain [5], turn.

Round 1 :

sc 3, inc, sc 3 [8]

Round 2 :

slst

β€” Assembling the Duck :

Info :

1. Sew the nose, 7th round.

Info :

2. Sew the eyes, between the nose.

Info :

3. Sew the crest on top of the head.

β€” Pig :

Info :

Materials: Yarn (pink, cream). Sewing thread (black, pink). Crochet hook no. 3. Needle to sew. 1 pair of small black beads for eyes

Info :

Start with pink yarn

Round 1 :

5 sc in a magic ring [5]

Round 2 :

inc x 5 [10]

Round 3 :

(sc, inc) x 5 [15]

Round 4 :

(sc 2, inc) x 5 [20]

Round 5 :

(sc 3, inc) x 5 [25]

Round 6-13 :

sc around [25]

Round 14 :

slst

Section :

Nose

Info :

Start with pink yarn

Round 1 :

4 sc in a magic ring [4]

Round 2 :

inc, sc, inc, sc [6]

Round 3 :

slst

Section :

Ears, make two

Info :

Start with pink yarn. Make a chain [3], turn. Row 2: sc 2, slst

β€” Assembling the Pig :

Info :

1. Embroider the nose using cream yarn. Sew it on 6th round.

Info :

2. Sew the eyes, between the nose.

Info :

3. Sew both ears.

β€” Dog :

Info :

Materials: Yarn (cream, dark brown). Sewing thread (black, brown). Crochet hook no. 3. Needle to sew. 1 pair of small black beads for eyes

Info :

Start with brown yarn

Round 1 :

5 sc in a magic ring [5]

Round 2 :

inc x 5 [10]

Round 3 :

(sc, inc) x 5 [15]

Round 4 :

(sc 2, inc) x 5 [20]

Round 5 :

(sc 3, inc) x 5 [25]

Round 6-13 :

sc around [25]

Round 14 :

slst

Section :

Ears

Info :

Start with brown yarn

Round 1 :

4 sc in a magic ring [4]

Round 2 :

inc x 4 [8]

Round 3-5 :

sc around [8]

Round 6 :

slst

Section :

Snout

Info :

Start with cream yarn. Make a chain [4], turn.

Round 2 :

sc, sc, inc, sc, sc, inc [8]

Round 3 :

sc around [8]

Round 4 :

slst

Section :

Nose

Round 1 :

Start with brown yarn. 4 sc in a magic ring [4]

Round 2 :

slst

β€” Assembling the Dog :

Info :

1. Sew the nose on the snout. Sew it on 6th round.

Info :

2. Sew the eyes above the snout.

Info :

3. Sew both ears on round 4.

β€” Horse :

Info :

Materials: Yarn (brown, dark brown, cream, pink). Sewing thread (black, brown). Crochet hook no. 3. Needle to sew. Stuffing for the nose. 1 pair of small black beads for eyes

Info :

Start with brown yarn

Round 1 :

5 sc in a magic ring [5]

Round 2 :

inc x 5 [10]

Round 3 :

(sc, inc) x 5 [15]

Round 4 :

(sc 2, inc) x 5 [20]

Round 5 :

(sc 3, inc) x 5 [25]

Round 6-13 :

sc around [25]

Round 14 :

slst

Section :

Nose

Info :

Start with pink yarn

Round 1 :

5 sc in a magic ring [5]

Round 2 :

inc x 5 [10]

Round 3 :

(sc, inc) x 5 [15]

Round 4 :

(sc 2, inc) x 5 [20]

Info :

Change to brown yarn

Round 5-7 :

sc around [20]

Round 8 :

slst

Section :

Ears, make two

Info :

Start with brown yarn. Make a chain [3], turn. Row 2: sc 2, slst

β€” Assembling the Horse :

Info :

1. Embroider the nose with cream yarn. Fill the nose with toy stuffing, and then sew it to the body.

Info :

2. Sew the eyes on each side of the body.

Info :

3. Sew both ears, 2 stitches apart from the eyes.

Info :

4. Make the mane with dark brown yarn by making a loop.

β€” Donkey :

Info :

Materials: Yarn (white, grey, dark grey, pink). Sewing thread (grey, black). Crochet hook no. 3. Needle to sew. Stuffing for the nose. 1 pair of small black beads for eyes

Info :

Start with grey yarn

Round 1 :

5 sc in a magic ring [5]

Round 2 :

inc x 5 [10]

Round 3 :

(sc, inc) x 5 [15]

Round 4 :

(sc 2, inc) x 5 [20]

Round 5 :

(sc 3, inc) x 5 [25]

Round 6-13 :

sc around [25]

Round 14 :

slst

Section :

Nose

Info :

Start with white yarn

Round 1 :

5 sc in a magic ring [5]

Round 2 :

inc x 5 [10]

Round 3 :

(sc, inc) x 5 [15]

Round 4 :

(sc 2, inc) x 5 [20]

Info :

Change to grey yarn

Round 5-7 :

sc around [20]

Round 8 :

slst

Section :

Ears, make two

Info :

Start with grey yarn. Make a chain [3], turn. Row 2: sc 2, slst

β€” Assembling the Donkey :

Info :

1. Embroider the nose with pink yarn. Fill the nose with toy stuffing, and then sew it to the body.

Info :

2. Sew the eyes on each side of the body.

Info :

3. Sew both ears, 2 stitches apart from the eyes.

Info :

4. Make the mane with dark grey yarn by making a loop.

β€” Lamb :

Info :

Materials: Yarn (white, cream). Sewing thread (red, black, cream). Crochet hook no. 3. Needle to sew. 1 pair of small black beads for eyes

Info :

Start with white yarn

Round 1 :

5 sc in a magic ring [5]

Round 2 :

inc x 5 [10]

Round 3 :

(sc, inc) x 5 [15]

Info :

Change to cream yarn

Round 4 :

(sc 2, inc) x 5 [20]

Round 5 :

(sc 3, inc) x 5 [25]

Round 6-7 :

sc around [25]

Info :

Change to white yarn

Round 8-13 :

sc around [25]

Round 14 :

slst

Section :

Ears, make two

Info :

Start with cream yarn. Make a chain [3], turn. Row 2: sc 2, ch 1, slst

β€” Assembling the Lamb :

Info :

1. Sew the fur with white yarn. Leave each stitches loose to create loops.

Info :

2. Sew the eyes on 6th round, 4 stitches apart.

Info :

3. Embroider the mouth with red sewing thread.

Info :

4. Sew both ears.

Assembly Instructions

  • Sew small features (nose, snout, beak) to the body at the specified round counts (for example, sew nose on 6th or 7th round) and secure with small stitches for durability.
  • Position and sew the eyes between the nose or beak as indicated (examples: 7th round for Old McDonald, 5th round for cat), spacing them by the number of stitches shown in the pattern.
  • Attach ears, horns, patches and other small parts by pinning in place first, then sew using a ladder stitch or whipstitch to keep seams tidy.
  • Use embroidery or sewing thread for small details (moustache, whiskers, mouth) and refer to the photo placement notes to get correct spacing and character expression.
  • For parts requiring stuffing (nose or horse/donkey nose), add a small amount of toy stuffing before sewing the part closed and attaching it to the body.

Important Notes

  • πŸ’‘Work in rounds and use a stitch marker to mark the first stitch of each round to avoid losing count during increases and color changes.
  • πŸ’‘Use BLO (back loop only) where indicated to create the flat, thin puppet shape that fits a finger comfortably.
  • πŸ’‘Keep stuffing light and gradual for small parts; overstuffing will distort their intended shape and placement.

This Farm Finger Puppet set includes Old McDonald and nine adorable animals to crochet and collect. Each puppet is designed for quick, enjoyable makes and playful storytelling. Perfect as a thoughtful handmade gift or a charming addition to your toy box. πŸ§ΆπŸ‘πŸ§΅

You ask,

we answer.

FAQs

What size will the finished piece be?

Each finger puppet is small β€” roughly the size to fit a finger, approximately 5-7 cm tall depending on yarn tension and hook size.

Can I use different yarn weights for this pattern?

Yes, you can use different yarn weights but the final size will change; choose an appropriate hook for the yarn weight and note that BLO fabric behavior may differ.

Do I need prior crochet experience for this pattern?

This pattern is rated intermediate; you should be comfortable working in rounds, making increases, and sewing small parts, though each step is clearly shown.

How long does this project typically take to complete?

Making the full 10-piece farm set typically takes 12-15 hours total; individual puppets can be made in under an hour each depending on experience.