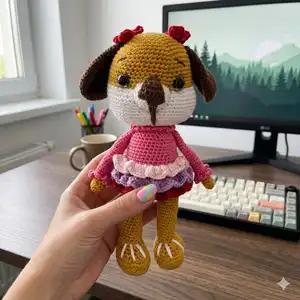
Make this charming Fancy Dog amigurumi with clear, photo-backed instructions and full round-by-round guidance. The pattern uses simple amigurumi techniques and thoughtful shaping to create a cuddly toy with ears, nose, and a layered skirt. Youll enjoy assembling the parts and customizing colors to make a unique companion.
Progress Tracker
0% Complete
— Materials & Abbreviations :
Infos :
Abbreviations: blo - back loop. ch - chain. cr - crochet. dc - double crochet. dc3tog - double crochet three together. dec - decrease. flo - front loop. hdc - half double crochet. FO - Fasten Off. inc - increase. rnd(s) - round(s). sc - single crochet. sc3tog - single crochet three together. slst - slip stitch. st - stitch. tr - treble stitch. (...) - number in parentheses indicates the number of stitches at the end of the round. [...] - repeat instructions x times or to the end of the round. (...) - work the stitches all into the same stitch.
— Head :
Round 1 :
6 sc in a magic ring
Round 3 :
(6 times)1 sc into sc next inc(18 sc)
Round 4 :
(6 times)2 sc into sc next inc(24 sc)
Round 5 :
(6 times)3 sc into sc next inc(30 sc)
Round 6 :
(6 times)4 sc into sc next inc(36 sc)
Round 7 :
(6 times)5 sc into sc next inc(42 sc)
Round 8 :
(6 times)6 sc into sc next inc(48 sc)
Round 9-17 :
(9 ring)sc into sc(48 sc) Install the safety eyes between rnd 15-16. There will be 9 sc in between.
Round 18 :
12 sc into sc (9 sc inc)6 sc into sc (9 sc inc)12 sc into sc(66 sc)
Round 19-26 :
(8 ring)sc into sc(66 sc)
Info :
Stuff the head tightly. Keep filling as you go.
Round 27 :
(6 times)9 sc into sc next dec(60 sc)
Round 28 :
(6 times)8 sc into sc next dec(54 sc)
Round 29 :
(6 times)7 sc into sc next dec(48 sc)
Round 30 :
(6 times)6 sc into sc next dec(42 sc)
Round 31 :
(6 times)5 sc into sc next dec(36 sc)
Round 32 :
(6 times)4 sc into sc next dec(30 sc)
Round 33 :
(6 times)3 sc into sc next dec(24 sc)
Round 34 :
Sc into sc (24 sc)fo. Leave a long thread for sewing.
— Arms :
Info :
Main Color - Make 2
Round 1 :
6 sc in a magic ring
Round 3-6 :
(4 ring)sc into sc (12 sc)
Round 7 :
Only in flo sc into sc(12 sc)
Round 8-22 :
(15 ring)sc into sc(12 sc)
Round 23 :
Flatten the needle in both layers. 6 sc fo. Do not fill the sleeves.
Info :
Arms Detail - Only in blo sc into 3 ch fo.
— Legs and Body :
Info :
Main Color - Make 2
Round 1 :
6 sc in a magic ring
Round 3 :
(6 times)1 sc into sc next inc(18 sc)
Round 4 :
sc into sc (18 sc)
Round 5 :
6 sc into sc(6 sc inc)6 sc into sc(24 sc)
Round 6 :
(2 times)sc into sc(24 sc)
Round 8 :
9 sc into sc(6 sc dec)9 sc into sc(18 sc)
Round 9 :
8 sc into sc(2 sc dec)8 sc into sc(16 sc)
Round 10-23 :
(14 ring)sc into sc(16 sc)
Info :
Stuff the legs tightly. Bring the legs together. Make 4 ch in between.
Round 24 :
16 sc into sc(4 ch into 4 sc)16 sc into sc(36 sc)
Round 25 :
4 sc into unworked loops of ch 36 sc into sc(40 sc)
Round 26-28 :
(3 ring)sc into sc(40 sc)
Round 29 :
Only in flo sc into sc (40 sc)
Round 30-32 :
(3 ring)sc into sc(40 sc)
Round 33 :
Only in flo sc into sc(40 sc)
Round 34-36 :
(3 ring)sc into sc(40 sc)
Round 37 :
Only in flo sc into sc(40 sc)
Round 38-44 :
(7 ring)sc into sc(40 sc)
Round 45 :
(6 times)5 sc into sc next dec(34 sc)
Round 46 :
sc into sc (34 sc)
Round 47 :
(4 times)7 sc into sc next dec(30 sc)
Info :
Tightly fill the hull. Keep filling as you go.
Round 48 :
Only in flo sc into sc(30 sc)
Round 49 :
sc into sc(30 sc)fo.
Info :
Leave a long thread for sewing.
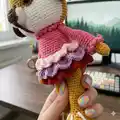
Item Name (P1) :
Elbise detayı- Etek - C Color
Round 29 :
Only in blo sc into 3 cr(120 cr)
Round -2 :
Cr into cr(120 cr)
Round 33 :
Only in blo sc into 3 cr(120 cr)
Round 2 :
Cr into cr(120 cr)
Round 37 :
Only in blo sc into 3 cr(120 cr)
Round 2 :
Cr into cr(120 cr)Fo.
Info :
Collar Detail - Rnd 48- Only in blo sc into 3 ch fo.
— Ears :
Round 1 :
6 sc in a magic ring
Round 3 :
(6 times)1 sc into sc next inc(18 sc)
Round 4 :
(6 times)2 sc into sc next inc(24 sc)
Round 5 :
(6 times)3 sc into sc next inc(30 sc)
Round 6-10 :
(5 ring)sc into sc(30 sc)
Round 11 :
(6 times)3 sc into sc next dec(24 sc)
Round 12-15 :
(4 ring)sc into sc (24 sc)
Round 16 :
(6 times)2 sc into sc next dec(18 sc)
Round 17-21 :
(5 ring)sc into sc(18 sc)
Round 22 :
Flatten the needle in both layers. 9 sc fo.
Info :
Leave a long thread for sewing.
— Queue :
Round 1 :
6 sc in a magic ring
Round 3 :
(3 times)3 sc into sc next inc(15 sc)
Round 4-6 :
(3 ring)sc into sc(15 sc)
Round 7 :
(3 times)3 sc into sc next dec(12 sc)
Round 8-12 :
(5 ring)sc into sc(12 sc)
Round 13 :
(4 times)1 sc into sc next dec(8 sc)
Round 14-15 :
(2 ring)sc into sc(8 sc)
Round 16 :
Flatten the needle in both layers. 4 sc fo.
— Hairpins :
Round 1 :
20 ch.20 ch into 20 cr
Round 2 :
Turn cr into cr(20 cr)fo.
Info :
Wrap the middle of the fold and Leave a long thread to sew.
Info :
Joining of Parts: Sew the ears to both sides Rnd-8. Sew the sleeves to both sides Rnd-47. Sew the buckles Rnd-6 to both sides.
— Nose and Nose Tip :
Round 1 :
2 ch into 2 sc turn
Round 2 :
1 sc inc 2 sc into sc (3 sc)turn
Round 3 :
1 sc inc 3 sc into sc(4 sc)turn
Round 4 :
1 sc inc 4 sc into sc(5 sc)turn
Round 5 :
1 sc inc 5 sc into sc(6 sc)fo.
Info :
Leave a long thread for sewing.
Round 1 :
5 ch ch into sc(10 sc)
Round 2 :
1 sc inc 4 sc into sc 1 sc inc(12 sc)
Round 3 :
1 sc inc 5 sc into sc 1 sc inc (14 sc)
Round 4 :
1 sc inc 6 sc into sc 1 sc inc(16 sc)
Round 5 :
1 sc inc 7 sc into sc 1 sc inc(18 sc)fo.
Info :
Fill the nose, leave a long thread for sewing.
Info :
Sew the nose between the 2 eyes between Rnd 16-20. fo.
This Fancy Dog amigurumi pattern was created to make a lovable, handmade friend you can customize in your favorite colors. Whether for gifts or playtime, the design balances cute details with approachable techniques for a rewarding finish. Make one in a weekend and share the joy of handmade charm! 🧶🧵