🧢 Beautiful ✨ Detailed πŸ’ Adorable

ELENDAN mushroom with mouse Amigurumi Pattern

ELENDAN mushroom with mouse Amigurumi Pattern
4.3β˜… Rating
1-2 Hours Time Needed
2.4K Made This
βœ‚οΈ

Beginner Friendly Level

Perfect for those just starting their crochet journey, with clear instructions and simple techniques

⏱️

Quick Make

Complete in under 2 hoursβ€”lightning fast fun for instant gratification and quick gifts.

🎁

Tiny Treasure

Small, sweet, and gift-worthy creations that fit perfectly in the palm of your hand with detailed charm.

About This ELENDAN mushroom with mouse Amigurumi Pattern

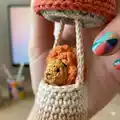
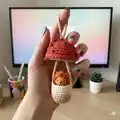
This pattern creates a tiny mushroom pendant with a small gnome that can be worn as a necklace or used as a cute decoration. The set uses fine cotton yarn and very small hooks to achieve a compact, detailed finish. Notes and photos guide you through stem, cap, inner cap, and a tiny gnome construction. Ideal for tight tension and minimal stuffing to keep pieces neat and wearable.

ELENDAN mushroom with mouse Amigurumi Pattern crochet pattern - detailed view of completed project

Finished mushroom pendant measures approx. 2" height (4.5 x 4 cm) and gnome approx. 1.75" (3.5 cm). The pattern uses US terms and recommends 100% cotton yarn and a 1.75 mm hook.

Why You'll Love This ELENDAN mushroom with mouse Amigurumi Pattern

I absolutely love this pattern because it turns simple stitches into a delightful miniature you can wear or gift. I enjoy how quickly a complete pendant and tiny gnome come together while still offering charming details like painted dots and sewn beads. I love the small scale that allows for creativity with decorations and tiny embellishments. I appreciate patterns that teach tight tension and finishing skills, and this one does both in a fun, accessible way. I hope you will love making it as much as I enjoyed designing it.

ELENDAN mushroom with mouse Amigurumi Pattern step 1 - construction progress ELENDAN mushroom with mouse Amigurumi Pattern step 2 - assembly progress ELENDAN mushroom with mouse Amigurumi Pattern step 3 - details and accessories ELENDAN mushroom with mouse Amigurumi Pattern step 4 - final assembly and finishing

Switch Things Up

I love changing colors to make each mushroom unique; try pastel shades for a softer look or bright colors for a playful pendant.

I sometimes shorten or lengthen the stem chain to adjust necklace length; ch fewer or more stitches to suit your preference.

I often swap the wooden bead for a tiny crocheted head in matching yarn to keep the pendant fully yarn-based and washable.

I like to embroider small details like a smile or freckles on the gnome instead of painting; it gives a handmade, textured finish.

To make a keychain instead of a necklace, simply attach a small metal ring to the stem chain before finishing and reduce chain length.

If you want a chunkier look, I use a thicker yarn and larger hook to scale up the pattern while keeping proportions similar.

For extra sparkle, I sew small beads around the cap edge or glue mini rhinestones after painting the dots for a decorative accent.

I sometimes create a matching set by making several mushrooms in complementary colors to hang as a garland or gift bundle.

Try tinting the stem with pastels for subtle shading rather than solid color; I find it adds depth to the pendant without heavy work.

I recommend experimenting with placement of the gnome within the cap; moving it slightly off-center changes the character and personality of the finished piece.

Common Mistakes & How to Fix Them

βœ— Not keeping your tension tight enough will make the pendant floppy and lose its shape; maintain firm, even tension and use a smaller hook if necessary. βœ— Skipping the advice to hide the tail inside while crocheting will make finishing messy; try to tuck or weave the starting tail as you work to conceal it. βœ— Forgetting to place a marker after each round will make it hard to identify row starts on small pieces; use a stitch marker or contrasting thread after each round. βœ— Overstuffing the gnome will distort its tiny shape and make sewing difficult; stuff sparingly and shape gradually to keep proportions correct. βœ— Painting the face after joining without protecting yarn may stain surrounding stitches; consider painting before assembly or use a small brush and light strokes to avoid spillover.

ELENDAN mushroom with mouse Amigurumi Pattern

Make a tiny mushroom pendant complete with a little gnome using simple crochet techniques. This pocket-sized amigurumi is perfect for gifting or wearing as a necklace. You will enjoy clear row-by-row instructions, materials list, and finishing tips to create a charming miniature. The pattern focuses on tight tension and small details for a polished result.

Beginner Friendly 1-2 Hours

Materials Needed for ELENDAN mushroom with mouse Amigurumi Pattern

β€” Main Fabric

  • 01
    100% cotton yarn 100g/200m (3.5 oz/218 yds) - corresponds to yarn weight No2 - fine/DK; small amounts of main colors needed for cap, stem and gnome
  • 02
    Small contrast yarns: approx. 5-15g each for accent colors and tiny details
  • 03
    Pieces of thread or yarn for marker (small scrap in contrast color)
  • 04
    Small amounts of paint or textile marker ink for face and cap dots

β€” Tools Required

  • 01
    Crochet hook size 1.75 mm (US steel/thread hook 4 or UK steel/thread hook 2)
  • 02
    Scissors
  • 03
    Wooden bead for gnome’s head (10-14 mm) or small crochet ball made with same yarn
  • 04
    Needle for yarn (usually tapestry needle with wide enough eye)
  • 05
    Piece of toys filler (polyester stuffing)
  • 06
    Tools for decor: textile markers or acrylic paints with brush, pastels to tint stem, beads, sewing thread in matching colors
  • 07
    Piece of thread in contrast color as a marker (or other markers of rows)

Progress Tracker

0% Complete

β€” MUSHROOM pendant :

Info :

Work in spiral rows (rounds). Use marker after finishing each row to see the beginning of next row if needed. Make a magic loop (adjustable ring) or ch 2, insert hook into 1-st ch.

β€” Stem :

Round 1 :

sc 6 (6) (try to hide the tail of yarn inside while crocheting)

Round 2 :

inc 6 (12)

Round 3 :

[inc, sc 2] x 4 (16)

Round 4-8 :

sc in each stitch (16), ch 250 (this would be approx. 65 cm strand to hang on neck as a necklace; you may ch as many as you wish), sl st into sc 7 of last row (into the middle of last row), fasten off, weave in the tail.

β€” Cap :

Info :

Top part: Make a magic loop (adjustable ring) or ch 2, insert hook into 1-st ch.

Round 1 :

sc 6 (6) (try to hide the tail of yarn inside while crocheting)

Round 2 :

inc 6 (12)

Round 3 :

[inc, sc 2] x 4 (16)

Round 4 :

into front loop only [inc, sc 3] x 4 (20)

Round 5 :

[inc, sc 4] x 4 (24)

Round 6-7 :

sc in each stitch (24), fasten off, weave in the tail. If you wish to sew the beads to the cap top, it would be more comfortable to make it before next step.

Item Name (P1) :

Inner part: Turn the top part of cap inner side out.

Round 1 :

sc into each back loop of top part row 3 (16)

Round 2 :

sc in each stitch (16)

Round 3 :

[dc inc, dc 3] x 4 (20), fasten off, weave in the tail.

Info :

Pull the stem chain through the center of cap (I use thick hook for this purpose).

β€” GNOME :

Info :

Make a magic loop (adjustable ring) or ch 2, insert hook into 1-st ch.

Round 1 :

sc 6 (6)

Round 2 :

[inc, sc] x 3 (9)

Round 3-5 :

sc into each stitch (9)

Round 6-8 :

ch 1, turn, sc 6 (6); stuff it. Fold the borders.

Round 9 :

sl st 3 through both borders. Fasten off, leaving long tail to sew the bead *

Info :

Pull the tail with a needle through the bead as showed and fix it. To make a quiff I let small tail of yarn left after sewing the bead remain on the outside. Otherwise just hide the tail inside. Make face features with textile marker/acrylic paint (I sometimes prefer to paint the face before sewing not to spoil the yarn around with paint).

Info :

*wooden bead may be replaced with crochet ball in suitable color of same yarn and hook: Crochet inner side out.

Round 1 :

sc 6 in a magic ring (6)

Round 2 :

sc into each stitch (6)

Round 3 :

dec 3 (3). Fasten off, hide the tail inside. You may embroider face with sewing thread (for me it’s easier to make a face after joining with body).

β€” DECORATION :

Info :

You may decorate mushroom with pastels / acrylic paints / textile markers. For example, tint the stem in the bottom. Sew beads or make paint dots on the cap. You may also crochet small white circles and sew them to it (honestly, I prefer quicker decor techniques :-P). Maybe you’d also like to embroider it.

β€” FINISH :

Info :

CONGRATULATIONS! Your mushroom pendant with gnome is ready! I hope you loved the process of growing it.

Assembly Instructions

  • Pull the stem chain through the center of the cap using a thicker hook to ease threading, then position and secure the chain so the cap hangs evenly.
  • Fold the gnome borders, join them by slip stitching 3 through both borders, fasten off and leave a long tail to sew the wooden bead for the head.
  • Thread the long tail through the wooden bead with a needle and secure it firmly; if using a crochet ball instead, sew it to the top and hide the tail inside.
  • If you wish to attach beads to the cap top, sew them before assembling inner cap and stem for easier handling and neater placement.
  • Decorate the mushroom by painting dots or tinting the stem, then sew on any small crocheted circles or beads and weave in all ends securely.

Important Notes

  • πŸ’‘Work in spiral rounds and use a stitch marker at the end of each row to clearly see the beginning of the next round.
  • πŸ’‘Crochet rather tight as instructed to ensure the mushroom keeps solid and straight; too loose stitches will cause misshaping.
  • πŸ’‘Hide or weave in starting tails while crocheting when possible to keep the tiny work neat and avoid bulky seams.
  • πŸ’‘Sew beads or add decorations before final assembly when it is more comfortable, and test face painting before permanent placement.

This tiny mushroom pendant with a sweet gnome is designed to delight and charm as a wearable miniature. It combines compact crochet techniques with tiny finishing details to create a memorable handmade keepsake. Whether you make it as a gift or a quick craft, it adds a whimsical touch to any day. πŸ„πŸ§Ά

You ask,

we answer.

FAQs

What size will the finished piece be?

With the suggested materials the mushroom pendant measures approximately 2" height (4.5 x 4 cm) and the gnome is approx. 1.75" height (3.5 cm).

Can I use a different yarn weight for this pattern?

You may choose thicker or thinner yarn, but the pattern is designed for fine/DK cotton. Changing yarn weight will affect the final size and you should adjust hook size accordingly.

Do I need to use a wooden bead for the gnome's head?

No, the wooden bead (10-14 mm) may be replaced with a small crochet ball made from the same yarn and hook; instructions are provided for the crochet alternative.

Is prior experience required to make this pendant?

This pattern is beginner friendly but requires working in spiral rounds, small hooks, and tight tension; basic knowledge of crochet stitches is helpful for best results.

How should I decorate the mushroom cap?

You can use textile markers, acrylic paints, pastels, beads, or crochet small white circles to sew on; many quick decor techniques are suggested in the decoration section.