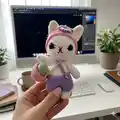
About This Easter Bunny Amigurumi Pattern
This pattern creates a small, adorable bunny amigurumi complete with hat, shorts, a little basket and a tiny egg. It features clear round-by-round instructions for every part, so you can crochet each piece and assemble them easily. The pattern uses basic amigurumi techniques plus a few shaping rounds for charming details.
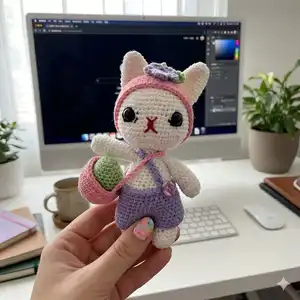
You will make the head, body, legs, arms, ears, hat, basket, egg and a flower accessory. Detailed photos and assembly notes help you position pieces accurately for a polished finish.
Why You'll Love This Easter Bunny Amigurumi Pattern
I absolutely love this pattern because it brings a lot of personality into a small, gift-sized crochet toy that you can finish in a weekend. I enjoy the combination of simple amigurumi construction with fun accessories like the tiny basket and egg that make it special. The shaping rounds are satisfying and create a cute silhouette that always makes me smile. I also love how customizable it is — you can change colors or add tiny outfits to make each bunny unique.
Switch Things Up
I love customizing this pattern by swapping colors and adding tiny outfits; try pastel palettes for a springtime bunny or bold tones for a modern look.
I often change the yarn weight and hook to make different sizes: use DK with a 2.5 mm hook for the original size or sport/bulky yarn with adjusted hooks for smaller or larger versions.
I sometimes embroider different facial expressions to create personalities—move the eyes or change the mouth shape to make shyer or happier bunnies.
Try adding tiny crocheted accessories like scarves, tiny carrots, or mini dresses to create themed characters for holidays and gifts.
I like to swap the basket for a tiny flower bouquet or a miniature gift bag to make the piece occasion-specific and more playful.
For a posable version, I add thin wire inside the limbs before stuffing so the arms and head can be posed and rearranged.
You can embellish the hat with beads, buttons or felt pieces for texture; I often sew on a small pearl or button to the flower center for extra charm.
If you want a safer toy for small children, replace safety eyes with embroidered eyes and secure all parts with extra stitching.
Combine two colorways to create siblings or a small family set, giving each bunny a different accessory or outfit for variety.
I also enjoy mixing yarn textures—try a fuzzy or boucle yarn for a plush-looking bunny while keeping the face in smooth yarn for clear details.
Common Mistakes & How to Fix Them
✗ Skipping stitch markers during continuous rounds can cause you to lose the start of the round; place a marker at the first stitch of each round and move it as you go to stay aligned.
✗ Forgetting to stuff gradually results in lumps or collapsing shapes; stuff small amounts frequently and shape as you work to maintain smooth curves.
✗ Pulling yarn too tight on increases or decreases will distort the piece; keep a consistent, moderate tension and practice increases evenly across the round.
✗ Not counting stitches after shaping rounds leads to incorrect stitch counts later; always count at the end of rounds with increases or decreases to ensure accuracy.
✗ Sewing parts without pinning can create uneven placement; pin or use safety pins to position arms, legs and ears before sewing to check symmetry.