🧢 Beautiful ✨ Detailed πŸ’ Adorable

Duck No Sew Amigurumi Pattern

Duck No Sew Amigurumi Pattern
4.0β˜… Rating
2-3 Hours Time Needed
3.5K Made This
βœ‚οΈ

Intermediate Level

Ideal for those with basic crochet experience, featuring slightly more advanced stitches and techniques to expand your skills.

⏱️

Bite-Sized Project

Finishes in 2-4 hoursβ€”perfect for an afternoon of creative relaxation.

🧸

Cute Companion

An adorable friend to cherish, handcrafted with love to bring comfort and joy for years to come.

About This Duck No Sew Amigurumi Pattern

This pattern creates a charming no-sew duck amigurumi with full, round-by-round instructions and photo guidance. You can make the classic yellow duck, a mallard with color changes, or follow the additional rooster notes for a chicken version. The design uses super bulky yarn for a plush texture and quick results.

Duck No Sew Amigurumi Pattern crochet pattern - detailed view of completed project

Clear abbreviations and materials are listed at the start of each piece so you can prepare easily. The pattern includes legs, speculum (beak), wings/comb instructions and assembly tips to finish your toy neatly.

Why You'll Love This Duck No Sew Amigurumi Pattern

I absolutely love this pattern because it turns simple stitches into the sweetest little duck in just a few hours. I enjoy how the super bulky yarn gives instant plush texture and satisfying results with minimal stuffing. I also love offering both a classic yellow duck and a mallard color option so you can customize your bird. The no-sew construction keeps finishing quick and beginner-friendly while still allowing for cute hand-sewn details.

Duck No Sew Amigurumi Pattern step 1 - construction progress Duck No Sew Amigurumi Pattern step 2 - assembly progress Duck No Sew Amigurumi Pattern step 3 - details and accessories Duck No Sew Amigurumi Pattern step 4 - final assembly and finishing

Switch Things Up

I love how easily you can customize this pattern by changing colors and yarn textures.

I often swap the super bulky yarn for a chenille-style bulky yarn to create an ultra-soft plush finish.

Want a pocket-sized keychain? Use a finer weight yarn and smaller hook to make a mini version perfect for bags.

I sometimes embroider a tiny smile or freckles to give each duck a unique personality before attaching the beak.

You can add wire into the legs or wings for posability if you want your bird to stand or pose differently.

Try felt or contrasting yarn for the beak and feet for a crisp, neat finish when you prefer not to crochet those pieces.

Mix and match mallard colors: try teal instead of green or cream instead of white to design your own species.

I like to add tiny crocheted accessories like scarves, hats, or a bow to create gift-ready characters.

For a decorative touch, sew on a small base or felt oval so your amigurumi sits sturdily on a shelf.

Experiment with eye typesβ€”use embroidered eyes for baby-safe toys or larger safety eyes for adult collectibles.

Common Mistakes & How to Fix Them

βœ— Skipping stitch counts on increase rounds causes size mismatches; always count stitches at the end of each round to ensure accuracy. βœ— Forgetting to change yarn colors at the exact round creates crooked color bands; mark the exact stitch where the color change should occur and switch yarn there. βœ— Not stuffing gradually will give uneven shaping and lumps; add small amounts of fiberfill as you go and shape with your fingers for a smooth finish. βœ— Cutting the leg yarn too early prevents easy attachment; keep the leg yarn tail long and do not cut it until you slip stitch the leg into the body. βœ— Placing safety eyes without checking spacing can ruin the face balance; position and pin the eyes between the recommended rounds and counted stitches before fixing them permanently.

Duck No Sew Amigurumi Pattern

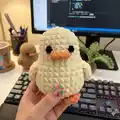
Create a sweet no-sew duck amigurumi using super bulky yarn and simple stitches. This pattern walks you through step-by-step rounds to crochet the body, legs, beak and small details. You can make a yellow duck, a mallard version with color changes, or follow the rooster notes for a chicken variation. Perfect for gifting or keeping as a cuddly handmade companion.

Intermediate 2-3 Hours

Materials Needed for Duck No Sew Amigurumi Pattern

β€” Main Fabric

  • 01
    Super Bulky yarn / Category 6 - main body color (e.g., Yellow) - small amount (approx 20-50g)
  • 02
    Super Bulky yarn / Category 6 - accent color Orange for beak and feet - small amount (approx 10-20g)
  • 03
    Super Bulky yarn / Category 6 - Mallard colors: Green, White, Brown - small amounts each (approx 20-50g each)
  • 04
    Super Bulky yarn / Category 6 - Rooster colors: White, Red, Yellow - small amounts each (approx 20-50g each)
  • 05
    Fiberfill - small amount for stuffing

β€” Tools Required

  • 01
    Crochet hook size 3.5mm (E)
  • 02
    Stitch marker
  • 03
    Sewing needle
  • 04
    Scissors
  • 05
    Plastic safety eyes 8mm (for duck and mallard)
  • 06
    Plastic safety eyes 6mm (for rooster)
  • 07
    Hot gun glue
  • 08
    Yarn needle for sewing and weaving ends
  • 09
    Pins for assembly (optional)

Progress Tracker

0% Complete

β€” Duck (Yellow) - Crochet from the body up to the head :

Round 1 :

6 SC in an MR (6)

Round 2 :

6 INC (12)

Round 3 :

(SC, INC) 6 times (18)

Round 4 :

(2 SC, INC) 6 times (24)

Round 5-8 :

24 SC (24)

Round 9 :

5 INC, 14 SC, 5 INC (34)

Round 10 :

9 SC, (5 Ch, turn: SC, HDC, 2 DC), Sk 2, 12 SC, (5 Ch, turn: SC, HDC, 2 DC), Sk 2, 9 SC (34)

Round 11 :

9 SC, 2 SC (Crochet into the two skip stitches in R10), 12 SC, 2 SC (Crochet into the two skip stitches in R10), 9 SC (34)

Round 12-16 :

34 SC (34)

Round 17 :

17 DEC (17)

Info :

*Stuffing*

Round 18 :

(SC, DEC) 5 times, 2 SC (12)

Round 19 :

6 DEC (6)

Info :

Weave in the yarn end and cut

β€” Legs (Make 2) :

Row 1 :

Make 3 CH. Start in the second stitch from the hook: 2 SC (2)

Row 2-3 :

2 SC (2)

Infos :

Keep the yarn without cutting it. Crochet 2 Slip stitches into the body at the position of the feet. Attach eyes on rows 7 and 8, spaced 4 stitches apart.

β€” Speculum (Beak) :

Item Speculum (P1) :

Begin with Orange. Row 1: 4 Slip stitch into the 4 stitches between rows 8 and 9 (the 4 stitches between the eyes), turn.

Round 2 :

Ch, 4 SC

Info :

Cut the yarn

β€” Mallard Duck (Green to Brown color change) - Crochet from the body up to the head :

Round 1 :

6 SC in an MR (6)

Round 2 :

6 INC (12)

Round 3 :

(SC, INC) 6 times (18)

Round 4 :

(2 SC, INC) 6 times (24)

Round 5-8 :

24 SC (24)

Info :

Change to White yarn

Round 9 :

5 INC, 14 SC, 5 INC (34)

Info :

Change to Brown yarn

Round 10 :

9 SC, (5 Ch, turn: SC, HDC, 2 DC), Sk 2, 12 SC, (5 Ch, turn: SC, HDC, 2 DC), Sk 2, 9 SC (34)

Round 11 :

9 SC, 2 SC (Crochet into the two skip stitches in R10), 12 SC, 2 SC (Crochet into the two skip stitches in R10), 9 SC (34)

Round 12-16 :

34 SC (34)

Round 17 :

17 DEC (17)

Info :

*Stuffing*

Round 18 :

(SC, DEC) 5 times, 2 SC (12)

Round 19 :

6 DEC (6)

Info :

Weave in the yarn end and cut

β€” Mallard Legs (Make 2) :

Row 1 :

Make 3 CH. Start in the second stitch from the hook: 2 SC (2)

Row 2-3 :

2 SC (2)

Infos :

Keep the yarn without cutting it. Crochet 2 Slip stitches into the body at the position of the feet. Attach eyes on rows 7 and 8, spaced 4 stitches apart.

β€” Mallard Speculum :

Item Speculum (P1) :

Begin with Orange. Row 1: 4 Slip stitch into the 4 stitches between rows 8 and 9 (the 4 stitches between the eyes), turn.

Round 2 :

Ch, 4 SC

Info :

Cut the yarn

β€” Rooster - Wings (Make 2) :

Item Wings (P1) :

Use white yarn. Make 4 chains, start with the second chain from the hook: INC, SC, 4SC in the last stitch, SC, INC, 2CH, Picot, CH, SLST in the first stitch

Info :

Weave in the yarn end and cut

β€” Rooster - Crochet from the body up to the head :

Round 1 :

6 SC in an MR (6)

Round 2 :

6 INC (12)

Round 3 :

(SC, INC) 6 times (18)

Round 4 :

(2 SC, INC) 6 times (24)

Round 5 :

(3 SC, INC) 6 times (30)

Round 6 :

(4 SC, INC) 6 times (36)

Round 7-8 :

36 SC (36)

Round 9 :

7 SC, 4 SC with the 1st arm, 14 SC, 4 SC with the 2nd arm, 7 SC (36)

Round 10-11 :

36 SC (36)

Instruction :

Make 6 CH, SLST in the first st, repeat 3 times, crochet with 2 pieces together with 10 SLST

Info :

*Stuffing*

Round 12 :

CH, 16 SC (16)

Round 13 :

(3 SC, INC) 4 times (20)

Round 14-15 :

20 SC (20)

Round 16 :

(2 SC, DEC) 5 times (15)

Round 17 :

(SC, DEC) 5 times (10)

Info :

*Stuffing*

Round 18 :

DEC 5 times (5)

Info :

Weave in the yarn end and cut

β€” Rooster Comb and Face Details :

Item Comb (P1) :

Use red yarn. Crochet crest from R17 to R18. The starting point is straight from the tail going up: (3CH, DC in the same st, SLST in the next stitch) 3 times

Info :

Cut the yarn. Make the mouth with yellow yarn, 3 lines like this at R13. Attach the eyes between R14-R15, apart 3 stitches.

Assembly Instructions

  • Attach head to body seamlessly as worked (no sewing) by finishing rounds as instructed and stuffing firmly before closing; weave in the yarn end and cut as directed.
  • Position and attach legs by slip stitching the leg tops into the body at the foot positions, using the leg yarn tail kept from making the feet; do not cut leg yarn until secured.
  • Attach the speculum (beak) into the 4 stitches between rounds 8 and 9 (the 4 stitches between the eyes) and sew or slip stitch securely in place.
  • Place and secure safety eyes between the indicated rounds: for the duck/mallard attach eyes on rows 7 and 8 spaced 4 stitches apart; for the rooster attach eyes between R14-R15, 3 stitches apart.
  • Attach wings and comb using the tails to whipstitch them into place or use hot glue for reinforcement; pin before final sewing to ensure symmetry.

Important Notes

  • πŸ’‘Use stitch markers to keep track of your rounds, especially when making increases, decreases, and color changes.
  • πŸ’‘Stuff gradually and evenly to maintain smooth shapingβ€”overstuffing can distort your work and under-stuffing will make pieces floppy.
  • πŸ’‘Keep leg yarn tails long and do not cut until you have securely slip stitched or attached the feet to the body.
  • πŸ’‘Weave in ends and cut only after you have checked placement of all facial features and appendages to ensure correct positioning.

This adorable no-sew duck and friends pattern is perfect for quick, satisfying makes that feel cozy and handmade. Create classic yellow ducks, handsome mallards, or a cheerful rooster using simple stitches and color changes. Make them as gifts, keychain pals, or shelf decorations β€” each one is a tiny handcrafted treasure. 🧢🧸

You ask,

we answer.

FAQs

What size will the finished piece be?

The finished amigurumi measures approximately 9-12 cm tall when using super bulky (#6) yarn and a 3.5mm hook; final size varies with tension and yarn.

Can I use different yarn weights for this pattern?

Yes, you can use different yarn weights but this will affect the final size; select an appropriate hook for your chosen yarn to maintain stitch consistency.

Do I need prior crochet experience for this pattern?

This pattern is rated intermediate because it includes increases, decreases, color changes, and small attachment techniques; basic knowledge of single crochet and working in the round is recommended.

How long does this project typically take to complete?

Most crafters finish a single duck in about 2-3 hours using the recommended materials; time may vary depending on experience and customization.

Where should I place the safety eyes?

Place safety eyes between rounds 7 and 8 for the duck and mallard, spaced 4 stitches apart; for the rooster place eyes between rounds 14 and 15, 3 stitches apart.