🧢 Beautiful ✨ Detailed πŸ’ Adorable

Doryfish Amigurumi Pattern

Doryfish Amigurumi Pattern
4.6β˜… Rating
2-4 Hours Time Needed
2.4K Made This
βœ‚οΈ

Intermediate Level

Ideal for those with basic crochet experience, featuring slightly more advanced stitches and techniques to expand your skills.

⏱️

Bite-Sized Project

Finishes in 2-4 hoursβ€”perfect for an afternoon of creative relaxation.

πŸ₯

Charming Critter

Delightful animal designs with sweet details that capture the essence of your favorite woodland and farmyard friends.

About This Doryfish Amigurumi Pattern

This pattern creates an adorable Dory-inspired amigurumi fish with clear row-by-row instructions and helpful photos to guide your work. It uses simple shaping, color changes, and small fins to capture the playful look. The body is worked from the body up to the tail with no-sew assembly needed.

Doryfish Amigurumi Pattern crochet pattern - detailed view of completed project

Includes dorsal fin instructions and eye placement guidance for an expressive finish. Designed to be quick and satisfying for crocheters with some experience.

Why You'll Love This Doryfish Amigurumi Pattern

I absolutely love this pattern because it captures the charm of a little blue fish with striking color details and a compact, satisfying shape. I enjoy the balance of simple rounds and playful color changes that keep the work interesting without being overwhelming. The no-sew construction from body to tail makes assembly stress-free and lets you focus on shaping and finishing. I also appreciate how the dorsal fin details add personality with just a few quick pieces. Making this fish always feels rewarding and joyful, especially when the eyes are added and the face comes alive.

Doryfish Amigurumi Pattern step 1 - construction progress Doryfish Amigurumi Pattern step 2 - assembly progress Doryfish Amigurumi Pattern step 3 - details and accessories Doryfish Amigurumi Pattern step 4 - final assembly and finishing

Switch Things Up

I love changing the colors to create different fish species; try turquoise and coral for a tropical vibe.

I sometimes use sport weight yarn and a smaller hook to make a miniature keychain-sized fish for gifts.

I also use bulky yarn with a larger hook to make a plush, squishy version perfect for cuddling.

I add embroidered smiles or tiny felt cheeks to personalize expressions and give each fish its own personality.

I often experiment with eye sizes; smaller safety eyes or embroidered eyes can give a cuter, softer look.

I like to add a tiny loop of yarn at the top so the fish can be hung as an ornament or used as a zipper pull.

I sometimes stitch on contrasting stripes or spots to create whimsical patterns and make each fish unique.

I recommend trying metallic or sparkly yarn for a subtle shimmer that catches the light and looks magical.

I occasionally make matching sets in complementary colors to create a school of fish for display or play.

I enjoy combining this fish with other sea-themed amigurumi to build a whole undersea scene; mix and match sizes and colors for impact.

Common Mistakes & How to Fix Them

βœ— Skipping the instruction to switch yarn when the text is bold and underlined; always change to the specified color immediately to keep stripe placement accurate. βœ— Forgetting to stuff before closing the body can make it hard to shape correctly; stuff gradually and firmly up to the point indicated to preserve form. βœ— Not counting stitches after rounds with multiple increases or decreases leads to mismatched shaping; count your stitches at the end of each round to confirm the correct stitch count. βœ— Ignoring the instruction to weave in yarn ends after fins and color changes causes messy finishing; weave in and cut ends as directed to secure color changes and trims.

Doryfish Amigurumi Pattern

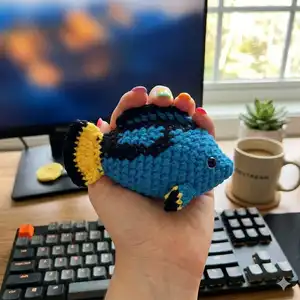
Make a delightful Dory-inspired amigurumi fish with clear, photo-backed instructions that guide you step by step. This pattern features bold color changes, dorsal fin details, and an easy no-sew body-to-tail construction. Perfect for gift-making or decorating a nautical nursery, you'll enjoy watching this tiny ocean friend come to life.

Intermediate 2-4 Hours

Materials Needed for Doryfish Amigurumi Pattern

β€” Main Fabric

  • 01
    Blue yarn - main color for body (use a medium/worsted weight yarn suitable for amigurumi)
  • 02
    Black yarn - for stripes and detailing (small amount)
  • 03
    Yellow yarn - for tail and fin accents (small amount)

β€” Tools Required

  • 01
    Crochet hook (use size appropriate for your yarn and tight amigurumi stitches)
  • 02
    Safety eyes (place at rounds R5-R6, apart 8 stitches)
  • 03
    Scissors
  • 04
    Yarn needle for weaving and sewing
  • 05
    Stitch markers
  • 06
    Polyester stuffing

Progress Tracker

0% Complete

β€” Body :

Info :

*When the text is bold and underlined, switch to BLACK yarn*

Row 1 :

5 SC in an MR (5)

Row 2 :

2SC, INC, 2SC (6)

Row 3 :

INC, SC, 2INC, SC, INC (10)

Row 4 :

SC, 7INC, 2SC (17)

Row 5 :

4SC, (INC, SC) 4 times, INC, 4SC (22)

Row 6 :

5SC, (INC, SC) 6 times, 5SC (28)

Row 7 :

8SC, INC, 10SC, INC, 8SC (30)

Row 8 :

14SC, 2SC, 14SC (30)

Row 9-10 :

13SC, 4SC, 13SC (30)

Row 11 :

10SC, 10SC, 10SC (30)

Row 12 :

9SC, 2SC, 2SC, 4SC, 2SC, 2SC, 9SC (30)

Row 13 :

9SC, SC, 3SC, 4SC, 3SC, SC, 9SC (30)

Row 14 :

3SC, DEC, 3SC, DEC, 3SC, DEC, 2SC, SC, DEC, SC, 2SC, DEC, 3SC, DEC (24)

Row 15-16 :

6SC, 2SC, 3SC, 3SC, 2SC, 2SC, 6SC (24)

Row 17 :

2SC, DEC, 2SC, (DEC, 2SC) 3 times, DEC, 2SC, DEC (18)

Row 18 :

5SC, 9SC, 4SC (18)

Row 19 :

(SC, DEC) 2 times, (SC, DEC) 3 times, SC, DEC

Infos :

*Stuffing* Cut the Black and Blue yarn Change to Yellow yarn

Row 20 :

Crochet 2 side together with 6SC

Row 21 :

Turn, 2CH, DC-INC 6 times (12)

Info :

Change to Black yarn

Row 22 :

Turn, CH, 12SC (12)

Info :

Weave in the yarn end and cut

β€” Dorsal Fins :

Part 1 (Make 2) :

Begin with Blue yarn. Pick up the yarn from row 7, apart 8 stitch. Row 1: (Chains 1, HDC, 3DC, HDC) in one stitch (5). Change to Yellow yarn. Row 2: Turn, CH, 5SC (5). Weave in the yarn end and cut.

Part 2 :

Begin with Blue yarn. Pick up the yarn from R8 to R16, in the vertical line from head to tail. Row 1: (Chains 1, SC, 7DC, SC) in one stitch (9). Change to Black yarn. Row 2: Turn, CH, 9SC (9). Weave in the yarn end and cut. Attach the eyes at R5-R6, apart 8 stitch.

Assembly Instructions

  • Attach the two small dorsal fin Part 1 pieces to the body along the pick-up point at Row 7, spacing each apart 8 stitches and secure with yarn end weaving.
  • Attach the larger dorsal fin (Part 2) along the vertical line from Row 8 to Row 16, aligning it from head to tail and sew or weave the base securely.
  • Place and secure safety eyes between R5 and R6, spacing them 8 stitches apart before closing the body and finishing color changes.
  • Stuff the body at the step marked *Stuffing* before changing to yellow yarn and closing the tail area to maintain shape and firmness.
  • Weave in all yarn ends after finishing each piece and cut the yarn to prevent unraveling and keep a neat finish.

Important Notes

  • πŸ’‘When the text is bold and underlined, switch to black yarn immediately to keep stripes and details aligned.
  • πŸ’‘Stuff the body at the indicated *Stuffing* step; stuffing later can make shaping and closing the tail difficult.
  • πŸ’‘Attach safety eyes between rounds R5-R6 and space them 8 stitches apart for the correct facial placement.

This cheerful Doryfish amigurumi brings ocean whimsy to your handmade collection with playful stripes and bright fins. 🐟 The pattern combines color changes, simple shaping, and easy fin details for a satisfying make. 🌊 Perfect as a small gift or nursery decorationβ€”happy crocheting! 🧢✨

You ask,

we answer.

FAQs

What size will the finished piece be?

The finished amigurumi measures approximately 10-12 cm long when using a medium/worsted weight yarn and the hook recommended for tight amigurumi stitches.

Can I use different yarn weights for this pattern?

Yes, you can use different yarn weights, but this will affect the final size and stitch counts; adjust your hook size accordingly for comparable tension.

Do I need prior crochet experience for this pattern?

This pattern is rated intermediate, so basic knowledge of single crochet, increases, decreases, and simple color changes is recommended.

Where should I place the eyes?

Attach the safety eyes at rounds R5-R6, spaced 8 stitches apart as instructed for the best facial placement.