🧢 Beautiful ✨ Detailed πŸ’ Adorable

Donut Amigurumi Pattern

Donut Amigurumi Pattern
4.6β˜… Rating
1-2 Hours Time Needed
3.3K Made This
βœ‚οΈ

Beginner Friendly Level

Perfect for those just starting their crochet journey, with clear instructions and simple techniques

⏱️

Quick Make

Complete in under 2 hoursβ€”lightning fast fun for instant gratification and quick gifts.

🎁

Tiny Treasure

Small, sweet, and gift-worthy creations that fit perfectly in the palm of your hand with detailed charm.

About This Donut Amigurumi Pattern

This pattern makes a charming little donut amigurumi with a beige base and a brown frosted topping. It uses sport/fine yarn and a small 3 mm hook to create a neat, compact toy. The pattern includes simple increases, rounds worked in single crochet, and a back-loop-only join for the frosting.

Donut Amigurumi Pattern crochet pattern - detailed view of completed project

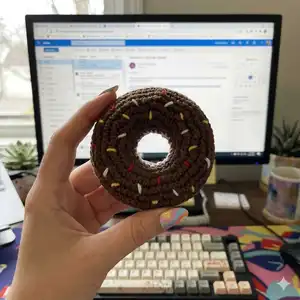
The donut is finished with stitched sprinkles using scraps of color and a yarn needle for playful detail. Ideal for quick gifts, keychains, or a handmade decor accent.

Why You'll Love This Donut Amigurumi Pattern

I absolutely love this pattern because it transforms simple stitches into a delightful miniature treat that makes people smile. I enjoy how quickly it comes together, so you get a satisfying finished piece in one sitting. The finishing touches like stitched sprinkles let me be playful with color and tiny details. I also appreciate how beginner-friendly the rounds and joins are, which makes it accessible to makers of many skill levels. Sharing these little handmade goodies always brightens someone’s day, and that motivates me to design more cute food amigurumi.

Donut Amigurumi Pattern step 1 - construction progress Donut Amigurumi Pattern step 2 - assembly progress Donut Amigurumi Pattern step 3 - details and accessories Donut Amigurumi Pattern step 4 - final assembly and finishing

Switch Things Up

I love changing the frosting color to make a whole box of different donuts β€” think pink, white, chocolate, or pastel blue for a playful set.

I sometimes use a chunky yarn and a larger hook to make a soft, squishy version that works as a pincushion or a plush toy.

I also like to make tiny keychain-sized versions by using thin yarn and a 2.5 mm hook for miniature treats.

I often add embroidered faces or tiny felt badges to turn the donut into a character with personality.

I recommend swapping yarn textures β€” try a cotton blend for a crisp look or acrylic for durability and easy washing.

I sometimes glue on small beads or seed beads for sparkly sprinkles instead of embroidered yarn for a different finish.

I enjoy making a matching set of coffee cup and donut by adjusting colors to coordinate as a cute gift pair.

I also experiment with adding a small loop before finishing to convert the donut into an ornament or keyring attachment.

I recommend using variegated yarn for the frosting for unexpected color streaks and a marbled sprinkle effect.

I often stitch a ribbon or small tag with a name to personalize donuts as party favors or gift tags.

I sometimes add a thin wire in the center seam if I want the donut to be slightly posable for display arrangements.

I encourage trying safety eyes or embroidered eyes to give your donut a whimsical face β€” placement changes the character dramatically.

Common Mistakes & How to Fix Them

βœ— Not leaving a long tail when instructed for the base can make joining impossible; leave the recommended long tail (about 15 cm) to sew the inner pieces together securely. βœ— Forgetting to work the BLO when joining the frosting will result in a bulky seam; follow the instruction to slip stitch into the back loops only to create a smooth top edge. βœ— Overstuffing the donut can distort its round shape and make assembly difficult; add polyester fiberfill gradually and check the shape as you go to maintain a flat donut profile. βœ— Skipping stitch counts during increases leads to uneven rounds and mismatched pieces; count stitches after each increase round to ensure you have the exact stitch count listed. βœ— Cutting the yarn too short when finishing the frosting prevents weaving in ends properly; when instructed to slip stitch and cut, leave enough tail to weave in or tuck the ends neatly.

Donut Amigurumi Pattern

Create a sweet, squishy crochet donut you can cherish or gift. This compact amigurumi pattern guides you through a small base, a frosted topping, and simple assembly so you can finish quickly. Perfect for practicing rounds, BLO joins and playful sprinkle details. Make one as a keychain, toy, or decorative accent.

Beginner Friendly 1-2 Hours

Materials Needed for Donut Amigurumi Pattern

β€” Main Fabric

  • 01
    Sport/Fine Yarn/4 Ply Weight Yarn (recommended)
  • 02
    Alize Cotton Gold - Beige Colour (55% Acrylic, 45% Cotton) for base
  • 03
    YarnArt Jeans - Brown Colour (55% Acrylic, 45% Cotton) for frosting
  • 04
    Some small amounts of assorted yarn colours for sprinkles

β€” Tools Required

  • 01
    Crochet hook 3 mm
  • 02
    Stitch marker
  • 03
    Yarn needle / Tapestry needle
  • 04
    Polyester fiberfill

Progress Tracker

0% Complete

β€” Materials :

Infos :

Yarn : Sport/Fine Yarn/4 Ply Weight Yarn. I used Alize Cotton Gold-Beige Colour and YarnArt Jeans-Brown Colour (55 % Acrylic, 45 % Cotton). Some colours of yarn for sprinkles. Crochet Hook : 3 mm. Stitch marker. Yarn Needle/Tapestry Needle. Polyester Fiberfill.

β€” Abbreviations :

Infos :

Ch:Chain. Sl: slip stitch. Sc: single crochet. Inc: increase. BLO: Back Loop Only.

β€” Difficulty :

Info :

Easy/Beginner

β€” Donut Base :

Info :

Start with BEIGE YARN, make a long tail about 15 cm and start with 20 chain

Round 1 :

sc 20 in the chain (20)

Round 2 :

(sc, inc) x 10 (30)

Round 3 :

(2 sc, inc) x 10 (40)

Round 4 :

(3 sc, inc) x 10 (50)

Round 5 :

(4 sc, inc) x 10 (60)

Round 6-8 :

Sc around

Info :

Sl, leave a long tail for sewing

β€” Donut Frosting / Topping :

Info :

Make same with BROWN (ANY COLOUR) YARN but no need give a long tail (sl and cut the yarn)

Round 1 :

sc 20 in the chain (20)

Round 2 :

(sc, inc) x 10 (30)

Round 3 :

(2 sc, inc) x 10 (40)

Round 4 :

(3 sc, inc) x 10 (50)

Round 5 :

(4 sc, inc) x 10 (60)

Round 6-8 :

Sc around

Info :

Sl, cut the yarn

Info :

With yarn Needle attach colours yarn as the sprinkles.

β€” Attachment :

Attach Inner :

First attach the inner of donuts (base and frosting/topping) using the long tail of yarn with slip stich (20).

Attach Outside :

Then attach the outside (base and top side): slip stitch donut base with frosting (BLO frosting/top base) until 50 stitch, then fill the polyfill.

Finish :

Then slip stitch all until done (60).

Assembly Instructions

  • Attach the inner donut (base and frosting/topping) first using the long tail from the base and slip stitch around the 20 inner stitches to close the hole securely.
  • Join the outer edges by slip stitching through the back loops only (BLO) of the frosting/top base to the top edge of the base until you reach 50 stitches, leaving an opening.
  • Fill the donut with polyester fiberfill through the opening after joining to round 50, adjusting stuffing to maintain a flat donut shape before finishing the join.
  • Continue slip stitching all remaining stitches until you complete 60 stitches and the donut is fully closed, then fasten off and weave in ends.
  • Attach sprinkles by threading small lengths of contrasting yarn through a yarn needle and embroidering short stitches across the frosting to mimic sprinkles.

Important Notes

  • πŸ’‘Leave a long tail (about 15 cm) at the start of the base for attaching the inner donut pieces securely.
  • πŸ’‘Use stitch markers to mark the first stitch of each round and keep your rounds even as you increase.
  • πŸ’‘Work the join between frosting and base in BLO (back loop only) as directed to create a neat top edge before stuffing.
  • πŸ’‘Stuff gradually and check the shape frequently; overstuffing will distort the donut profile and make finishing harder.

This adorable donut amigurumi is a quick, joyful project you can finish in one sitting. 🍩 It uses simple rounds and a clever BLO join for a neat frosted edge, plus playful stitched sprinkles for character. 🧢 Perfect for gifts, keyrings, or a sweet display pieceβ€”happy crocheting!

You ask,

we answer.

FAQs

What size will the finished piece be?

The finished amigurumi measures approximately 6-8 cm in diameter when using sport/fine yarn and a 3 mm hook, though exact size may vary with tension.

Can I use different yarn weights for this pattern?

Yes, you can use different yarn weights, but the final size will change; use a larger hook with bulky yarn for a chunkier donut or a smaller hook with thin yarn for a mini version.

Do I need prior crochet experience for this pattern?

This pattern is beginner friendly and uses basic stitches like single crochet, increases, and slip stitches, so basic crochet knowledge is recommended.

How long does this project typically take to complete?

Most crocheters finish this quick project in about 1-2 hours, depending on experience and how detailed you are with sprinkles and finishing.