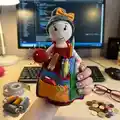
About This Doll - organizer Amigurumi Pattern
This pattern creates a decorative doll that doubles as an organizer with multiple pockets and a needle ball. The doll features a crocheted head and torso, a structured base, removable apron pockets and sewn-on hair and accessories. Youll follow round-by-round instructions and simple sewing steps to assemble each piece.
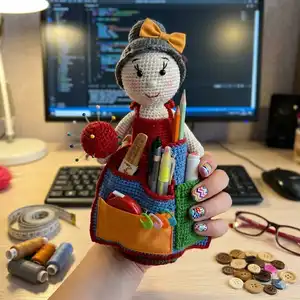
It uses small-gauge yarn and a 2.0 mm hook for fine detail and stability. The finished piece is approximately 25 cm (10 in) tall and includes photo-reference placement tips.
Why You'll Love This Doll - organizer Amigurumi Pattern
I absolutely love this pattern because it combines practicality with charm — a cute doll that keeps your sewing tools organised. I enjoy designing pockets and small details that let you personalize each apron and needle ball. I find the mix of amigurumi shaping and flat pocket knitting really satisfying to make. Im excited to share clear round-by-round instructions so you can recreate every detail and customize colors and accessories.
Switch Things Up
I often change the yarn colors to match my sewing room or give the doll as a themed gift — try pastel tones for a soft look or bright contrasting colors for a playful design.
I vary the yarn weight and hook size to create different scales — a thicker yarn with a larger hook makes a chunky, toy-like organizer while fine yarn creates a delicate, compact version.
I like to add posable wire inside the arms so the doll can hold the needle ball or small tools; you can run the wire through the arm before final sewing and secure the ends inside stuffing.
To change the pockets, adjust chain length and row counts: shorten or lengthen the large pocket to hold larger or smaller supplies, or add additional small pockets for scissors, measuring tape, and pens.
I sometimes add felt or embroidered appliques to the apron to personalize it; embroidery, buttons, or tiny crocheted flowers give the apron a unique signature.
If you want a heavier base for larger tools, increase the size of the cardboard disc and add more glass balls or small metal washers for added weight and stability.
I recommend trying different fastenings for the apron ribbon — ties, snap buttons, or tiny Velcro patches make the apron removable for washing or swapping colors.
I enjoy mixing textured stitches for the pocket edges to create visual interest — try a picot edge, crab stitch, or a small shell border for a decorative finish.
For gift sets, make matching mini organizers in different colors and sizes by changing the number of rounds and pocket dimensions — they make great coordinated sewing kits.
I also experiment with embellishments like tiny beads or a little crocheted pincushion that attaches to the apron for added function and charm.
Common Mistakes & How to Fix Them
✗ Skipping the placement of safety eyes between the 12th and 13th rounds will shift the face; place the eyes before you continue rounds past R9 and double-check spacing of 8 loops between eyes.
✗ Forgetting to stuff as you go causes uneven shaping and large gaps; add fiberfill gradually while shaping the head and torso to maintain smooth curves.
✗ Not using the cardboard/plastic circle and glass balls in the base can make the doll unstable; cut a sturdy circle the same size as your crocheted base and add 5-10 glass balls for weight.
✗ Pulling stitches too tight when joining base to body will pucker the seam; use even tension and crochet two loops together (1 body loop + 1 base loop) as instructed to create a neat join.