🧶 Beautiful ✨ Detailed 💝 Adorable

Cute Doll Amigurumi Pattern

Cute Doll Amigurumi Pattern
4.5★ Rating
8-10 Hours Time Needed
3.1K Made This
✂️

Intermediate Level

Ideal for those with basic crochet experience, featuring slightly more advanced stitches and techniques to expand your skills.

⏱️

All-Day Adventure

Requires 8-10 hours, ideal for a full day of immersive crocheting.

🧸

Cute Companion

An adorable friend to cherish, handcrafted with love to bring comfort and joy for years to come.

About This Cute Doll Amigurumi Pattern

This pattern guides you to make a sweet crocheted girl doll with curly hair, a removable skirt, and tiny flower embellishments. You will work in rounds for the head, body, arms and legs, then create layered hair strands and sew everything together. The design features simple shaping details for a lovable facial expression and easy clothing accessories.

Cute Doll Amigurumi Pattern crochet pattern - detailed view of completed project

Includes complete round-by-round instructions for head, body, arms, legs, skirt, flowers and hair. Photos are included to help with placement and finishing touches.

Why You'll Love This Cute Doll Amigurumi Pattern

I absolutely love this pattern because it brings out so much personality with simple stitches and layering. I enjoy making the curly hair strands and arranging them into a playful style that really gives the doll character. The skirt and little flower details let me add color and creativity, and sewing everything together feels rewarding every time. I also love that the pattern is detailed enough to follow easily while still allowing room for personalization.

Cute Doll Amigurumi Pattern step 1 - construction progress Cute Doll Amigurumi Pattern step 2 - assembly progress Cute Doll Amigurumi Pattern step 3 - details and accessories Cute Doll Amigurumi Pattern step 4 - final assembly and finishing

Switch Things Up

I love how this pattern lets me experiment with colors, so I often swap the skirt color to create seasonal outfits.

I sometimes change the hair color and make shorter or longer strands for different hairstyles to match the personality I want.

I like to use a slightly thicker yarn and bigger hook if I want a chunkier, cuddlier doll version that works great as a toy.

If you want a tiny keychain version, use finer yarn and a smaller hook to scale everything down proportionally.

I often add embroidered freckles, a little blush, or a tiny mouth variation to change the doll's expression and mood.

Try swapping the flower shapes or sizes and placing them asymmetrically for a more boho look on the skirt and hair.

For safety-eye-free options, embroider the eyes for a fully washable toy safe for babies and small children.

I sometimes add a small felt pocket to the skirt to make the doll interactive and playful.

To create a themed set, change outfit colors and accessory shapes—tiny hearts, stars, or miniature toys are fun additions.

I also personalize finished dolls with tiny name tags or ribbons so each one becomes a special, unique gift.

Common Mistakes & How to Fix Them

✗ Placing the safety eyes too early or too close together will ruin the facial spacing; place the eyes between rnd 15-16 with 8 sc between them as instructed to get the correct look. ✗ Forgetting to stuff gradually causes lumps and uneven shaping; stuff the head, legs and body steadily as you work and keep filling as you go for smooth curves. ✗ Not counting stitches during increases and decreases will alter the final shape; count your stitches at the end of each round, especially after rounds with multiple (x times) instructions. ✗ Skipping the instruction to leave a long thread to sew on will make assembly harder later; always leave the indicated long thread when finishing sections so you can sew parts securely. ✗ Neglecting to secure hair strands and layers can cause slippage; sew the first hair layer fully and edit later layers as instructed, attaching only the required layers for a stable hairstyle.

Cute Doll Amigurumi Pattern

Create a charming handmade crochet doll with expressive eyes, curly hair, and a cute removable skirt. This pattern walks you through every round and detail so you can recreate the doll exactly as shown. Perfect for gifting or keeping as a treasured handmade friend, you will enjoy shaping the face, assembling hair layers, and adding little floral accents.

Intermediate 8-10 Hours

Materials Needed for Cute Doll Amigurumi Pattern

— Main Fabric

  • 01
    Yarn (suitable for 2.5 mm hook)
  • 02
    Main Color: Cream (Main Color)
  • 03
    Color A: Fushcia
  • 04
    Color B: Pink
  • 05
    Color C: Light Pink
  • 06
    Color D: Brown

— Tools Required

  • 01
    Crochet hook size 2.5 mm (or a size that fits your yarn)
  • 02
    Scissors
  • 03
    Stuffing (polyester fiberfill)
  • 04
    Tapestry needle for sewing
  • 05
    Stitch markers
  • 06
    Pins for assembly
  • 07
    Safety eyes (place between rnd 15-16 as instructed)
  • 08
    Measuring tape (optional for finished size checking)

Progress Tracker

0% Complete

— Head :

Rnd 1-8 :

sc in a mr

Rnd 2-8 :

sc inc(16)

Rnd 3 :

(8 times)1 sc into sc next inc(24)

Rnd 4 :

(8 times)2 sc into sc next inc(32)

Rnd 5 :

(8 times)3 sc into sc next inc(40)

Rnd 6 :

(8 times)4 sc into sc next inc(48)

Rnd 7 :

(8 times)5 sc into sc next inc(56)

Rnd 8-18 :

(11 ring)sc into sc(56)

Rnd 19-21 :

sc into sc(14 sc inc)21 sc into sc(70)

Rnd 20-24 :

(5 ring) sc into sc (70)

Rnd 25 :

(8 times) 9 sc into sc next dec (62)

Rnd 26 :

(8 times) 8 sc into sc next dec (54)

Rnd 27 :

(8 times) 7 sc into sc next dec (46)

Info :

Place the safe eyes between rnd 15-16. There should be 8 sc between them. Stuff the head tightly.

Info :

Keep filling as you go.

Rnd 28 :

(8 times) 6 sc into sc next dec (38)

Rnd 29 :

(8 times) 5 sc into sc next dec (30)

Rnd 30 :

(8 times) 4 sc into sc next dec (22)

Rnd 31-36 :

(6 ring) sc into sc (22) fo Leave a long thread to sew on.

— Legs & Body :

— A COLOR :

Rnd 1- 6 sc in a mr

Round 2 :

Rnd 2- 6 sc inc (12)

Round 3 :

Rnd 3- (6 times) 1 sc into sc next inc(18)

Round 4 :

Rnd 4-(6 times)2 sc into sc next inc(24)

Round 5 :

Rnd 5-sc into sc(24)

Round 6 :

Rnd 6-in flo sc into sc(24)

Round 7-8 :

Rnd 7-8-(2 ring)sc into sc(24)

Round 9 :

Rnd 9-5 sc into sc(8 sc dec)5 sc into sc(16)

Round 10 :

Rnd 10-sc into sc(16)

— C COLOR :

Rnd 11-in flo sc into sc(16)

Rnd 12-17 :

Rnd 12-17-(6 ring)sc into sc(16)

Rnd 18 :

Rnd 18-Socks detail - in blo sc into 3 ch(16)

— MAIN COLOR :

Rnd 19-in flo 2 sc dec(14) Stuff the legs. keep filling as you go

Rnd 20-33 :

Rnd 20-33-(14 ring)sc into sc(14)

Rnd 34 :

Rnd 34-2 sc inc(16)

Rnd 35 :

Rnd 35-sc into sc(16)

— Legs & Body More :

Rnd 36 :

Rnd 36-2 sc inc(18)

Rnd 37 :

Rnd 37-2 sc inc(20)

Rnd 38 :

Rnd 38-Bacakları birleştirin Sc into sc(40)

Rnd 39 :

Rnd 39-sc into sc(40)

Rnd 40-44 :

Rnd 40-44-(5 ring)sc into sc(40)

— B COLOR :

Rnd 45-47-(3 ring)scinto sc(40)

Rnd 48 :

Rnd 48-(4 times)9 sc into sc next dec(36)

Rnd 49-50 :

Rnd 49-50-(2 ring)sc into sc(36)

Rnd 51 :

Rnd 51-(6 times)4 sc into sc next dec(30)

Rnd 52-57 :

Rnd 52-57-(6 ring)sc into sc(30)

Rnd 58 :

Rnd 58-(6 times)3 sc into sc next dec(24)

Info :

Stuff the body tightly. keep filling as you go

Rnd 59-60 :

Rnd 59-60-(2 ring)sc into sc(24)

Ana color :

Rnd 61-in flo sc into sc(24)

Rnd 62 :

Rnd 62-sc into sc(24)fo.

Item Name (P1) :

collar detail - Rnd 61-in blo sc into 3 ch(24)fo.

— Arms :

Rnd 1-6 :

sc in a mr

Rnd 2 :

Rnd 2-6 sc inc(12)

Rnd 3-6 :

Rnd 3-6-(4 ring)sc into sc(12)

Rnd 7 :

Rnd 7-2 ch.turn 2 ch into sc sc into sc(12)

Rnd 8 :

Rnd 8-2 sc dec sc into sc(10)

Rnd 9 :

Rnd 9-2 sc dec sc into sc(8)

Rnd 10 :

Rnd 10-(4 times)1 sc into sc next inc(12))

Rnd 11-22 :

Rnd 11-22-(12 ring)sc into sc(12)

B COLOR :

Rnd 23-sc into sc(12)

Rnd 24 :

Rnd 24-in flo sc into sc(12) Fill the sleeves. Keep filling as you go.

Rnd 25 :

Rnd 25-2 sc inc sc into sc(14)

Rnd 26-27 :

Rnd 26-27-(2 ring)sc into sc(14)

Rnd 28 :

Rnd 28-(4 times)2 sc into sc next dec(10)

Rnd 29 :

Rnd 29-Straighten it. sink the needle into both layers. 5 sc fo. Leave a long thread to sew on.

Info :

sleeve detail -Rnd 24-in blo sc into 3 ch.(12)fo. clean the tip of the thread.

— Skirt :

— A COLOR :

Rnd 1-40 ch. Combine

Rnd 2 :

Rnd 2-40 ch into sc(40)

Rnd 3 :

Rnd 3-sc into sc(40)

Rnd 4 :

Rnd 4-40 sc inc(80)

Rnd 5 :

Rnd 5-sc into sc(80)

Rnd 6 :

Rnd 6-sc into cr(80 cr)

Rnd 7-9 :

Rnd 7-9-(3 ring)cr into cr(80 cr)

Rnd 10 :

Rnd 10- in blo sc into hdc (80) fo.

Info :

Hangers are two

Rnd 1 (hanger) :

Rnd 1- 30 ch. 30 ch into sc (29sc) fo. leave some thread for sewing

— Flowers :

MAKE 5 :

Rnd 1- 8 sc in a mr fo. leave some thread for sewing

— Hairs :

D COLOR Rnd 1 :

8 sc in a mr

Rnd 2 :

8 sc inc (16)

Rnd 3 :

(8 times) 1 sc into sc next inc (24)

Rnd 4 :

(8 times) 2 sc into sc next inc (30) First Layer

Rnd 5 :

(6 hair strand) 10 sc. 10 ch into sc (9 sc) 1 sc into sc.

Rnd 6 :

(17 hair strand) 40 ch. turn 8 ch inc (16) 32 ch into sc Second Layer

Rnd 7 :

(14 hair strand)45 ch.turn 8 sc inc(16 sc)37 sc into sc fo. Third Layer

Rnd 8 :

(14 hair strand)50 ch turn 8 sc inc (16 sc)42 sc into sc fo.

— Joining Parts :

Rnd-56 :

stitch the sleeves to both sides.

Info :

Sew the head to the body.

Info :

Sew the hair to the head, the strands of the first layer. edit other layers without sewing them. release it.

Info :

Dress and shoe flowers-8 sc in a mr fo. Leave a long thread end to sew. Make 5 of them.

— Buckles :

Buckles - make 2 of them. Color: red and green

Rnd 1 :

Rnd 1-12 sc in a mr

Rnd 2 :

Rnd 2-(6 times)1 sc into sc 1 sc into 4 cr fo.

Rnd 3 :

Rnd 3-95 ch turn 95 ch into sc fo. Plant the flowers on it.

Assembly Instructions

  • Stitch the sleeves to both sides as indicated in Joining Parts (Rnd-56) and ensure seams are secure for durable wear.
  • Sew the head to the body using the long thread left from the head (Rnd 31-36) and align the neck opening evenly before tightening the seam.
  • Sew the hair to the head by attaching the strands of the first layer securely; edit and release other layers without sewing them as instructed to create the layered hairstyle.
  • Attach the dress and shoe flowers by sewing the 8-sc flower pieces to the skirt and shoes; leave a long thread end when making the flowers to make sewing easier.
  • Make the two buckles (red and green) and attach them to the hangers/straps of the skirt as shown, planting the small flowers on the buckles after finishing (Rnd 3).

Important Notes

  • 💡Place the safety eyes between rnd 15-16 with 8 single crochet stitches between them for correct facial placement.
  • 💡Stuff the head, legs and body tightly but gradually—keep filling as you go to maintain smooth shaping and avoid lumps.
  • 💡Leave long threads when finishing parts such as head, sleeves and flowers so you have enough to sew pieces together securely.

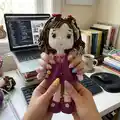
This adorable crochet doll pattern helps you create a timeless handmade friend full of personality and tiny details. 🌸 The layers of hair, carefully placed eyes, and floral accents make each doll unique and gift-ready. 🧵 Follow the step-by-step rounds and photos to bring your creation to life with love and patience.

You ask,

we answer.

FAQs

What size will the finished piece be?

The finished amigurumi measures around 20 cm in circumference and about 10 cm in length as listed in the pattern.

Can I use a different hook size?

Yes, you can use a different hook size but this will change the final size; the pattern recommends a 2.5 mm hook or one that fits your yarn.

When should I place safety eyes?

Place the safety eyes between rounds 15-16, ensuring there are 8 single crochet stitches between them for correct placement.

Is this pattern suitable for beginners?

This pattern is rated intermediate due to layered hair construction, assembly, and shaping—basic crochet experience is recommended.