🧢 Beautiful ✨ Detailed πŸ’ Adorable

Cute Chick Amigurumi Pattern

Cute Chick Amigurumi Pattern
4.4β˜… Rating
5-7 Hours Time Needed
1.2K Made This
βœ‚οΈ

Beginner Friendly Level

Perfect for those just starting their crochet journey, with clear instructions and simple techniques

⏱️

Weekend Treat

Takes 5-7 hours, making it an enjoyable project to finish over a couple of days.

🧸

Cute Companion

An adorable friend to cherish, handcrafted with love to bring comfort and joy for years to come.

About This Cute Chick Amigurumi Pattern

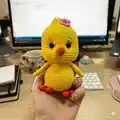
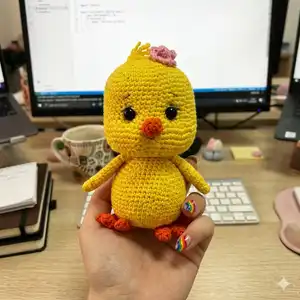
This pattern creates a sweet little chick amigurumi with a rounded head, plump body, wings, feet, beak and a tiny flower accent. It uses basic amigurumi techniquesβ€”single crochet in the round, increases and decreasesβ€”so you can focus on shaping and finishing. The finished doll is compact and perfect for gifting or display, easily customized with color and small accessories. Instructions include placement notes for safety eyes and sewing tips for a neat finish.

Cute Chick Amigurumi Pattern crochet pattern - detailed view of completed project

Complete round-by-round instructions guide you through every step, with clear notes for stuffing and assembly. Suitable for crocheters learning to shape toys and practice consistent tension.

Why You'll Love This Cute Chick Amigurumi Pattern

I absolutely love this pattern because it captures a lot of personality with very simple stitches and shaping. I designed the chick to be compact and satisfying to finish in a weekend, so you get that sense of accomplishment quickly. I enjoy how easy it is to customize the look with different colors, eye placement, or a tiny flower on top. Making several in different hues is one of my favorite little projects to gift to friends and family.

Cute Chick Amigurumi Pattern step 1 - construction progress Cute Chick Amigurumi Pattern step 2 - assembly progress Cute Chick Amigurumi Pattern step 3 - details and accessories Cute Chick Amigurumi Pattern step 4 - final assembly and finishing

Switch Things Up

I love changing up the colors to make a whole family of chicks; try pastel shades for a nursery-friendly set.

I often use thicker yarn and a larger hook to make a chunky, cuddly version that is great for little hands.

I sometimes add eyelash yarn or embroider eyelashes for a different expression on the face.

I like switching safety eyes for embroidered eyes for a totally soft, baby-safe toy alternative.

I also experiment with different flower styles or tiny hats to create seasonal or themed versions.

I recommend adding a small felt heart or applique on the belly to personalize each chick.

I sometimes insert a bit of wire into the wings to give a slight poseability for display if desired.

I enjoy pairing this chick with other mini amigurumi for gift sets β€” change yarn color and size to coordinate.

I occasionally crochet tiny scarves or bows to accessorize the chick for holidays or special occasions.

I find that experimenting with eye placement and beak size dramatically changes the personality, so try different positions before sewing permanently.

Common Mistakes & How to Fix Them

βœ— Skipping stitch markers during continuous rounds causes you to lose track of the round start; use a marker at the first stitch of each round to keep count. βœ— Forgetting to stuff gradually leads to lumps or a misshapen body; add stuffing a little at a time while you work to maintain smooth shape. βœ— Placing safety eyes too low or unevenly will make the face look unbalanced; measure and mark between rounds 17-18 with equal spacing before inserting the eyes. βœ— Not leaving long thread ends for sewing details makes assembly fiddly; always leave a generous tail when finishing small pieces so you can stitch them securely. βœ— Pulling stitches too tight when joining layers can distort shaping and make seams visible; use gentle, even tension when stitching layers together for a neat finish.

Cute Chick Amigurumi Pattern

Make this adorable crochet chick to brighten any shelf or gift box. The pattern walks you through each round with clear instructions so you can follow along easily. Perfect for personalizing with tiny flowers, wings, or color changes to match your style. A warm, cuddly handmade companion you will enjoy making and sharing.

Beginner Friendly 5-7 Hours

Materials Needed for Cute Chick Amigurumi Pattern

β€” Main Fabric

  • 01
    Yarn - main color: Yellow (main body)
  • 02
    Yarn - accent color A: Orange (beak and feet)
  • 03
    Yarn - accent color B: Pink (flower)
  • 04
    Yarn - accent color C: Lilac (optional flower center or detail)
  • 05
    Note: The pattern lists 'Yarn' without a specific weight; choose a yarn that works well with a 2.5 mm hook for a firm fabric

β€” Tools Required

  • 01
    Crochet hook size 2.5 mm (or a size that fits your yarn)
  • 02
    Scissors
  • 03
    Polyester stuffing
  • 04
    Tapestry/yarn needle for sewing and weaving ends
  • 05
    Stitch marker
  • 06
    Pins for assembly and positioning
  • 07
    Safety eyes (place between rounds 17-18) - use appropriate size for your yarn (example 6-8 mm)
  • 08
    Optional: small embroidery needle for eyebrow details

Progress Tracker

0% Complete

β€” Head & Body :

Round 1-6 :

sc in a mr

Round 2-6 :

sc inc(12)

Round 3 :

(6 times)1 sc into sc next inc(18)

Round 4 :

(6 times)2 sc into sc next inc(24)

Round 5 :

(6 times)3 sc into sc next inc(30)

Round 6 :

(6 times)4 sc into sc next inc(36)

Round 7 :

(6 times)5 sc into sc next inc(42)

Round 8 :

(6 times)6 sc into sc next inc(48)

Round 9 :

(6 times)7 sc into sc next inc(54)

Round 10-19 :

(10 ring)sc into sc(54)

Info :

Place the safe eyes between rnd 17-18. There should be 8 sc in between.

Round 20 :

18 sc into sc(18 sc inc)18 sc into sc(72)

Round 21-26 :

(6 ring)sc into sc(72)

Round 27 :

18 sc into sc(18 sc dec)18 sc into sc(54)

Round 28 :

(6 times)7 sc into sc next dec(48)

Round 29 :

(6 times)6 sc into sc next dec(42)

Round 30 :

(6 times)5 sc into sc next dec(36)

Round 31 :

(6 times)4 sc into sc next dec(30)

Info :

Stuff the head tightly. keep filling as you go.

Round 32 :

(6 times)3 sc into sc next dec(24)

Round 33 :

(6 times)2 sc into sc next dec(18)

Round 34-35 :

(2 ring)sc into sc(18)

Round 35 :

(6 times)2 sc into sc next inc(24)

Round 36 :

(6 times)3 sc into sc next inc(30)

Round 37 :

(6 times)4 sc into sc next inc(36)

Round 38 :

(6 times)5 sc into sc next inc(42)

Round 39 :

(6 times)6 sc into sc next inc(48)

Round 40-51 :

(12 ring)sc into sc(48)

Round 52 :

(6 times)6 sc into sc next dec(42)

Round 53 :

(6 times)5 sc into sc next dec(36)

Round 54 :

(6 times)4 sc into sc next dec(30)

Round 55 :

(6 times)3 sc into sc next dec(24)

Info :

Stuff the body tightly. keep filling as you go.

Round 56 :

(6 times)2 sc into sc next dec(18)

Round 57 :

(6 times)1 sc into sc next dec(12)

Round 58 :

6 sc dec fo.clean the end of the thread.

β€” Beak :

Info :

A COLOR

Round 1 :

6 sc in a mr

Round 2 :

sc into sc(6)

Round 3 :

2 sc inc(8)

Round 4-5 :

(2 ring)sc into sc(8)fo.Leave a long thread end to sew.

β€” Wings :

Info :

MAIN COLOR - MAKE 2

Round 1-6 :

sc in a mr

Round 2 :

2 sc inc(8)

Round 3 :

sc into sc(8)

Round 4 :

2 sc inc(10)

Round 5 :

sc into sc(10)

Round 6 :

2 sc inc(12)

Round 7 :

2 sc inc(14)

Round 8 :

2 sc inc(16)

Round 9 :

2 sc inc(18)

Round 10 :

2 sc inc(20)

Round 11-13 :

(3 ring)sc into sc(20)

Round 14 :

2 sc dec(18)

Round 15 :

2 sc dec(16)

Round 16 :

2 sc dec(14)

Round 17 :

Straighten it. sink the needle into both layers. 7 sc fo.

Info :

Leave a long thread end to sew.

β€” Feet - Nails :

Info :

MAKE 2 A COLOR

Info :

NAILS - MAKE 3

Round 1 :

6 sc in a mr

Round 2 :

4-(3 ring)sc into sc(6)

Round 5 :

Birleştirn sc into sc(18)

Round 6-8 :

(3 ring)sc into sc(18)

Round 9 :

Straighten it. sink the needle into both layers. 8 sc fo.

Info :

Leave a long thread end to sew.

β€” Flower :

Info :

B COLOR

Round 1 :

17 ch.turn

Round 2 :

(8 times)1 ch into sc 1 ch into 4 cr fo.Leave a long thread end to sew.

Assembly Instructions

  • Place and secure safety eyes between rounds 17-18 on the head, making sure there are 8 single crochet stitches between them before tightening and securing.
  • Sew the beak to the face using the long tail left when finishing the beak; position it centered below the eyes and stitch firmly through head stitches.
  • Attach wings to the sides of the body; pin them first to check symmetry then sew through the inner edge so they sit flat and even.
  • Sew the feet to the bottom of the body using the long thread ends; position two feet spaced evenly for stability and make sure nails are oriented forward.
  • Stitch the flower on top of the head using the long thread end left when making the flower; tack it down securely and hide the tail inside the head.

Important Notes

  • πŸ’‘Place safety eyes between rounds 17-18 and ensure 8 single crochet stitches separate them for correct facial proportion.
  • πŸ’‘Stuff the head and body gradually and keep filling as you go to achieve a smooth, even shape without lumps.
  • πŸ’‘Leave a long thread end when you fasten off small parts such as the beak, wings, feet and flower so sewing is easier.
  • πŸ’‘Use a 2.5 mm hook or the size that matches your yarn to create a firm fabric suitable for amigurumi shaping.

This little chick makes a delightful handmade gift or a charming addition to your craft collection. πŸ₯ The pattern is compact, cheerful, and easy to customize with different colors or accessories. 🧢 Have fun stitching, personalizing, and sharing these sunny little friends! 🌸

You ask,

we answer.

FAQs

What size will the finished piece be?

The finished amigurumi measures around 20 cm in circumference and about 10 cm in length with the recommended hook and yarn tension.

Can I use different yarn weights for this pattern?

Yes, you can use different yarn weights, but this will change the final size; adjust the hook to match your yarn for a firm fabric.

Do I need prior crochet experience for this pattern?

This pattern is beginner friendly and uses basic stitches like single crochet, increases and decreases; some experience with working in the round is helpful.

How long does this project typically take to complete?

Most crocheters finish this project in 5-7 hours depending on experience and how much time is spent on assembly and finishing details.