🧢 Beautiful ✨ Detailed πŸ’ Adorable

Cute Chick Amigurumi Pattern

Cute Chick Amigurumi Pattern
4.0β˜… Rating
5-7 Hours Time Needed
2.6K Made This
βœ‚οΈ

Intermediate Level

Ideal for those with basic crochet experience, featuring slightly more advanced stitches and techniques to expand your skills.

⏱️

Weekend Treat

Takes 5-7 hours, making it an enjoyable project to finish over a couple of days.

🧸

Cute Companion

An adorable friend to cherish, handcrafted with love to bring comfort and joy for years to come.

About This Cute Chick Amigurumi Pattern

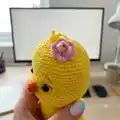
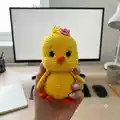
This pattern creates a small, charming chick amigurumi with separate pieces for head, body, wings, beak, feet and a flower accent. It uses single crochet shaping with increases and decreases to get round, neat shaping. You will assemble the pieces and add safety eyes and embroidered brows for a delightful finished character.

Cute Chick Amigurumi Pattern crochet pattern - detailed view of completed project

Perfect for gifting or decorating nurseries, the chick is compact and quick to make. The pattern includes explicit round-by-round instructions and sewing notes for accurate placement.

Why You'll Love This Cute Chick Amigurumi Pattern

I absolutely love this pattern because it balances simplicity with personality β€” just a few tidy shaping rounds create such a sweet face and body. I enjoy how easy it is to customize the colors and tiny details like the flower and eyebrows to make each chick unique. The construction is satisfying: you can see the shape come to life round by round as you stuff and shape. Everything is designed to be approachable yet rewarding, so I always recommend it for people who want a fun, weekend crochet project.

Cute Chick Amigurumi Pattern step 1 - construction progress Cute Chick Amigurumi Pattern step 2 - assembly progress Cute Chick Amigurumi Pattern step 3 - details and accessories Cute Chick Amigurumi Pattern step 4 - final assembly and finishing

Switch Things Up

I love customizing this chick pattern with different color palettes; try pastel shades for a nursery-ready version or bright contrasting colors for a playful look.

To make the chick larger or smaller, change your yarn weight and hook size: bulky yarn with a bigger hook makes a cuddly chunky chick, while finer yarn and a smaller hook create a tiny keychain-sized friend.

I often add small embroideries like eyelashes or freckles to change the personality of the face; using embroidery thread gives delicate, visible details.

If you want posable wings, consider adding thin wire inside the wing before closing; this gives you the option to shape the wings after sewing them on.

Swap the flower for a tiny bow or a crocheted hat to suit the recipient; these little accessories make great personalization options.

Use safety eyes of different sizes to alter the expression β€” larger eyes give a more whimsical, cartoon look while smaller eyes read as more realistic.

Try stuffing firmer for a more structured toy or a bit softer for a cuddly feel; stuffing technique changes the final silhouette noticeably.

For a seasonal theme, change the beak and feet colors (for example, white and green for a spring-themed chick) and add small props like a tiny egg or carrot.

I like to make a set of chicks in graduated sizes using the same pattern by switching yarn weights so they stack nicely as a decorative family.

Finally, experiment with surface crochet or subtle color changes on the body to create feather-like texture and make each chick uniquely yours.

Common Mistakes & How to Fix Them

βœ— Skipping placement notes for the safety eyes causes uneven spacing; place the safety eyes between rounds 17-18 with 8 single crochets between them as directed. βœ— Understuffing the head and body will produce a floppy shape; stuff the head and body tightly and keep filling as you go to maintain the correct silhouette. βœ— Ignoring stitch counts after increase or decrease rounds leads to mistakes later; count your stitches after each shaping round to ensure you match the written counts. βœ— Not leaving long thread ends for sewing makes assembly harder; always leave a long thread end on wings, beak and nails so you can sew them securely without extra ends.

Cute Chick Amigurumi Pattern

Make an adorable handmade chick amigurumi you will love to display or gift. This pattern guides you step-by-step through crocheting the head, body, wings, beak, feet and a sweet little flower detail. With clear rounds and helpful assembly notes, you can create a cheerful yellow chick full of personality.

Intermediate 5-7 Hours

Materials Needed for Cute Chick Amigurumi Pattern

β€” Main Fabric

  • 01
    Yarn - Main Color: Yellow (used for body and head)
  • 02
    Yarn - Color B: Orange (used for beak, feet and nails) - small amount
  • 03
    Yarn - Color C: Pink (used for flower) - small amount
  • 04
    Yarn - Lilac (optional small accent color)
  • 05
    Note: Specific yarn weight is not listed on the pattern; choose a yarn that works well with a 2.5 mm hook for a firm amigurumi fabric

β€” Tools Required

  • 01
    Crochet hook size 2.5 mm (or a size that fits your yarn)
  • 02
    Scissors
  • 03
    Polyester stuffing
  • 04
    Tapestry needle for sewing and weaving ends
  • 05
    Stitch marker
  • 06
    Pins for assembly and positioning
  • 07
    Safety eyes (place between rounds 17-18) - 2 pieces
  • 08
    Sewing needle (for embroidered details like brows)

Progress Tracker

0% Complete

β€” Head & Body :

Round 1-6 :

sc in a mr

Round 2 :

2-6 sc inc(12)

Round 3 :

-(6 times)1 sc into sc next inc(18)

Round 4 :

-(6 times)2 sc into sc next inc(24)

Round 5 :

-(6 times)3 sc into sc next inc(30)

Round 6 :

-(6 times)4 sc into sc next inc(36)

Round 7 :

-(6 times)5 sc into sc next inc(42)

Round 8 :

-(6 times)6 sc into sc next inc(48)

Round 9 :

-(6 times)7 sc into sc next inc(54)

Round 10-19 :

(10 ring)sc into sc(54) Place the safe eyes between rnd 17-18. There should be 8 sc in between.

Round 20 :

-18 sc into sc(18 sc inc)18 sc into sc(72)

Round 21-26 :

-(6 ring)sc into sc(72)

Round 27 :

-18 sc into sc(18 sc dec)18 sc into sc(54)

Round 28 :

-(6 times)7 sc into sc next dec(48)

Round 29 :

-(6 times)6 sc into sc next dec(42)

Round 30 :

-(6 times)5 sc into sc next dec(36)

Round 31 :

-(6 times)4 sc into sc next dec(30)

Info :

Stuff the head tightly. keep filling as you go.

Round 32 :

-(6 times)3 sc into sc next dec(24)

Round 33 :

-(6 times)2 sc into sc next dec(18)

Round 34-35 :

(2 ring)sc into sc(18)

Round 35 :

-(6 times)2 sc into sc next inc(24)

Round 36 :

-(6 times)3 sc into sc next inc(30)

Round 37 :

-(6 times)4 sc into sc next inc(36)

Round 38 :

-(6 times)5 sc into sc next inc(42)

Round 39 :

-(6 times)6 sc into sc next inc(48)

Round 40-51 :

-(12 ring)sc into sc(48)

Round 52 :

-(6 times)6 sc into sc next dec(42)

Round 53 :

-(6 times)5 sc into sc next dec(36)

Round 54 :

-(6 times)4 sc into sc next dec(30)

Round 55 :

-(6 times)3 sc into sc next dec(24)

Info :

Stuff the body tightly. keep filling as you go.

Round 56 :

-(6 times)2 sc into sc next dec(18)

Round 57 :

-(6 times)1 sc into sc next dec(12)

Round 58 :

-6 sc dec fo.clean the end of the thread.

β€” Beak :

Info :

A COLOR

Round 1-6 :

sc in a mr

Round 2 :

sc into sc(6)

Round 3 :

2 sc inc(8)

Round 4-5 :

(2 ring)sc into sc(8)fo.Leave a long thread end to sew.

β€” Wings :

Info :

MAIN COLOR - MAKE 2

Round 1-6 :

sc in a mr

Round 2 :

2 sc inc(8)

Round 3 :

sc into sc(8)

Round 4 :

2 sc inc(10)

Round 5 :

sc into sc(10)

Round 6 :

2 sc inc(12)

Round 7 :

2 sc inc(14)

Round 8 :

2 sc inc(16)

Round 9 :

2 sc inc(18)

Round 10 :

2 sc inc(20)

Round 11-13 :

(3 ring)sc into sc(20)

Round 14 :

2 sc dec(18)

Round 15 :

2 sc dec(16)

Round 16 :

2 sc dec(14)

Round 17 :

Straighten it. sink the needle into both layers. 7 sc fo.

Info :

Leave a long thread end to sew.

β€” Feet - Nails :

Info :

MAKE 2 A COLOR

Info :

NAILS - MAKE 3

Round 1-6 :

sc in a mr

Round 2 :

4-(3 ring)sc into sc(6)

Round 5 :

Birleştirin sc into sc(18)

Round 6-8 :

(3 ring)sc into sc(18)

Round 9 :

Straighten it. sink the needle into both layers. 8 sc fo.

Info :

Leave a long thread end to sew.

β€” Flower :

Info :

B COLOR

Round 1 :

17 ch.turn

Round 2 :

-(8 times)1 ch into sc 1 ch into 4 cr fo.Leave a long thread end to sew.

Assembly Instructions

  • Place the safety eyes between rounds 17-18 of the head with 8 single crochets between them before continuing to shape the head.
  • Stuff the head tightly as you go and close according to the rounds; keep filling continuously to achieve a smooth shape.
  • Sew the beak centered on the face using the long tail left from fastening off, secure with whipstitch and hide the end.
  • Attach wings to the sides of the body, pinning them first to check symmetry and sewing through both layers where instructed.
  • Sew feet and nails together and attach them to the bottom of the body, using pins to position evenly before stitching securely.

Important Notes

  • πŸ’‘Use a stitch marker to mark the start of each round to avoid losing your place during increases and decreases.
  • πŸ’‘Keep tension consistent and stuff firmly but not overstuffed to preserve the round shape and prevent stitching gaps.
  • πŸ’‘Leave long thread ends at the end of pieces (wings, beak, nails, flower) to make sewing on parts easier and more secure.
  • πŸ’‘Place safety eyes before final shaping and stuffing to ensure correct placement and stable attachment.

This sweet chick pattern brings a little handmade sunshine to your day with cheerful colors and a tiny floral touch. Create one for a friend, nursery decor, or a pocket-sized companion to brighten any shelf. The design is compact, lovable, and easy to personalize β€” happy crocheting! 🧢🌸

You ask,

we answer.

FAQs

What size will the finished piece be?

The finished amigurumi measures approximately 20 cm in circumference and about 10 cm in height when using the recommended hook size and yarn tension.

Can I use different yarn weights for this pattern?

Yes, you can change yarn weight but your final size will vary; choose an appropriate hook size for the yarn and expect a larger or smaller chick accordingly.

Do I need prior crochet experience for this pattern?

This pattern is rated intermediate; you should be comfortable with single crochet, increases, decreases and working in the round for best results.

How long does this project typically take to complete?

Most crafters finish this project in about 5-7 hours, though time may vary by experience, speed, and how much time is spent on assembly and finishing.

Where should I place the safety eyes?

Place the safety eyes between rounds 17-18 of the head with 8 single crochets between them as specified in the pattern for the correct facial proportion.