๐Ÿงถ Beautiful โœจ Detailed ๐Ÿ’ Adorable

Cute Cat Amigurumi Pattern

Cute Cat Amigurumi Pattern
4.0โ˜… Rating
5-7 Hours Time Needed
1.7K Made This
โœ‚๏ธ

Beginner Friendly Level

Perfect for those just starting their crochet journey, with clear instructions and simple techniques

โฑ๏ธ

Weekend Treat

Takes 5-7 hours, making it an enjoyable project to finish over a couple of days.

๐Ÿงธ

Cute Companion

An adorable friend to cherish, handcrafted with love to bring comfort and joy for years to come.

About This Cute Cat Amigurumi Pattern

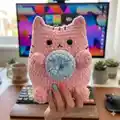
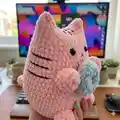
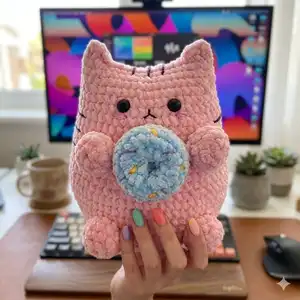
This pattern creates an adorable plush cat amigurumi with a tiny donut accessory and embroidered details. You will crochet a rounded body, pointed ears, short arms and legs, a tail, and a decorative donut. The design uses plush yarn for a soft, cuddly finish and simple shaping for an approachable make.

Cute Cat Amigurumi Pattern crochet pattern - detailed view of completed project

Clear round-by-round instructions are provided for every piece, plus placement and finishing tips for eyes and embroidery. Small details like embroidered cheeks and stripes bring the cat to life.

Why You'll Love This Cute Cat Amigurumi Pattern

I absolutely love this pattern because it turns simple stitches into a lovable little character that kids and adults adore. I enjoy how quickly the body grows with basic increases and rounds, so you get satisfying progress fast. The soft plush yarn makes the finished toy irresistibly cuddly and cozy. Adding tiny embroidered details and a donut accessory lets me personalize each cat and give it a unique personality.

Cute Cat Amigurumi Pattern step 1 - construction progress Cute Cat Amigurumi Pattern step 2 - assembly progress Cute Cat Amigurumi Pattern step 3 - details and accessories Cute Cat Amigurumi Pattern step 4 - final assembly and finishing

Switch Things Up

I love experimenting with color โ€” try pastel pink for a soft look or bright colors for a playful character.

I often change the donut color or add multicolored sprinkles using embroidery thread to make each toy unique.

I sometimes make the cat larger by using a thicker plush yarn and a bigger hook for a chunkier, cuddlier friend.

If you want a tiny keychain version, use thin yarn and a small hook to scale down the pattern while keeping the same stitch sequences.

I add felt accents or tiny crocheted bows to give each cat a different personality and seasonal theme.

I experiment with different eye sizes; smaller safety eyes create a cuter, more delicate face while larger eyes give a cartoon look.

Try adding wire inside the tail or arms for slight posability โ€” I use it sparingly so the toy stays safe for children.

I switch embroidery thread thickness for different facial expressions; a thinner thread makes fine lines, while thicker yarn gives bold features.

I sometimes embroider eyelashes or freckles to make the face more expressive and shareable as a gift.

I recommend trying different yarn textures for the donut (fuzzy vs smooth) to see how it contrasts with the plush body and adds tactile interest.

Common Mistakes & How to Fix Them

โœ— Skipping stitch count checks leads to uneven shaping and irregular sizing; count your stitches after each round to ensure accuracy and fix mistakes early. โœ— Forgetting to leave long yarn tails for sewing makes assembly difficult and fiddly; always leave extra length at the end of parts to make sewing on arms, legs, and tail easy. โœ— Not stuffing as you go can create lumps or an inverted shape in the body; stuff gradually in small amounts while shaping to maintain a smooth finish. โœ— Placing safety eyes too late or too close can distort facial placement; mark eye positions between rounds 5 and 6 and keep 5 stitches between eyes for an even look.

Cute Cat Amigurumi Pattern

Make a sweet, squishy Cute Cat amigurumi you will love to cuddle or gift. This pattern guides you through crocheting the body, ears, arms, legs, tail and a tiny donut accessory step by step. With simple rounds and friendly shaping, you will create a charming toy with embroidered details and personality. Perfect for making colorful variations and quick handmade presents.

Beginner Friendly 5-7 Hours

Materials Needed for Cute Cat Amigurumi Pattern

โ€” Main Fabric

  • 01
    Himalaya Dolphin Baby plush yarn - main color for cat, approximately 1-1.5 skeins
  • 02
    Himalaya Dolphin Baby plush yarn - two small contrasting colors for donut (small amounts of each)
  • 03
    YarnArt Jeans (or similar) - small amounts for embroidered lines on the donut
  • 04
    Black YarnArt Jeans (or similar) - small amount for embroidered stripes on cat body/head
  • 05
    Embroidery thread - for nose and mouth details
  • 06
    Polyester stuffing - enough to fill body, arms, legs, tail

โ€” Tools Required

  • 01
    Crochet hook size 4 mm
  • 02
    Safety eyes 10 mm (2 pieces)
  • 03
    Glue for eyes (glue gun recommended) or secure eye backs
  • 04
    Scissors
  • 05
    Yarn needle for sewing and embroidery
  • 06
    Stitch markers
  • 07
    Polyester stuffing
  • 08
    Pins for assembly (optional)

Progress Tracker

0% Complete

โ€” Body :

R1 :

make ch2, in the second ch from the hook: 6 sc (6)

R2 :

6inc (12)

R3 :

(1sc, inc )*6 (18)

R4 :

(2sc, inc)*6 (24)

R5 :

(3 sc, inc)*6 (30)

R6 :

(4sc, inc)*6 (36)

R7 :

(5sc, inc)*6 (42)

R8 :

(6sc, inc)*6 (48)

R9 :

(3sc, inc)*12 (60)

R10 :

(4sc, inc)*12 (72)

R11-16 :

(6 rounds) without changes (72)

R17 :

(4sc, dec)*12(60)

R18-21 :

(4 rounds): without changes (60)

R22 :

(8sc, dec)*6 (54)

R23-24 :

(2 rounds): without changes (54)

R25 :

(7sc, dec)*6 (48)

R26-27 :

(2 rounds): without changes (48)

R28 :

(6sc, dec)*6 (42)

R29-33 :

(5 rounds): without changes (42)

โ€” Crochet ears :

Infos :

Fold the bode in half and work, joining 2 sides.

R34 :

3 dc, 14 sl st, 3 dc

Info :

Cut off the yarn and hide the end.

โ€” Arms and legs :

Info :

Arms and legs are crocheted in the same way (make 4)

R1 :

Make ch2, in the second ch from the hook: 6sc (6)

R2 :

6inc (12)

R34 :

(2 rounds): without changes (12)

Info :

Leave a long end for sewing

โ€” Glue eyes :

Info :

Count 5 round from the top. Glue eyes between rounds 5 and 6 The distance between eyes is 5 stitches.

โ€” Embroidery :

Info :

Embroidery a mouth (as it is shown on the pictures)

Info :

Embroidery cheeks: Make several stitches (you may use embroidery thread/ cotton thread or plush yarn, as you like more).

Info :

Embroider lines of 2 cm on the head.

Info :

Embroider lines on the body: count 2 rounds down from the eyes, the width of the lines is 5-6 stitches.

โ€” Tail :

R1 :

Make ch2, in the second ch from the hook: 6sc (6)

R2 :

6inc (12)

R3-4 :

(2 rounds): without changes (12)

R5 :

(1sc, dec)*4 (8)

R6-13 :

(8 rounds): without changes (8)

Info :

Leave a long end for sewing

Info :

Sew the tail at level of rounds 10-11

โ€” Donut :

R1 :

Make ch12, close in a ring, 12sc in a ring

R2 :

(1sc, inc)*6 (18)

R3 :

18sc

R4 :

BLO: 18sc

R5 :

1sc, dec (12)

R6 :

without changes (12)

Infos :

Leave the end for sewing. Sew the first and the last rounds. Stuff as you go.

Info :

Embroider colored spots.

Info :

Sew the donut to the arms joining to the side stitches of the arms.

โ€” Assembly :

Info :

Sew arms: Count from the ears 8 rounds and sew arms. Lightly stuff the arms. The distance between arms is 8 stitches.

Info :

Sew legs at level of rounds 11-12 of the body. The distance between legs is 8 stitches. Lightly stuff the legs.

Info :

Sew the donut to the arms joining to the side stitches of the arms.

Info :

Embroider small mouth and nose using embroidery thread as shown in the photos.

Info :

Your cat is ready!

Assembly Instructions

  • Attach safety eyes between rounds 5 and 6, keeping a distance of 5 stitches between the eyes and securing them with glue or safety backs.
  • Sew arms in place counting 8 rounds down from the ears; lightly stuff the arms and space them 8 stitches apart.
  • Sew legs at the level of rounds 11-12 of the body, spacing the legs 8 stitches apart and lightly stuffing before finishing.
  • Sew the tail at the level of rounds 10-11 and weave the yarn end neatly on the inside to secure.
  • Sew the donut onto the arms by joining the donut to the side stitches of each arm so it sits centered between the paws.

Important Notes

  • ๐Ÿ’กUse a stitch marker to mark the beginning of each round and keep track of increases and decreases for accurate shaping.
  • ๐Ÿ’กStuff gradually and evenly while you work to avoid lumps and to maintain the round shape of the body and limbs.
  • ๐Ÿ’กLeave long tails for sewing on all appendages and hide ends neatly inside the toy after completing assembly.
  • ๐Ÿ’กWhen adding safety eyes, consider using glue or secure backs and double-check placement before fixing them permanently.

This Cute Cat amigurumi pattern helps you make a soft, squishy friend that is perfect for gifting or snuggling. ๐Ÿงถ Follow the easy rounds and simple assembly to create a charming cat with embroidered details and a tiny donut accessory. ๐Ÿงต Make it in different colors for a whole family of cuddly kitties to love! ๐Ÿ’•

You ask,

we answer.

FAQs

What size will the finished piece be?

The finished amigurumi measures approximately 21-23 cm tall when using the recommended plush yarn and a 4 mm hook.

Can I use different yarn weights for this pattern?

Yes, you can change yarn weight and hook size, but the final size and fluffiness will vary; adjust hook size to fit your yarn and expect different stitch counts visually.

Do I need prior crochet experience for this pattern?

This pattern is beginner friendly and uses basic stitches like sc, inc, and dec, but you should be comfortable working in the round and sewing pieces together.

How long does this project typically take to complete?

Most crocheters complete this project in 5-7 hours, depending on experience and how many accessories (like the donut) you add.