🧢 Beautiful ✨ Detailed πŸ’ Adorable

Crocheted Bumblebee Amigurumi Pattern

Crocheted Bumblebee Amigurumi Pattern
4.4β˜… Rating
2-4 Hours Time Needed
2.4K Made This
βœ‚οΈ

Intermediate Level

Ideal for those with basic crochet experience, featuring slightly more advanced stitches and techniques to expand your skills.

⏱️

Bite-Sized Project

Finishes in 2-4 hoursβ€”perfect for an afternoon of creative relaxation.

🎁

Tiny Treasure

Small, sweet, and gift-worthy creations that fit perfectly in the palm of your hand with detailed charm.

About This Crocheted Bumblebee Amigurumi Pattern

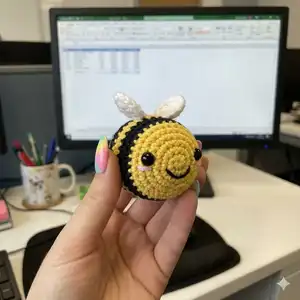
This pattern creates small crocheted bumblebee keychains using Natura Just Cotton yarn and simple amigurumi techniques. You will work in the round with colour changes to form the bee stripes and small wings. The finished piece is compact, cute, and perfect for gifts or decorations.

Crocheted Bumblebee Amigurumi Pattern crochet pattern - detailed view of completed project

The instructions include clear rounds for the body, separate wing pieces, and full assembly notes. No advanced shaping is required, but some experience with increases, decreases and colour changes is helpful.

Why You'll Love This Crocheted Bumblebee Amigurumi Pattern

I absolutely love this pattern because it turns simple stitches into an irresistibly cheerful little bee. I enjoy the quick satisfaction of finishing a tiny amigurumi that still has charming details like stripes and embroidered features. The design is versatile so I often make several at once in different colorways for gifts. It is rewarding to see how a few rounds of crochet become a delightful handmade keepsake.

Crocheted Bumblebee Amigurumi Pattern step 1 - construction progress Crocheted Bumblebee Amigurumi Pattern step 2 - assembly progress Crocheted Bumblebee Amigurumi Pattern step 3 - details and accessories Crocheted Bumblebee Amigurumi Pattern step 4 - final assembly and finishing

Switch Things Up

I love making variations of this bee by switching colours; try pastel tones for a soft, nursery-friendly version or bright neons for playful pop.

To make the bee larger or smaller, change your yarn weight and corresponding hook size; bulky yarn creates a chunky bee and fingering weight makes a tiny charm.

I often swap the white wings for glitter or metallic thread for a sparkly effect that catches the light on a bag or keyring.

Try adding a tiny crocheted hat, scarf, or bow to personalize each bee for a themed gift or seasonal decoration.

For more durable keychains, insert a small plastic disc inside the body before final stuffing to protect the stuffing when attaching hardware.

I sometimes embroider different expressions with the mouth placement to give each bee a unique personality.

Use felt instead of crocheted wings for a simpler, faster option and glue them securely in place.

If you want posable wings, stitch a thin wire into the wing seam and bend to shape for a whimsical look.

I recommend trying combinations of yarn textures, such as cotton body with a fluffy eyelash yarn accent, to experiment with tactile contrast.

For gifting, attach a tiny tag or loop a ribbon through the hanging chain and include a handwritten note to make each bee feel special.

Common Mistakes & How to Fix Them

βœ— Skipping the correct placement of safety eyes will throw off facial symmetry; measure between rounds 5 and 6 with 8 stitches between the eyes before securing them. βœ— Not stuffing as you go results in lumps or flattened shapes; stuff gradually and evenly to maintain a smooth round body while you crochet. βœ— Forgetting to change colours cleanly can create loose tails and messy joins; carry yarn neatly or weave in ends as you change colours each stripe for a tidy finish. βœ— Pulling yarn too tight during increases and decreases makes the bee misshapen; use consistent, moderate tension and adjust as needed to keep the shape round. βœ— Cutting tails too short when fastening off makes final sewing difficult; leave long tails for sewing the last stitches together and for attaching the hanging loop.

Crocheted Bumblebee Amigurumi Pattern

Create adorable crocheted bumblebee keychains with this friendly, small amigurumi pattern. You will enjoy color changes and simple shaping to make a sunny little bee perfect for gifts. The pattern is detailed and includes assembly notes so you can finish professional-looking keychains. Suitable for makers who enjoy quick, rewarding projects.

Intermediate 2-4 Hours

Materials Needed for Crocheted Bumblebee Amigurumi Pattern

β€” Main Fabric

  • 01
    Crochet yarn Natura Just Cotton - Colour A: Tournesol (yellow)
  • 02
    Crochet yarn Natura Just Cotton - Colour B: Noir (black)
  • 03
    Crochet yarn Natura Just Cotton - Colour C: Ibiza (white)
  • 04
    Crochet yarn Natura Just Cotton - Colour D: Rose Layette (pink) for cheeks/embroidery
  • 05
    Stuffing material (polyester filling or similar)
  • 06
    Optional small parcel of dried lavender for scent (optional)

β€” Tools Required

  • 01
    Crochet hook size 2.5mm
  • 02
    Yarn needle
  • 03
    Scissors
  • 04
    6 mm black safety eyes (2 pieces)
  • 05
    Pins for assembly (optional)

Progress Tracker

0% Complete

β€” Materials :

Info :

- Hook 2.5. - Yarn needle. - Scissors. - Crochet yarn Natura Just Cotton Colour A: Tournesol Colour B: Noir Colour C: Ibiza Colour D: Rose Layette. - Stuffing material. - 6 mm black safety eyes.

β€” Body :

Round 1 :

Using colour A work 6 sc in magic ring (6)

Round 2 :

2 inc (12)

Round 3 :

*1 sc, 1 inc**, repeat from *to ** 6 times (18)

Round 4 :

*2 sc, 1 inc**, repeat from *to ** 6 times (24)

Round 5 :

*3 sc, 1 inc**, repeat from *to ** 6 times (30)

Round 6 :

Sc in each st

Round 7-10 :

Change to colour B and continue in sc

Info :

Stop crocheting and place safety eyes between round 5 and 6, considering 8 stitches between the eyes.

Round 11-13 :

Change to colour A and continue in sc

Round 14-17 :

Change to colour B and continue in sc

Round 18 :

Change to colour A and continue in sc

Round 19 :

*3 sc, 1 dec**, repeat from *to ** 6 times (24)

Round 20 :

*2 sc, 1 dec**, repeat from *to ** 6 times (18)

Info :

Stop crocheting and start stuffing the bee firmly, I filled my bee with a small parcel of dried lavender as well but this is optional.

Round 21 :

*1 sc, 1 dec**, repeat from *to ** 6 times (12)

Round 22 :

6 dec (6)

Info :

Fasten off leaving a long tail for sewing the last stitches together.

β€” Wings (make 2) :

Round 1 :

Using colour C work 6sc in magic ring (6)

Round 2 :

2 inc (12)

Info :

Work a slip stitch and fasten off leaving a long tile for sewing the wings to the bee.

β€” Assembling :

Info :

Sew the wings to top of the body, between the 2 black stripes with 2 rows in between to allow space for the chain.

Info :

Chain 40, leaving a tail long enough to pass through the bee. Finish the chain by joining the first st with a slip stitch. Using the 2 long tails, sew the hanging loop to the body.

Info :

Using 3 strands of thread from colour D sew 2 pink dots 2 rows down from the eyes on each side.

Info :

Using 3 strands of thread from colour B make the mouth by making a V at the front of the face.

Assembly Instructions

  • Sew the wings to the top of the body, positioning them between the two black stripes with two rows in between to leave space for the chain.
  • Chain 40 to make the hanging loop, leave a tail long enough to pass through the bee, join the chain with a slip stitch and use the two long tails to sew the loop securely to the body.
  • Place safety eyes between rounds 5 and 6 with approximately 8 stitches between the eyes before securing them permanently.
  • Using three strands of colour D thread, sew two small pink dots two rows below each eye to create cheeks on both sides.
  • Using three strands of colour B thread, embroider a small V shaped mouth at the front center of the face.

Important Notes

  • πŸ’‘Place safety eyes before closing the body, between rounds 5 and 6, and ensure there are roughly 8 stitches between the eyes for proper spacing.
  • πŸ’‘Stuff the bee firmly and evenly as you approach the closing rounds; overstuffing can distort the shape while understuffing makes it floppy.
  • πŸ’‘Leave long tails when fastening off so you have enough yarn to sew the last stitches together and attach the hanging loop securely.

Make bright little gifts with this Crochet Bumblebee pattern β€” perfect for keychains, party favors, or cheerful decor. 🐝 This tiny treasure is quick to make and full of character with its striped body and embroidered face. ✨ Enjoy the process and share the honeyed smiles with friends and family! 🧢

You ask,

we answer.

FAQs

What size will the finished piece be?

The finished amigurumi keychain measures approximately 4-6 cm in diameter depending on yarn tension and stuffing when using the recommended hook size.

Can I use different yarn weights for this pattern?

Yes, you can use different yarn weights, but this will affect the final size. Use an appropriate hook for your chosen yarn and expect the bee to be larger or smaller accordingly.

Do I need prior crochet experience for this pattern?

This pattern is rated intermediate, so basic knowledge of single crochet, increases, decreases, and working in the round is recommended for best results.

How long does this project typically take to complete?

Most crocheters complete a single bee keychain in 2-4 hours, though time may vary based on experience level and how much time is spent on finishing and assembly.