🧢 Beautiful ✨ Detailed πŸ’ Adorable

Crochet Wine Tote Bag Pattern

Crochet Wine Tote Bag Pattern
4.1β˜… Rating
5-7 Hours Time Needed
4.2K Made This
βœ‚οΈ

Intermediate Level

Ideal for those with basic crochet experience, featuring slightly more advanced stitches and techniques to expand your skills.

⏱️

Weekend Treat

Takes 5-7 hours, making it an enjoyable project to finish over a couple of days.

✨

Stylish Touch

An elegant detail to elevate any look, combining traditional techniques with contemporary design sensibilities.

About This Crochet Wine Tote Bag Pattern

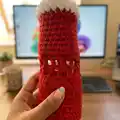
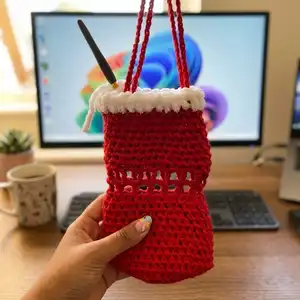
This pattern creates a handmade wine tote sized to fit most standard bottles, featuring a round reinforced base, a tall crochet body and a decorative perforated band. You will work mostly half double crochet (hdc) rounds, add a perforated square section for interest and finish with plush velvet trim and sturdy straps. It uses macrame yarn for structure and velvet yarn for a soft cuff.

Crochet Wine Tote Bag Pattern crochet pattern - detailed view of completed project

Perfect for gifting or holiday presentation, the tote is durable and stylish with clear step-by-step photos included. The pattern includes materials, stitch explanations and complete row-by-row instructions.

Why You'll Love This Crochet Wine Tote Bag Pattern

I absolutely love this pattern because it transforms simple stitches into a functional and elegant gift-ready tote. I enjoy how the perforated band adds a playful peek-through detail that still keeps the bottle secure. The combination of sturdy macrame yarn with a soft velvet cuff gives a professional, finished look I always get compliments on. It is also very customizable β€” I often change the colors or make a set in different palettes for seasonal gifts.

Crochet Wine Tote Bag Pattern step 1 - construction progress Crochet Wine Tote Bag Pattern step 2 - assembly progress Crochet Wine Tote Bag Pattern step 3 - details and accessories Crochet Wine Tote Bag Pattern step 4 - final assembly and finishing

Switch Things Up

I love how easily this wine tote adapts to different yarns and sizes; try a bulkier macrame yarn and a larger hook for a chunkier, faster version.

I sometimes make minis by using thinner cotton and a smaller hook to create tiny bottle sleeves for decorative bottles.

I like to experiment with color blocking: work the base and body in one color and the perforated band in a contrasting shade to highlight the openwork.

You can replace the velvet cuff with faux fur or a ribbed single crochet band for a different texture and look.

I often change strap length to make a short hand-carry tote or a long crossbody-style strap; measure against your shoulder before finishing.

Try embroidering a monogram on the solid area below the perforated band for personalized gifting.

I sometimes add beads or tiny bells threaded into the perforated squares to make a festive version for holiday gifting.

If you want a firmer base, insert a cardboard disk covered in fabric and slip it into the bottom for extra stability when carrying heavier bottles.

I like to make matching sets in alternating colors for a holiday displayβ€”small tweaks keep the pattern fresh and giftable.

Don't be afraid to mix yarn types: using cotton for the body and velvet for the cuff creates a sturdy bag with a luxurious edge.

Common Mistakes & How to Fix Them

βœ— Not counting your stitches after increases leads to uneven shaping; always count at the end of each round to confirm you have the correct total. βœ— Crocheting too tightly when making the base can prevent the circle from lying flat; loosen your tension slightly and block the base if needed to flatten. βœ— Missing or misplacing the turning chains when switching between rounds and straight rows causes uneven edges; always make the specified chain at the beginning of each round and treat it as the first stitch when instructed. βœ— Pulling the velvet yarn too tight for the cuff will hide stitches and make joining difficult; work more loosely with the velvet and use your hand to feel chains as recommended. βœ— Skipping the knotting or securing step for the strap ends can cause the straps to slip; tie and knot the connecting ends tightly and weave in ends securely to stabilize the handles.

Crochet Wine Tote Bag Pattern

Make a charming crochet wine tote that fits a standard bottle and makes a lovely handmade gift. This pattern walks you through the base, body, perforated window detail, straps and a soft velvet trim so you can create a polished finished piece. Clear step-by-step rounds and helpful photos make this project enjoyable whether you gift it or keep it for your own celebrations.

Intermediate 5-7 Hours

Materials Needed for Crochet Wine Tote Bag Pattern

β€” Main Fabric

  • 01
    Macrame yarn, approximately 100 g (main color, example red)
  • 02
    White velvet yarn, approximately 20 g (for cuff/trim)

β€” Tools Required

  • 01
    Crochet hook size 4.5 mm

Progress Tracker

0% Complete

β€” Materials :

Infos :

4.5 mm hook. 100 g macrame yarn (main color). 20 g white velvet yarn (for cuff/trim).

β€” Crochet Terms :

Infos :

Chain (ch) - yarn over, pull yarn through stitch on hook. Slip stitch (Slip St) - insert hook into stitch or space indicated, yarn over, pull yarn through both loops on hook. Single crochet (Sc) - insert hook into stitch or space indicated, yarn over, pull up a loop (2 loops in hook), yarn over, pull yarn through loops on hook. Half double crochet (hdc) - yarn over, insert hook into stitch or space indicated, pull up a loop (3 loops in hook), yarn over, pull yarn through loops on hook. Double crochet (dc) - yarn over, insert hook into stitch or space indicated, pull up a loop (3 loops in hook) * yarn over, pull yarn through 2 loops on hook; repeat from * once more. Treble crochet (tr) - yarn over twice, insert hook into stitch or space indicated, pull up a loop (4 loops in hook) * yarn over, pull yarn through 2 loops on hook; repeat from * 2 times.

β€” Base (Beginning rounds) :

Round 1 :

Make 6 ch and connect to the first ch to form a ring. Make 10 hdc into the ring. Close the row by sinking into the top of the first hdc. With 2 ch go to the top row (we have reached the 2nd row). (10 hdc)

Round 2 :

Make 3 ch to go up to the 3rd row. Make 1 more hdc into the same ch. (In the 2nd row we made 2 hdc into each ch. In the 3rd row we will advance the row by making 1 double 1 single.) 1 hdc on the next ch, 2 hdc on the next ch, continue this pattern around. When we come to the end, connect to the top of the first hdc. (20 hdc)

Round 3 :

Let's move on to row 4 with 2 ch. In this row our work on all chains will be as follows; 1 hdc on 1 ch, 1 hdc on the next 1 ch, 2 hdc on the next 1 ch, (repeat sequence so increases are evenly spaced). So when we complete the row, connect to the first hdc and close row 4. To move to row 5, make 2 ch. We will no longer increase; make 1 hdc on each ch. The trick here is to make the hdc chain only on the edge line. We do this for a complete curl. (picture a-b) When we complete the row, connect to the first hdc and close the 5th row. In rows 4 and 5, it will start to curl inwards and take the bottle form. (30 hdc)

β€” Sides and Body (working up the walls) :

Round 4 :

In all the next 10 rows, when we close the row, we go to the top row with 1 ch and we make 1 hdc on each ch. Continue this same procedure for the next 10 rows to build the straight sides of the tote. (work 1 hdc in each stitch for each round)

β€” Perforated band and textured section :

Round 5 :

In this order, we go to the top row with 4 ch. (The reason why it is 4 is that we have moved to the perforated row.) Skip 1 ch and make 1 dc on the 2nd ch. Make 1 ch, make 2 ch, skip 1 ch and make 1 dc on the next ch. Complete the whole row like this. When closing the row, connect to the 3rd of the first 4 ch groups and close. When the row is completed, go up to the top row with 4 ch. Make 1 dc on top of the dc in the next row. Make 2 ch, make 1 dc on top of the next dc so we will form squares. When closing the row, connect to the 3rd of the first group of 4 ch and close.

Info :

This perforated row and its following connection create the decorative openwork band (squares) around the body of the tote.

β€” Returning to straight rows and finishing the body :

Round 6 :

In this order, we switch from perforated rows to straight rows again. In the bottom row, we made 2 ch between the squares. In this row, we will only work on 2 chs. We will complete the whole row by making 2 hdc in every 2 ch spaces. Do not knit tightly in this row; knit more freely so that it does not tighten. When you reach the end of the row, connect to the first ch. Go to the top row with 1 ch. In this and the next 7 rows, we will make 1 hdc on each ch. (total 8 rows)

Info :

These straight hdc rounds restore the solid body below and above the perforated band and build height for the bottle fit.

β€” Straps / Belt (making the handles) :

Round 7 :

We're moving on to making straps. Make 40 ch. (you can extend the length here as much as you want; you can also do it by measuring). Skip 8 ch and connect on the 9th ch. Here we must make it tight while connecting. We will call it a belt. We will complete the belt by making 1 hdc on each ch on the belt. Connect to the beginning and cut the rope, knot tightly.

Round 7 (continued) :

Count 4 ch from the end of the arch and tie into ch 5. Make 40 ch (this will be the 2nd arch). Skip 8 ch and tie tightly to the 9th ch. Go back and make 1 hdc in all ch. Tie at the beginning and cut the rope, knot tightly.

β€” Velvet Trim and Final Rows :

Round 8 :

In this order we switch to velvet thread. The trick here: after knitting the straps, continue with velvet because you want the straps to stay inside; follow this way for a more beautiful look. Since the velvet rope is fluffy, it may be difficult for you to see the chains; try to understand with your hand. We will continue in this way for a total of 2 rows by making 1 ch on each ch.

Infos :

Work two rows with velvet yarn making 1 hdc (or 1 ch then hdc, as you used previously) in each stitch to create a soft cuff that hides strap connection points and finishes the top attractively.

β€” Assembly & Finishing :

Info :

Weave in all ends securely and knot strap ends tightly inside the cuff. Optionally block the base gently for a flatter bottom. Decorate the perforated band by threading velvet thread if desired or attach a note by tying through a square.

Assembly Instructions

  • Weave and secure all loose ends inside the body, trimming excess yarn and hiding knots under the velvet cuff for a tidy finish.
  • Attach straps by knotting the strap ends tightly at the connection points described in Round 7, then secure with additional stitches through the strap base and body to stabilize under the cuff.
  • Switch to velvet yarn for two final rows, covering the strap attachment area; this both decorates and conceals the knots and raw edges.
  • If you added the perforated square band, you can thread a small note or ribbon through one of the squares and knot it on the inside for presentation.
  • Block the base lightly if needed so the round base sits flat when the bottle is inserted; do not over-wet velvet trim, just shape gently.

Important Notes

  • πŸ’‘Count your stitches at the end of each round to ensure the base increases remain even for a flat circle.
  • πŸ’‘Keep your tension relaxed when switching to velvet yarn so stitches remain visible and the cuff lays smoothly.
  • πŸ’‘Knot and weave in strap ends securely before covering with the cuff to prevent the straps from loosening over time.
  • πŸ’‘Use the specified 4.5 mm hook with macrame yarn for the recommended size and structure; changing hook size will affect final dimensions.

This wine tote pattern is a delightful mix of sturdy macrame structure and a soft velvet finish that feels special during the holidays. It makes a thoughtful handmade gift or a stylish way to present a bottle at parties. Have fun customizing colors and trims to make each tote unique. 🧢🎁

You ask,

we answer.

FAQs

What size will the finished piece be?

The finished wine tote fits a standard 750 ml bottle; dimensions vary slightly based on yarn and tension but are designed to hold a typical wine bottle securely.

Can I use a different yarn weight for this pattern?

Yes, you can use different yarn weights, but changing yarn weight will change the size and structure; adjust hook size accordingly and expect a tighter or looser fit.

Do I need advanced crochet skills to make this tote?

This pattern is rated intermediate and uses half double crochet, double crochet and basic shaping; you should be comfortable with increases and reading round-by-round instructions.

How long does this project typically take to complete?

Most crocheters complete this project in 5-7 hours depending on experience and how much time you spend customizing straps and trim.

How do I secure the straps so they do not slip?

Knot the strap ends tightly when joining, add several reinforcement stitches through the strap base and body, and cover the attachment with the velvet cuff to conceal and secure them.