About This Crochet Emotional Support Pickle Amigurumi Pattern
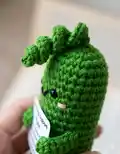
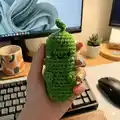
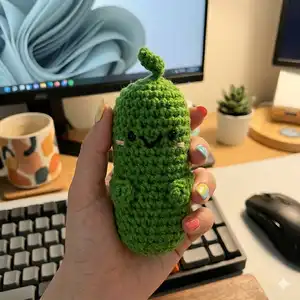
This pattern creates a tiny Emotional Support Pickle amigurumi with a curled stem, embroidered smile, and sewn-on cheeks. It uses continuous rounds and simple shaping to form a plump, palm-sized pickle. You will also print and attach a small sign to give it personality and turn it into a thoughtful gift.
Clear step-by-step photos guide stem making, face sewing, and finishing touches. The pattern is compact and beginner friendly while producing a polished little toy.
Why You'll Love This Crochet Emotional Support Pickle Amigurumi Pattern
I absolutely love this pattern because it brings a playful smile to anyone who holds it and is quick to make from start to finish. I enjoy designing small projects that are satisfying to finish in one sitting, and this pickle fits perfectly in the palm of your hand. The little curled stem and embroidered face add so much personality with very little effort. Making these as gifts means you can add a custom sign and color to make each one unique and meaningful.
Switch Things Up
I love how easy it is to customize this pattern by changing yarn color — try lime, mint, or even striped green for a playful twist.
I often swap the 5 ply cotton for a slightly thicker yarn and a larger hook to create a cuddly, chunkier version for a bigger gift.
You can make it dainty by using thinner yarn and a smaller hook to create tiny keychain-sized pickles; add a keyring before finishing.
I sometimes embroider different facial expressions — a sleepy smile, a surprised O, or a mischievous grin — to give each pickle a personality.
For seasonal fun I add tiny crocheted hats or scarves and embroider small motifs on the body to match holidays or themes.
I like to add a small loop of yarn at the top of the stem to hang the pickle as an ornament or bag charm.
If you want posable arms, insert a short length of thin craft wire inside the hands before sewing them on to allow gentle shaping.
I also change the cheek color or make felt cheeks for a softer look — experiment with placement to change the expression.
Try using safety eyes of different sizes for varying personalities, or embroider eyes for a fully handmade finish suitable for all ages.
Finally, mix and match signs and printed messages on the 5" x 7" card to create themed gift sets — they make adorable party favors or little pick-me-ups.
Common Mistakes & How to Fix Them
✗ Skipping the magic ring or not tightening it properly; always pull the magic ring closed and make the first joins snug to avoid a gap at the top of the piece.
✗ Not using a stitch marker when crocheting continuously in the round; place a marker at the start of each round to keep track of your position and avoid accidental increases or decreases.
✗ Overstuffing or understuffing the body which can distort the shape; stuff gradually, check the shape often, and add small amounts until the silhouette is plump but not stretched.
✗ Placing safety eyes too late can make accurate spacing difficult; install safety eyes between rounds 8-9 before you stuff too much to maintain the correct eye placement.
✗ Pulling the slip stitch too tight when closing the stem or top; follow the instructions to pull the two strings on the hook to make the sl st smaller but keep the stem curl natural to avoid a stiff finish.