๐Ÿงถ Beautiful โœจ Detailed ๐Ÿ’ Adorable

Crochet Donut Pillow Pattern

Crochet Donut Pillow Pattern
4.0โ˜… Rating
5-7 Hours Time Needed
2.2K Made This
โœ‚๏ธ

Intermediate Level

Ideal for those with basic crochet experience, featuring slightly more advanced stitches and techniques to expand your skills.

โฑ๏ธ

Weekend Treat

Takes 5-7 hours, making it an enjoyable project to finish over a couple of days.

๐Ÿก

Cozy Accent

A warm touch for your space that transforms ordinary corners into inviting nooks filled with handmade charm.

About This Crochet Donut Pillow Pattern

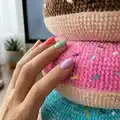
This pattern shows you how to crochet a plush donut pillow with a soft peach base and a colorful frosting section. It includes full round-by-round instructions, notes on color changes, and step-by-step decoration for sprinkles. The finished pillow measures about 12.20 inches (29 centimeters) depending on yarn and tension.

Crochet Donut Pillow Pattern crochet pattern - detailed view of completed project

Designed for intermediate crocheters comfortable with increases and decreases, this pattern uses single crochet rounds and back-loop detail rows. Decorative stitching instructions are included to add sprinkles and finishing touches.

Why You'll Love This Crochet Donut Pillow Pattern

I absolutely love this pattern because it turns simple crochet stitches into a whimsical, functional home accent that brings a smile. I enjoyed designing the round shaping so the pillow feels balanced and plush when finished. The sprinkle decoration is my favorite part โ€” its a quick way to add personality and color with simple needlework. I love that the pattern adapts easily to different yarns and color schemes, letting you personalize each donut effortlessly.

Crochet Donut Pillow Pattern step 1 - construction progress Crochet Donut Pillow Pattern step 2 - assembly progress Crochet Donut Pillow Pattern step 3 - details and accessories Crochet Donut Pillow Pattern step 4 - final assembly and finishing

Switch Things Up

I love how easy it is to customize this pillow by changing the frosting color; try chocolate brown, pastel pink, or mint green for different looks.

I often switch yarn weight and hook size to make a mini version for a keyring or a jumbo version for a cozy floor cushion.

I like adding embroidered sprinkles with thin yarn or embroidery thread for a delicate look, or use thick yarn for chunky sprinkles with more texture.

I sometimes add a contrasting border row around the hole to make the center pop; just pick a standout color and work a few rounds for emphasis.

If you want a firmer pillow, I use extra fiberfill and stuffing in smaller pieces to avoid lumps while keeping a round profile.

You can also sew on felt shapes or small buttons as decorative toppings instead of embroidered sprinkles for child-friendly embellishments.

I recommend experimenting with fuzzy or boucle yarns for a unique texture โ€” just keep consistent tension to maintain stitch counts.

To make a set, vary the sprinkle colors across donuts so they look like a coordinated collection on a sofa or shelf.

I sometimes add a hidden zipper along one seam before sewing the hole completely closed so the pillow can be unstuffed and washed more easily.

Finally, I like to gift these with a small matching crochet pouch of sprinkles or a tag โ€” a little personalization makes each donut extra special.

Common Mistakes & How to Fix Them

โœ— Skipping stitch counts during increase rounds leads to uneven shaping; count your stitches at the end of each round to confirm the totals and correct mistakes immediately. โœ— Changing color without securing tails can cause loose ends showing through; leave a small tail and weave it in or knot and hide tails as you go to keep the surface neat. โœ— Overstuffing the pillow can distort the donut shape and make sewing up the hole difficult; stuff gradually, checking the shape and firmness, and add fiberfill in small amounts until you reach the desired fullness. โœ— Not using back loop only when instructed will change texture and fit of the frosting row; switch to working in the back loops only for the specified round to achieve the correct edge and fit. โœ— Sewing the final hole closed without folding and aligning edges will make a bulky closure; fold the donut as shown, pass the yarn through the last loops, sew a little, stuff, then sew again for a smooth finish.

Crochet Donut Pillow Pattern

Make a soft, squishy donut-shaped pillow with this easy-to-follow crochet pattern. Youll create a plush round pillow with a neat center hole and colorful sprinkles for a fun decorative touch. The pattern uses chenille-style polyester yarn and simple single crochet rounds to shape the donut. Perfect for gifting or brightening your couch, this pattern guides you from start to finish.

Intermediate 5-7 Hours

Materials Needed for Crochet Donut Pillow Pattern

โ€” Main Fabric

  • 01
    Himalaya Dolphin Baby peach color - code 80333 - 100% polyester - approximately 2 skeins (use more if you crochet tightly)
  • 02
    Himalaya Dolphin Baby pink color - code 80303 - 100% polyester - approximately 2 skeins (used for frosting/contrast)
  • 03
    Assorted small amounts of polyester, cotton, or acrylic yarns for sprinkle decoration (several colors, small scraps)
  • 04
    Polyester fiberfill - about 150 grams (one set of fiberfill is enough for one donut pillow)

โ€” Tools Required

  • 01
    Crochet hook size 3.5 mm
  • 02
    Long sewing needle for assembly and decoration
  • 03
    Scissors
  • 04
    Yarn needle for weaving in ends and sewing up hole
  • 05
    Stitch markers (optional but helpful)
  • 06
    Polyester stuffing (fiberfill) - 150 grams
  • 07
    Small needles for sprinkle embroidery or yarn ends

Progress Tracker

0% Complete

โ€” Donut Pillow :

Round 1 :

Start crochet the bottom of donut pillow with peach color 36 CH then connect in a ring (36)

Round 2 :

36 SC (36)

Round 3 :

(2 SC,1 INC) *12 (48)

Round 4 :

48 SC (48)

Round 5 :

(3 SC,1 INC) *12 (60)

Round 6 :

(4 SC,1 INC) *12 (72)

Round 7 :

72 SC (72)

Round 8 :

(5 SC,1 INC) *12 (84)

Round 9 :

(6 SC,1 INC) *12 (96)

Round 10 :

96 SC (96)

Round 11 :

(7 SC,1 INC) *12 (108)

Round 12 :

108 SC (108)

Round 13 :

(8 SC,1 INC) *12 (120)

Round 14 :

120 SC (120)

Round 15 :

(9 SC,1 INC) *12 (132)

Round 16 :

132 SC (132)

Round 17 :

(10 SC,1 INC) *12 (144)

Round 18 :

144 SC (144)

Round 19 :

(11 SC,1 INC) *12 (156)

Round 20-23 :

20-23 Rnds= 4 Rows 15 SC (156)

Round 24 :

CC and crochet this row with a hook only for the back loops.

Round 25-30 :

25-30 Rnds= 6 Rows 156 SC (156)

Round 31 :

= (11 SC,1 DEC) *12 (144)

Round 32 :

144 SC (144)

Round 33 :

(10 SC,1 DEC) *12 (132)

Round 34 :

132 SC (132)

Round 35 :

= (9 SC,1 DEC) (120)

Round 36 :

120 SC (120)

Round 37 :

(8CS,1 DEC) *12 (108)

Round 38 :

108 SC (108)

Round 39 :

(7 SC,1 DES) *12 (96)

Round 40 :

96 SC (96)

Round 41 :

(6 SC,1 DEC) *12 (84)

Round 42 :

(5 SC,1 DEC) *12 (72)

Round 43 :

72 SC (72)

Round 44 :

(4 SC,1 DEC) *12 (60)

Round 45 :

(3 SC,1 DEC) *12 (48)

Round 46 :

48 SC (48)

Round 47 :

(2 SC,1 DEC) *12 (36)

Round 48 :

36 SC (36)

Info :

Pass the long end of the yarn through the last loop of the stitch. Fold the donut as in the picture and start sewing up the hole.

Info :

Here I used dark cotton yarn to show how I sew up the hole. Sew a little and be sure to stuff the donut with fiberfill and again sew a little and stuff the donut...

โ€” Decoration :

Step 1 :

Insert a needle with yarn from the bottom of donut.

Step 2 :

After pulling out the needle, insert it nearby, stepping back two centimeters.

Step 3 :

Repeat this with different colors of yarn until you decorate the donut.

Step 4 :

At the end, stick the yarn back from where you started to insert the needle.

Step 5 :

Tie 2 ends of the yarn and hide inside.

Info :

Congratulation! Your Donut is finished!

Assembly Instructions

  • Fold the donut by passing the long tail through the last loop, align the edges, and sew the opening closed with small stitches while stuffing gradually.
  • Stuff the donut firmly but gradually with 150 g fiberfill, checking the shape as you go to maintain a round donut profile.
  • When sewing the final hole, use a contrasting yarn only for demonstration; use matching yarn for an invisible seam and sew a little, stuff, and sew again for a smooth finish.
  • Decorate the surface by inserting a needle from the bottom of the donut and pulling out nearby, repeating with different colored yarns to create sprinkles; tie and hide ends inside.
  • Weave in all yarn tails with a yarn needle and trim excess, then reshape the pillow and smooth any lumps before final display.

Important Notes

  • ๐Ÿ’กWork with consistent tension throughout the rounds to ensure an even circular shape and correct stitch counts.
  • ๐Ÿ’กSwitch to working in the back loop only for the frosting row (Round 24) as instructed to obtain the correct edge and texture.
  • ๐Ÿ’กStuff the pillow gradually and check shape frequently; overstuffing can distort the donut profile and make sewing difficult.
  • ๐Ÿ’กFold and pin the edges before sewing the final hole closed to ensure a neat finish and even alignment.

This donut pillow pattern is a delightful home accent that adds playful charm to any room. ๐Ÿงถ Use your favorite color combos to create sprinkles and frosting that match your decor. ๐ŸŽจ Finish one this weekend and enjoy a squishy, handmade friend on your couch. ๐Ÿ›‹๏ธโœจ

You ask,

we answer.

FAQs

What size will the finished piece be?

The finished pillow measures approximately 12.20 inches (29 centimeters) across when using the recommended yarn and 3.5 mm hook; size may vary with tension and yarn choice.

Can I use different yarn weights for this pattern?

Yes, you can use different yarn weights but the finished size and texture will change; choose an appropriate hook for your yarn and expect a larger or smaller pillow.

Do I need prior crochet experience for this pattern?

This pattern is rated intermediate, so familiarity with single crochet, increases, decreases, and working in back loops is recommended for best results.

How long does this project typically take to complete?

Most crocheters complete this project in 5-7 hours, though time may vary based on experience level, yarn choice, and how much time you spend on decoration.

How much stuffing do I need?

You will need about 150 grams of polyester fiberfill for one donut pillow as noted in the materials list; add slightly more if you prefer a firmer pillow.