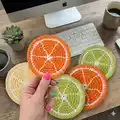
About This Citrus Slice Coasters Pattern
This pattern creates bright citrus slice coasters inspired by lemons, limes, and oranges. Youll work in rounds with simple single crochet increases to form a flat circular coaster. The final step uses back stitch embroidery to add the citrus segment lines for a realistic, charming finish.

Perfect for beginners, the pattern uses two contrasting colors and straightforward shaping. Make a set to mix and match colors for festive table decor or thoughtful handmade gifts.
Why You'll Love This Citrus Slice Coasters Pattern
I absolutely love this pattern because it transforms simple stitches into a cheerful, functional piece that brightens any table. I enjoy how quickly one coaster comes together, making it a satisfying project between larger works. The color changes create such a fresh, summery vibe that I find irresistible. I also love the finishing step—embroidering the segment lines adds a personal, hand-crafted touch that makes each coaster unique.
Switch Things Up
I love customizing these coasters by swapping the color pairings to match seasons or parties—try pastel tones for spring or bold neons for summer.
I sometimes change yarn weight and hook size to make larger trivets or tiny mini coasters for dollhouse scenes.
I often add a decorative picot or shell edging around the final round for a more delicate border that suits tea parties.
You can replace the embroidered white segments with contrast-coloured crochet surface slip stitches for a raised texture look.
I like to make a matching set with alternating Contrast B colors so each coaster in the stack has a different fruit vibe.
I occasionally back the coasters with a small felt circle glued or whipstitched to protect delicate surfaces and provide extra stability.
I enjoy embroidering tiny seeds or freckles in the center with a darker yarn to mimic different citrus types like blood orange.
For gift sets, I package three coasters with a small crocheted coaster holder or ribbon in coordinating colors to create a polished present.
I experiment with using cotton-blend yarns for extra durability and absorbency when these coasters will see more use.
Try combining two different stitch patterns in the rounds for a decorative spiral or ribbed effect that still lies flat.
I sometimes add a small loop on the edge for hanging the coaster as a decorative ornament or kitchen hanger when not in use.
Finally, I recommend testing a single coaster design before making a full set so you can fine-tune color placement, embroidery spacing, and finishing details.
Common Mistakes & How to Fix Them
✗ Skipping the second chain as the starting point can change your starting stitch height; always work 6 sc in the 2nd ch from hook to get the correct center.
✗ Not joining rounds with a slip stitch neatly can leave visible gaps at the join; join each round with a slip stitch to the first sc and weave in ends close to the join.
✗ Changing colors without securing ends can cause loose tails and messy edges; weave and secure yarn tails after color changes and trim carefully.
✗ Failing to count stitches after increases results in uneven round shaping; count your stitches at the end of each round to confirm the correct stitch count.