🧢 Beautiful ✨ Detailed πŸ’ Adorable

Cinnamon Beret Pattern

Cinnamon Beret Pattern
4.7β˜… Rating
2-4 Hours Time Needed
3.8K Made This
βœ‚οΈ

Beginner Friendly Level

Perfect for those just starting their crochet journey, with clear instructions and simple techniques

⏱️

Bite-Sized Project

Finishes in 2-4 hoursβ€”perfect for an afternoon of creative relaxation.

πŸ‘•

Casual Chic

Relaxed style with a modern twist, perfect for everyday wear while maintaining that handcrafted uniqueness.

About This Cinnamon Beret Pattern

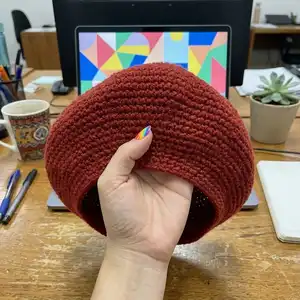
This pattern creates a classic cinnamon-coloured beret crocheted from the centre outwards using single crochet rounds. The design is structured with repeated increases, then decreases, producing the iconic beret shape. It is a quick, weekend-friendly project that gives a neat, textured finish when blocked.

Cinnamon Beret Pattern crochet pattern - detailed view of completed project

Worked in continuous rounds with a 3.5 mm hook and Aran weight yarn, the pattern includes exact stitch counts for each round. Finished measurements and gauge are provided so you can match the size and shape accurately.

Why You'll Love This Cinnamon Beret Pattern

I absolutely love this pattern because it turns a simple single crochet stitch into a timeless beret with minimal fuss. I enjoy how quickly it grows from the magic loop into a full hat, making it satisfying to work on. The round-by-round increases give precise control over the shape, and the decreases create the flattering crown. I also appreciate how easy it is to customize with different yarns and hook sizes to change the final look.

Cinnamon Beret Pattern step 1 - construction progress Cinnamon Beret Pattern step 2 - assembly progress Cinnamon Beret Pattern step 3 - details and accessories Cinnamon Beret Pattern step 4 - final assembly and finishing

Switch Things Up

I like to experiment with yarn weight and hook size to change the finished size and drape of this beret.

I often swap the Aran yarn for a sport or DK weight and use a smaller hook to make a sleeker, lighter beret.

Using a bulkier yarn and a larger hook will create a cozy, chunky beret perfect for winter wear.

I sometimes add a rolled or ribbed brim by working a few rounds of back loop single crochet at the start of the decreases for extra structure.

Try adding a small pom-pom or a crocheted flower at the center for a playful accent.

I recommend experimenting with colorwork or a simple stripe before starting the increases to personalize the top of the beret.

If you want a slouchier shape, stop decreasing a round earlier or switch to a larger hook for the decrease rounds.

For a more fitted, tam-style beret, tighten tension slightly and block more firmly so the brim sits closer to the head.

I sometimes line the inside with a soft fabric for added warmth and comfort; sew it in carefully after blocking.

When making multiple hats, I keep notes about yarn, hook, and where I changed counts so I can reproduce exact versions later.

Common Mistakes & How to Fix Them

βœ— Skipping the stitch marker when working in rounds can cause you to lose track of the start; always insert and move a marker at the end of each round to maintain correct stitch counts. βœ— Failing to close rounds with a slip stitch as noted will make the pattern inconsistent; follow the instruction 'Close all rounds with sl st.' to keep rounds neat and aligned. βœ— Ignoring gauge leads to a hat that is too large or too small; measure 18 sts and 18 rows per 10 cm in single crochet and adjust hook size to match gauge. βœ— Increasing too tightly or loosely will distort the beret shape; keep consistent, moderate tension and make increases evenly as specified to ensure smooth expansion. βœ— Not blocking the beret after finishing will hide the true shape and texture; wash and block the finished piece to relax stitches and shape the beret properly.

Cinnamon Beret Pattern

Make a stylish, classic beret worked from the center outwards. This pattern uses simple single crochet increases and decreases so you can crochet a beautiful hat in a single weekend. Clear round-by-round instructions are included so you can follow along easily and achieve a polished, wearable beret.

Beginner Friendly 2-4 Hours

Materials Needed for Cinnamon Beret Pattern

β€” Main Fabric

  • 01
    Cisne Cetim yarn, 100g/170m, composition: 70% acrylic, 30% wool, Aran (8 wpi)
  • 02
    Final weight used for sample: 113 g
  • 03
    Approximate finished size: One size - 28 cm overall width and 52 cm head contour

β€” Tools Required

  • 01
    Crochet hook size 3.5 mm
  • 02
    Stitch marker
  • 03
    Tapestry needle to weave in ends
  • 04
    Scissors
  • 05
    Blocking tools (pins, mat) for shaping after washing

Progress Tracker

0% Complete

β€” Pattern :

Start :

Crochet a Magic Loop

Info :

Note: Close all rounds with sl st..

Round 1 :

6 sc, sl st. Then insert the marker.

Round 2 :

6 inc, sl st. Total 12 sc.

Round 3 :

*1 inc, 1 sc*, repeat from * to * across, sl st. Total 18 sts.

Info :

Continue to increase 6 sts in each Round.

Round 4 :

*1 inc, 2 sc*, repeat from * to * across, sl st. Total 24 sts.

Round 5 :

*1 inc, 3 sc*, repeat from * to * across, sl st. Total 30 sts.

Round 6 :

*1 inc, 4 sc*, repeat from * to * across, sl st. Total 36 sts.

Round 7 :

*1 inc, 5 sc*, repeat from * to * across, sl st. Total 42 sts.

Round 8 :

*1 inc, 6 sc*, repeat from * to * across, sl st. Total 48 sts.

Round 9 :

*1 inc, 7 sc*, repeat from * to * across, sl st. Total 54 sts.

Round 10 :

*1 inc, 8 sc*, repeat from * to * across, sl st. Total 60 sts.

Round 11 :

*1 inc, 9 sc*, repeat from * to * across, sl st. Total 66 sts.

Round 12 :

*1 inc, 10 sc*, repeat from * to * across, sl st. Total 72 sts.

Round 13 :

*1 inc, 11 sc*, repeat from * to * across, sl st. Total 78 sts.

Round 14 :

*1 inc, 12 sc*, repeat from * to * across, sl st. Total 84 sts.

Round 15 :

*1 inc, 13 sc*, repeat from * to * across, sl st. Total 90 sts.

Round 16 :

*1 inc, 14 sc*, repeat from * to * across, sl st. Total 96 sts.

Round 17 :

*1 inc, 15 sc*, repeat from * to * across, sl st. Total 102 sts.

Round 18 :

*1 inc, 16 sc*, repeat from * to * across, sl st. Total 108 sts.

Round 19 :

*1 inc, 17 sc*, repeat from * to * across, sl st. Total 114 sts.

Round 20 :

*1 inc, 18 sc*, repeat from * to * across, sl st. Total 120 sts.

Round 21 :

*1 inc, 19 sc*, repeat from * to * across, sl st. Total 126 sts.

Round 22 :

*1 inc, 20 sc*, repeat from * to * across, sl st. Total 132 sts.

Round 23 :

*1 inc, 21 sc*, repeat from * to * across, sl st. Total 138 sts.

Round 24 :

*1 inc, 22 sc*, repeat from * to * across, sl st. Total 144 sts.

Round 25 :

*1 inc, 23 sc*, repeat from * to * across, sl st. Total 150 sts.

Round 26 :

*1 inc, 24 sc*, repeat from * to * across, sl st. Total 156 sts.

Info :

Total 26 Rounds with increases.

Decreases :

Begin decreases as follows to shape the beret crown.

Round 27 :

*sc2tog, 24 sc*, repeat from * to * across, sl st. Total 150 sts.

Round 28 :

*sc2tog, 23 sc*, repeat from * to * across, sl st. Total 144 sts.

Round 29 :

*sc2tog, 22 sc*, repeat from * to * across, sl st. Total 138 sts.

Round 30 :

*sc2tog, 21 sc*, repeat from * to * across, sl st. Total 132 sts.

Round 31 :

*sc2tog, 20 sc*, repeat from * to * across, sl st. Total 126 sts.

Round 32 :

*sc2tog, 19 sc*, repeat from * to * across, sl st. Total 120 sts.

Round 33 :

*sc2tog, 1 sc, sc2tog, 15 sc*, repeat from * to * across, sl st. Total 108 sts.

Round 34 :

*sc2tog, 1 sc, sc2tog, 13 sc*, repeat from * to * across, sl st. Total 96 sts.

Round 35 :

*sc2tog, 1 sc, sc2tog, 11 sc*, repeat from * to * across, sl st. Total 84 sts.

Last Round :

*1 sl st, ch1*, repeat from * to * across, sl st.

To Finish :

Weave in all ends. Wash and block.

Assembly Instructions

  • Weave in all yarn ends securely using a tapestry needle so there are no loose tails visible on the beret surface.
  • Wash and block the beret while shaping it on a round form or plate to achieve the correct flat crown and drape.
  • After blocking, let the beret dry completely on the form to set the shape and texture.
  • If desired, fold or roll the brim slightly and pin into place while damp to train the edge for a neater finish.

Important Notes

  • πŸ’‘Use a stitch marker to mark the beginning of each round when working continuous rounds to maintain accurate stitch counts.
  • πŸ’‘Match the gauge of 18 sts and 18 rows per 10 cm in single crochet to ensure the finished size matches the pattern.
  • πŸ’‘Close all rounds with a slip stitch as noted; this keeps the rounds neat and the increases aligned properly.
  • πŸ’‘Block the finished beret to open the fabric and set the shape for a professional-looking result.

This Cinnamon Beret pattern brings classic style and cozy warmth to your handmade wardrobe. Crafted from simple rounds and clear instructions, it is perfect for a relaxed weekend make. Try different yarns and colors to create your own signature look. 🧢✨

You ask,

we answer.

FAQs

What size will the finished piece be?

The finished beret measures approximately 28 cm overall width and fits a head contour of approximately 52 cm when worked to the stated gauge.

Can I use different yarn weights for this pattern?

Yes, you can use different yarn weights but this will change the final size; adjust your hook to match gauge or change stitch counts to achieve the desired fit.

Do I need prior crochet experience for this pattern?

This pattern is beginner friendly, so basic knowledge of single crochet, increases, decreases and working in rounds is recommended for best results.

How long does this project typically take to complete?

Most crocheters complete this beret in 2-4 hours, depending on experience and working pace.