🧶 Beautiful ✨ Detailed 💝 Adorable

Chunky chain Pattern

Chunky chain Pattern
4.4★ Rating
2-3 Hours Time Needed
3.0K Made This
✂️

Beginner Friendly Level

Perfect for those just starting their crochet journey, with clear instructions and simple techniques

⏱️

Bite-Sized Project

Finishes in 2-4 hours—perfect for an afternoon of creative relaxation.

Stylish Touch

An elegant detail to elevate any look, combining traditional techniques with contemporary design sensibilities.

About This Chunky chain Pattern

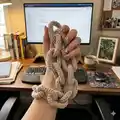
This pattern teaches you how to crochet chunky, interlocking chain links from cord to make a decorative chain for bags or wearable jewelry. It uses basic single crochet stitches worked in rounds with clear photo references to guide you step by step. The result is a sturdy, fashionable chain that can be sized to your needs and finished neatly by hiding ends.

Chunky chain Pattern crochet pattern - detailed view of completed project

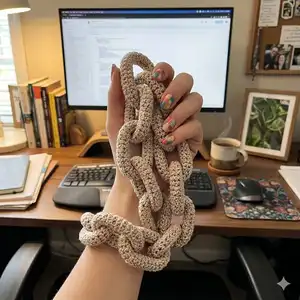
Ideal for beginners, the pattern includes materials, abbreviations, gauge and a concise assembly process. Make a full 22-inch chain or shorten it to create a handle or necklace.

Why You'll Love This Chunky chain Pattern

I absolutely love this pattern because it turns a simple cord and single crochet into a chic, functional accessory that elevates any bag or outfit. I enjoy how quick and satisfying each link is to make—you see progress immediately and can customize length and color easily. The technique is straightforward yet produces a professional-looking finish that I am proud to gift or sell. I also appreciate that the finishing steps hide ends securely, so the final piece is both durable and elegant.

Chunky chain Pattern step 1 - construction progress Chunky chain Pattern step 2 - assembly progress Chunky chain Pattern step 3 - details and accessories Chunky chain Pattern step 4 - final assembly and finishing

Switch Things Up

I love experimenting with different cord colors to create multi-toned chains; try alternating two colors every other link for a striped effect.

If you want a bulkier chain, use thicker cord and a larger hook; this gives a chunky, statement look perfect for bold bag handles.

To make a delicate necklace, switch to a thinner cord and smaller hook; the same instructions produce an elegant, lightweight accessory.

You can add beads between links for sparkle; slide small beads onto the cord before you begin crocheting each link and position them as you work.

Try mixing materials by combining a crocheted section with a metal chain—crochet a few links and attach a metal segment for contrast and durability.

I often finish ends by weaving tails into the back loops and then melting them carefully; this gives a secure, invisible finish that lasts.

For a reversible look, experiment with working rounds in the opposite direction every other link so the visible seam alternates sides.

Create different lengths by making more or fewer links; for a shoulder strap make 12-15 links, while a short handle needs 6-8 links depending on cord thickness.

I also like to attach tassels or a small charm to the last link to personalize the piece—try adding a leather tassel or metal initial charm.

If you want posable links, consider leaving a small gap and inserting a thin plastic tube or cord core to keep shape while remaining flexible.

Try sewing the chain onto the edge of a handmade clutch for an integrated handle, or loop it through snap rings to make a removable strap.

Experiment with textured cords such as braided or metallic threads for a luxe finish that elevates simple garments and accessories.

Common Mistakes & How to Fix Them

✗ Skipping a stitch marker will make it hard to know the start of each row; place and move a marker at the first SC of every row to stay accurate. ✗ Not tightening the chain join can cause a loose beginning loop; after connecting the chain into a circle, make a securing SlSt and place the last SC into that SlSt to hold shape. ✗ Forgetting to pull the end through and secure it leads to unraveling; always pull the tail through the first loop, weave through a few loops, cut and melt or seal the end as instructed. ✗ Crocheting into both loops for the base trim instead of only the back loop changes the edge appearance; insert the hook into the back loop only when making the base trim for a clean finish.

Chunky chain Pattern

Create a stylish, hand-crocheted chunky chain that works beautifully as a bag handle or a statement necklace. This beginner-friendly pattern uses simple single crochet stitches and a 2 mm cord to build sturdy, elegant links. Follow the step-by-step photos and clear instructions to make a full-length chain or just a few links for a handle. Perfect for customizing to match your projects and gifts.

Beginner Friendly 2-3 Hours

Materials Needed for Chunky chain Pattern

— Main Fabric

  • 01
    Any cord 2 mm, approximately 60 yards (50 m)
  • 02
    Example used: Polyester cord Shikimiki PP Macrame Mini, latte color (approx 50 m)
  • 03
    Use 2 mm cord or similar thin macrame cord for best results

— Tools Required

  • 01
    Crochet hook size 3 mm
  • 02
    Stitch marker
  • 03
    Lighter (for finishing cord ends)
  • 04
    Scissors
  • 05
    Yarn needle for hiding ends

Progress Tracker

0% Complete

— Crochet the chain :

Info :

Crochet chain with 25 CH. Connect in a circle.

Info :

SlSt in the 1st loop of the chain, CH.

Round 1 :

1 row. 25 SC. Place the marker in the 1st SC of this row, last SC make in the SlSt and the 1st loop of the chain. (25)

Info :

SlSt, CH.

Round 2 :

2 row. 25 SC, SlSt, CH, rearrange the marker in the 1st loop of this and the each subsequent row. (25)

Info :

Pull out the end through the 1st loop of the chain.

Info :

Then pull the end through a few loops of the 1st row. Cut, process with fire.

Info :

Crochet the row.

Round 3-4 :

3-4 rows. 25 SC, SlSt, CH. (25)

Round 5 :

5 row. 25 SC, SlSt. (25)

Info :

Fold the work in half lengthwise, right side inward.

Info :

Pull the working loop through the loop of the chain.

Base trim :

Base trim. Crochet 25 SlSt. Insert the hook on the back loop only of the last row and the loop of the chain.

Info :

Cut the thread, pull out the end. Insert the hook under the 1st SlSt. Pull the end.

Info :

Pull back the end in the last SlSt. Strengthen and hide the end. Process with fire.

Info :

Crochet the next chain link through hole of the 1st link.

Info :

Crochet the required number of the links. For example, 9-10 links for a handle.

Info :

Put the crochet chain to the snap hook rings.

Info :

The chain can be used as a necklace.

Info :

I hope you enjoy this pattern, and if you have questions about it, please convo me on ETSY. I am always glad to help!!!

Assembly Instructions

  • After Round 2, pull the tail end through the 1st loop of the chain and weave it through a few loops of the first row; cut and melt the cord end to secure it.
  • Fold the work in half lengthwise, right side inward, then pull the working loop through the loop of the chain to close the link seam neatly.
  • For the base trim, crochet 25 SlSt inserting the hook in the back loop only of the last row and into the loop of the chain, then cut and hide the end under the first SlSt.
  • To form the next link, pass the new link through the hole of the previous link before you begin crocheting it so links interlock while you work.
  • Attach finished chain to snap hook rings or bag hardware; the chain may also be worn as a necklace or used as a decorative handle.

Important Notes

  • 💡Use a stitch marker at the first SC of each row and move it up each row to keep track of the start and maintain consistent stitch counts.
  • 💡When hiding cord ends, pull the tail through several loops and carefully melt the end with a lighter to prevent fraying—work safely and sparingly.
  • 💡Insert the hook into the back loop only for the base trim to create a clean edge that nests neatly with the chain loop.

This chunky crochet chain pattern helps you create a stylish accessory or bag handle with simple stitches and neat finishing techniques. 🧶 Make a custom-length chain using your favorite cord color for a unique, handmade touch to any bag or outfit. ✨ Whether you make a single handle or a full necklace, this project is a fast and fun addition to your crafting repertoire. 🔗

You ask,

we answer.

FAQs

What size will the finished piece be?

The finished chain from the specified materials measures approximately 22 inches (55 cm) with 10 chain links; individual link is about 3 inches (8 cm) long and 2 inches (5 cm) wide.

Can I use different cord thicknesses or yarn?

Yes, you can use different cord thicknesses, but the link size and finished chain length will change; thinner cord makes smaller links and thicker cord makes chunkier links—adjust hook size accordingly.

Do I need prior crochet experience for this pattern?

This pattern is beginner friendly; basic knowledge of chain stitch, single crochet and slip stitch is recommended to follow the instructions and finishing steps.

How long does this project typically take to complete?

Most crocheters complete a handle-length set of links in about 2-3 hours, though time varies depending on the number of links and your pace.