๐Ÿงถ Beautiful โœจ Detailed ๐Ÿ’ Adorable

Christmas Minion Amigurumi Pattern

Christmas Minion Amigurumi Pattern
4.4โ˜… Rating
5-7 Hours Time Needed
1.7K Made This
โœ‚๏ธ

Intermediate Level

Ideal for those with basic crochet experience, featuring slightly more advanced stitches and techniques to expand your skills.

โฑ๏ธ

Weekend Treat

Takes 5-7 hours, making it an enjoyable project to finish over a couple of days.

๐ŸŽ

Tiny Treasure

Small, sweet, and gift-worthy creations that fit perfectly in the palm of your hand with detailed charm.

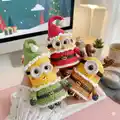
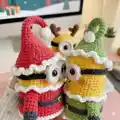
About This Christmas Minion Amigurumi Pattern

This pattern creates three tiny holiday Minions (Bob, Kevin, Stuart) with different shirt colors, hats, and accessories for a festive collection. Youll work in the round using sport-weight yarn to shape the bodies, hats, arms, legs, glasses, and horns. Clear stitch counts and color-change points are included for accurate shaping and assembly. Photographs and finishing notes help with placement and final details.

Christmas Minion Amigurumi Pattern crochet pattern - detailed view of completed project

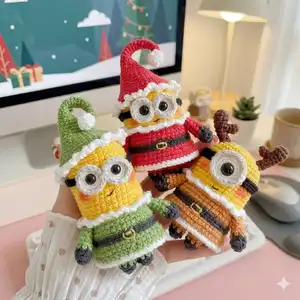
Perfect for making small giftable amigurumi or tree ornaments, the pattern uses sport yarn and a 2.0โ€“2.5mm hook. It includes instructions for glasses, collars, shirt pieces, and Stuart's horn for complete character builds.

Why You'll Love This Christmas Minion Amigurumi Pattern

I absolutely love this pattern because it turns a familiar character into a festive, palm-sized amigurumi that is both fun and rewarding to stitch. I enjoyed designing distinct outfits and tiny accessories that let each minion have its own personality. I love how quickly each mini finishes, making them perfect gifts or holiday decorations. I also appreciate the clear round-by-round instructions which make assembly and finishing much easier and more satisfying.

Christmas Minion Amigurumi Pattern step 1 - construction progress Christmas Minion Amigurumi Pattern step 2 - assembly progress Christmas Minion Amigurumi Pattern step 3 - details and accessories Christmas Minion Amigurumi Pattern step 4 - final assembly and finishing

Switch Things Up

I love customizing these Minions by swapping hat and shirt colors to match holiday themes or team colors for a playful twist.

I often make a tiny keyring version by using thinner yarn and a 1.5mm hook to create mini charms that fit on a bag or phone strap.

You can enlarge the design by using worsted weight yarn and a larger hook to make cuddle-sized versions; adjust stuffing and safety eye size accordingly.

I sometimes embroider different facial expressions instead of using safety eyes to give each character more personality and a handmade look.

Try adding tiny crocheted accessories like scarves, presents, or tiny candy canes to make each Minion unique and gift-ready.

I also experiment with metallic or sparkly yarn for hats to give a festive sheen and make ornaments shimmer on the tree.

For a rustic look I switch to natural fiber yarns and hand-dyed colors; they give the Minions a cozy, vintage vibe.

I recommend changing the placement of the glasses slightly to alter the Minion's expression โ€” higher or lower changes personality instantly.

If you like posing your characters, add a small wire inside the arms for gentle posability and movement.

I often design matching outfits for a whole set (matching belts, buttons, or tiny buckles) which makes them perfect themed gifts.

Finally, mix embroidery, felt, and tiny buttons for details like belts and buckles to create textured, layered finishes I adore.

Common Mistakes & How to Fix Them

โœ— Skipping stitch markers during color changes will make round placement hard to track; use markers at each round transition and color change to keep accurate counts. โœ— Stuffing too early or unevenly leads to a lumpy body shape; stuff gradually and evenly while closing to maintain smooth contours. โœ— Not counting stitches after increases or decreases causes mismatched shaping; count your stitches at the end of each round to confirm the correct stitch count. โœ— Pulling yarn too tightly when making eyes or sewing parts distorts the minion's shape; keep moderate tension and adjust placement before securing permanently. โœ— Forgetting to leave long yarn tails for sewing pieces will make attachment difficult later; always leave a long tail when a part is meant to be sewn on and hide ends after assembly.

Christmas Minion Amigurumi Pattern

Make festive, palm-sized Christmas Minions perfect for gifts, tree ornaments, or cute seasonal decor. This pattern walks you through three distinct minion versions (Bob, Kevin, Stuart) with hats, glasses, and accessories. Youll enjoy clear round-by-round instructions, helpful photos, and assembly notes so you can create charming holiday characters with confidence.

Intermediate 5-7 Hours

Materials Needed for Christmas Minion Amigurumi Pattern

โ€” Main Fabric

  • 01
    Sport weight yarn (approx. 1.5-2mm strand thickness) - Yellow (main body) ~20-30g
  • 02
    Sport weight yarn - Red (hat/shirt accent) ~10-20g
  • 03
    Sport weight yarn - Green (hat/shirt accent) ~10-20g
  • 04
    Sport weight yarn - Brown/Dark brown (horns, Stuart details) ~5-10g
  • 05
    Sport weight yarn - Orange (shirt option) ~10g
  • 06
    White yarn for glasses and collar ~10g
  • 07
    Black yarn for details and straps ~10g
  • 08
    Gray yarn for glasses rim ~5g
  • 09
    Small amounts of other colors for accents (pink for blush, etc.)

โ€” Tools Required

  • 01
    Crochet hook size 2.0mm - 2.5mm (use 2.0mm for recommended gauge)
  • 02
    Sport weight yarn (as listed in materials)
  • 03
    Black safety eyes size 8-10mm (pattern used 8mm)
  • 04
    Scissors
  • 05
    Yarn needle for sewing and weaving ends
  • 06
    Stitch markers
  • 07
    Polyester stuffing (fiberfill)
  • 08
    Black embroidery thread for decorating details and mouth
  • 09
    Glue for securing safety eyes or small details (optional)
  • 10
    Pins for assembly placement

Progress Tracker

0% Complete

โ€” Bob's Body :

Info :

Start with yellow yarn

Round 1 :

7sc in MR (7)

Round 2 :

7 -inc (14)

Round 3 :

(sc, inc) * 7 (21)

Round 4 :

(inc, 2sc) * 7 (28)

Round 5 :

(3sc, inc) * 7 (35)

Round 6-14 :

(9 rnds) 35sc (35)

Info :

Switch to red yarn

Round 15 :

BLO (4sc, inc) * 7 (42)

Round 16-17 :

(2 rnds) 42sc (42)

Info :

Switch to black yarn

Round 18-19 :

(2 rnds) 42sc (42)

Info :

Switch to red yarn

Round 20 :

BLO 42sc (42)

Round 21 :

42sc (42)

Round 22 :

(4sc, dec) * 7 (35)

Round 23 :

(3sc, dec) * 7 (28)

Info :

Stuff the body tight with fiberfill

Round 24 :

(2sc, dec) * 7 (21)

Round 25 :

(sc, dec) * 7 (14)

Round 26 :

7 -dec (7)

Info :

Cut the yarn. Invisible fasten off. Thread a needle with your yarn tail and close the ramaining gap.

โ€” Kevin's Body :

Info :

Start with yellow yarn

Round 1 :

7sc in MR (7)

Round 2 :

7 -inc (14)

Round 3 :

(sc, inc) * 7 (21)

Round 4 :

(inc, 2sc) * 7 (28)

Round 5 :

(3sc, inc) * 7 (35)

Round 6-21 :

(16 rnds) 35sc (35)

Info :

Switch to green yarn

Round 22 :

BLO (4sc, inc) * 7 (42)

Round 23-24 :

(2 rnds) 42sc (42)

Info :

Switch to black yarn

Round 25-26 :

(2 rnds) 42sc (42)

Info :

Switch to green yarn

Round 27 :

BLO 42sc (42)

Round 28 :

42sc (42)

Round 29 :

(4sc, dec) * 7 (35)

Round 30 :

(3sc, dec) * 7 (28)

Info :

Stuff the body tight with fiberfill

Round 31 :

(2sc, dec) * 7 (21)

Round 32 :

(sc, dec) * 7 (14)

Round 33 :

7 -dec (7)

Info :

Cut the yarn. Invisible fasten off. Thread a needle with your yarn tail and close the ramaining gap.

โ€” Stuart's Body :

Info :

Start with yellow yarn

Round 1 :

7sc in MR (7)

Round 2 :

7 -inc (14)

Round 3 :

(sc, inc) * 7 (21)

Round 4 :

(inc, 2sc) * 7 (28)

Round 5 :

(3sc, inc) * 7 (35)

Round 6-17 :

(12 rnds) 35sc (35)

Info :

Switch to brrown yarn

Round 18 :

BLO (4sc, inc) * 7 (42)

Round 19-20 :

(2 rnds) 42sc (42)

Info :

Switch to black yarn

Round 21-22 :

(2 rnds) 42sc (42)

Info :

Switch to brown yarn

Round 23 :

BLO 42sc (42)

Round 24 :

42sc (42)

Round 25 :

(4sc, dec) * 7 (35)

Round 26 :

(3sc, dec) * 7 (28)

Info :

Stuff the body tight with fiberfill

Round 27 :

(2sc, dec) * 7 (21)

Round 28 :

(sc, dec) * 7 (14)

Round 29 :

7 -dec (7)

Info :

Cut the yarn. Invisible fasten off. Thread a needle with your yarn tail and close the ramaining gap.

โ€” Arms :

Info :

With black and minion shirt's yarn (make two)

Round 1 :

start with black 4sc in MR (4)

Round 2 :

4 -inc (8)

Info :

Switch color

Round 3-8 :

(6 rnds) 8sc (8)

Info :

Cut the yarn. Leave a long tail. Thread a needle with your yarn tail and sew to the body at the round you switch to minion shirt's color yarn.

โ€” Legs :

Info :

With black and minion shirt's yarn.

Round 1 :

start with black 7sc in MR (7)

Round 2 :

inc, 6sc (8)

Info :

Switch color

Round 3-4 :

8sc (8)

Info :

Cut the yarn. Leave a long tail. Thread a needle with your yarn tail and sew the legs to bottom of the body.

โ€” Bob's and Kevin's Glasses :

Info :

With white and gray.

Round 1 :

start with white 7sc in MR (7)

Round 2 :

7 -inc (14)

Info :

Switch to gray

Round 3 :

FLO 14sc, slst(14)

Info :

Cut the yarn. Leave a long tail. Thread a needle with your yarn tail and sew the glasses to the body. Place the eyes on glasses and use glue to stick them to the body.

โ€” Stuart's Glasses :

Info :

With white and gray.

Round 1 :

start with white 7sc in MR (7)

Round 2 :

7 -inc (14)

Round 3 :

(sc, inc) * 7 (21)

Info :

Swith to gray

Round 4 :

FLO 21sc, slst (21)

โ€” Black trap for Bob and Kevin glasses :

Info :

Start with black yarn, ch32, 31 -slst on chain.

Info :

Cut the yarn. Leave a long tail. Thread a needle with your yarn tail and sew it to the body of minion.

โ€” Black trap for Stuart glasses :

Info :

Start with black yarn, ch37, 36sc on chain.

Info :

Cut the yarn. Leave a long tail. Thread a needle with your yarn tail and sew it to the body of minion.

โ€” Piece of shirt :

Info :

With minion shirt's yarn Insert your hook to FLO stitches of the second BLO round on the body,

Round 1 :

ch1, (5sc, inc) * 7, slst (49)

Round 2-3 :

(2 rnds) ch1, 49sc, slst (49)

Info :

Switch to white yarn

Round 4 :

49sc, slst (49)

Info :

Cut the yarn. Invisible fasten off. Hide your yarn tail.

โ€” Collar :

Info :

With white yarn Insert your hook to FLO stitches of the first BLO round on the body, (ch 3, slst to the next stitch) * end round

Info :

Cut the yarn. Invisible fasten off. Hide your yarn tail.

โ€” Bob's and Kevin's hat :

Info :

With minion shirt's yarn

Round 1 :

4sc in MR (4)

Round 2-4 :

(3 rnds) 4sc (4)

Round 5 :

3sc, inc (5)

Round 6-8 :

(3 rnds) 5sc (5)

Round 9 :

4sc, inc (6)

Round 10-12 :

(3 rnds) 6sc (6)

Round 13 :

(sc, inc) * 3 (9)

Round 14 :

9sc (9)

Round 15 :

(2sc, inc) * 3 (12)

Round 16-17 :

(2 rnds) 12sc (12)

Round 18 :

(sc, inc) * 6 (18)

Round 19 :

18sc (18)

Round 20 :

(2sc, inc) * 6 (24)

Round 21 :

24sc (24)

Round 22 :

(3sc, inc) * 6 (30)

Round 23 :

(4sc, inc) * 6 (36)

Round 24 :

2sc, inc, (5sc, inc) * 5, 3sc (42)

Round 25 :

42sc (42)

Info :

Switch to white yarn

Round 26 :

42sc (42)

Round 27 :

(Ch 3, slst to the next stitch) * end round

Info :

Cut the yarn. Invisible fasten off. Hide your yarn tail.

โ€” Stuart's horn :

Info :

With dark brown yarn. Make two.

Big piece (P1) :

Round 1. 6sc in MR (6)

Round 2 :

(2sc, inc) * 2 (8)

Round 3 :

8sc (8)

Round 4 :

2sc, 2-dec, 2sc (6)

Round 5 :

2sc, dec, 2sc (5)

Round 6-7 :

(2 rnds) 5sc (5)

Round 8 :

3sc, dec, slst (4)

Info :

Cut the yarn. Leave a long tail for sewing.

Small piece (P2) :

Round 1. 4sc in MR (4)

Round 2-3 :

(2 rnds) 4sc (4)

Info :

Cut the yarn. Leave a long tail. Thread a needle with your yarn tail. Sew small piece to big piece spanning rounds 5&6.

Info :

Sew the horn to the top of minion spanning rounds 4&5

Assembly Instructions

  • Attach head pieces (glasses and eyes) to the front of the body centering them across the face; use glue for safety eyes if required and stitch the glasses securely in place.
  • Sew arms to the sides of the body at the round where you switched to the minion shirt color, angling slightly forward for a natural pose and securing with whipstitch.
  • Sew legs to the bottom of the body spaced evenly so the minion can sit flat; use the long tails left on legs and secure tightly.
  • Position and sew hats on top of the head aligning the hat brim with the white collar round; tuck and hide yarn tails inside before finishing.
  • Sew Stuart's horns to the top of his head spanning the indicated rounds (4 & 5), ensuring symmetry and securing firmly with long yarn tails.

Important Notes

  • ๐Ÿ’กUse stitch markers to mark the first stitch of every round and to mark color-change rounds for easy tracking.
  • ๐Ÿ’กStuff the body firmly but evenly before final decreases so the shape remains smooth and stable.
  • ๐Ÿ’กLeave long yarn tails on parts intended for sewing; this simplifies attachment and prevents reworking later.
  • ๐Ÿ’กWhen switching colors for shirt stripes, carry yarn or tidy ends as you go to avoid bulky joins and maintain clean edges.

Create your own set of festive Christmas Minions with this cheerful pattern โ€” perfect for gifts or holiday decor. These tiny treasures are quick to make and brim with character in each hat and accessory. Make a trio in different colors for a charming display or give them away as special handmade presents. ๐ŸŽ„๐Ÿงถ

You ask,

we answer.

FAQs

What size will the finished piece be?

The finished amigurumi measures approximately palm-sized (about 8-12 cm tall) depending on yarn tension and hook size used.

Can I use different yarn weights for this pattern?

Yes, you can use different yarn weights but this will change the final size; adjust your hook accordingly and make a gauge swatch to plan size.

Do I need prior crochet experience for this pattern?

This pattern is rated Intermediate, so prior experience with single crochet, increases, decreases, BLO/FLO and working in the round is recommended.

How long does this project typically take to complete?

Most crocheters complete a single minion in about 5-7 hours for the set of three depending on experience and detail work; smaller minis or fewer accessories reduce time.