🧶 Beautiful ✨ Detailed 💝 Adorable

Christmas hats for Mini penguins Amigurumi Pattern

Christmas hats for Mini penguins Amigurumi Pattern
4.7★ Rating
5-7 Hours Time Needed
2.1K Made This
✂️

Intermediate Level

Ideal for those with basic crochet experience, featuring slightly more advanced stitches and techniques to expand your skills.

⏱️

Weekend Treat

Takes 5-7 hours, making it an enjoyable project to finish over a couple of days.

🎁

Tiny Treasure

Small, sweet, and gift-worthy creations that fit perfectly in the palm of your hand with detailed charm.

About This Christmas hats for Mini penguins Amigurumi Pattern

This pattern provides complete instructions to crochet four different miniature Christmas hats for mini penguin toys: Elf, Santa, Christmas tree and Cookie hat. Each hat includes step-by-step rounds, color change notes, and decorative details like pompom curls, brims, stars and glazed icing. Photographs accompany key steps to help you with assembly and finishing.

Christmas hats for Mini penguins Amigurumi Pattern crochet pattern - detailed view of completed project

Written in US crochet terms and worked in continuous spirals unless stated, these hats are sized for toys with a head coverage of 14.5 cm (5.7 inches). Techniques include BLO rounds, picot stitches, and crocheted curls for pompons.

Why You'll Love This Christmas hats for Mini penguins Amigurumi Pattern

I absolutely love this pattern because it packs so much festive personality into tiny, quick-to-make hats. I enjoy the way the color changes and brims add dimension and charm without needing complex shaping. The photographed steps make finishing touches like sewing the glaze or attaching the star straightforward and fun. I also love that you can mix and match yarn colors to create a whole set with different holiday vibes. It feels rewarding to complete a small, gift-ready item in a single session.

Christmas hats for Mini penguins Amigurumi Pattern step 1 - construction progress Christmas hats for Mini penguins Amigurumi Pattern step 2 - assembly progress Christmas hats for Mini penguins Amigurumi Pattern step 3 - details and accessories Christmas hats for Mini penguins Amigurumi Pattern step 4 - final assembly and finishing

Switch Things Up

I love how these tiny hats respond to color changes—I often swap the red and green for pastel tones to create a softer holiday look.

I sometimes use a slightly thicker sport/dk yarn and a larger hook to make chunkier, more cuddly hats; conversely, a finer cotton will produce dainty mini hats perfect for ornaments.

I like to replace the star with a tiny crocheted bell or bead for a different topper—experiment with small buttons or felt shapes for variety.

Try embroidering tiny snowflakes or stripes instead of crocheting curls for a simpler finish if you prefer less three-dimensional detail.

For a glossier glaze on the cookie hat, use mercerized cotton or embroidery thread to make the picot points pop; you can also add tiny seed beads for sparkle.

To make the hats fit other small toys, change yarn weight and hook size and test fit on the toy, adjusting rounds if needed to increase or decrease circumference.

I enjoy making a matching scarf in contrast colors to create a tiny holiday outfit—use the scarf instructions and vary colors every few rows.

If you want a removable hat for frequent dressing/undressing, sew a small loop inside the rim to anchor with a hook or snap rather than permanently sewing the hat on.

I often add a small wire in the pompon or hat tip when I want the hat to hold a particular bend or pose; wrap wire and then crochet over it for a hidden posable support.

Don`t be afraid to mix yarn brands and textures: a cotton main body with a fluffy acrylic pompom can give a charming mixed-material effect that reads as handcrafted and unique.

Common Mistakes & How to Fix Them

✗ Skipping the stitch marker and losing the start of the round leads to mismatched rows; always mark the first stitch of the round and move the marker as you go. ✗ Changing colors without securing the yarn tail can create loose ends at the color join; weave in or carry the yarn neatly and secure tails immediately after the color change. ✗ Overstuffing the small pompon or hat details causes lumps and distorted shapes; stuff gradually with small amounts and shape as you crochet to keep the silhouette tidy. ✗ Forgetting to work in the BLO when instructed results in incorrect brim or curl placement; double-check notes that specify BLO and work the designated loops only. ✗ Not counting stitch increases and decreases accurately leads to the wrong diameter; count after each increase/decrease round to confirm stitch totals match the pattern.

Christmas hats for Mini penguins Amigurumi Pattern

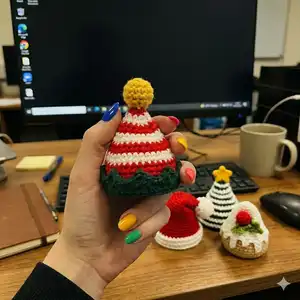
Create a set of charming mini Christmas hats designed specifically for tiny penguin amigurumi. This pattern includes four festive hat designs — elf, Santa, Christmas tree and cookie — plus decorations and accessories. You will get clear, photographed steps and full-round instructions so you can crochet each detail with confidence. Perfect for holiday displays, gifts, or tiny toy wardrobes.

Intermediate 5-7 Hours

Materials Needed for Christmas hats for Mini penguins Amigurumi Pattern

— Main Fabric

  • 01
    Yarn Art Jeans (50g/160 m, 55% cotton / 45% acrylic, weight: Sport / Fine): color No 01 (white)
  • 02
    Yarn Art Jeans (50g/160 m): color No 07 (beige)
  • 03
    Yarn Art Jeans (50g/160 m): color No 35 (yellow)
  • 04
    Yarn Art Jeans (50g/160 m): color No 51 (dark red)
  • 05
    Yarn Art Jeans (50g/160 m): color No 69 (green)
  • 06
    Yarn Art Jeans (50g/160 m): color No 90 (red)
  • 07
    Yarn Art Jeans (50g/160 m): color No 92 (dark green)
  • 08
    Suitable alternatives: Alize cotton gold (55% cotton 45% acrylic, 100g/330m) and Schachenmayr Catania Originals (100% cotton, 50g/125m, 5 ply).

— Tools Required

  • 01
    Crochet hook size 2.25 mm (metal US B/1, GB 13)
  • 02
    Stuffing material (hollowfibre)
  • 03
    Yarn needle for sewing details
  • 04
    Scissors
  • 05
    Stitch marker

Progress Tracker

0% Complete

— Elf hat :

Info :

Use the yellow yarn.

Round 1 :

6sc in MR (6)

Round 2 :

6 inc (12)

Round 3-5 :

12sc (3 rounds) Stuff detail with stuffing material, continue crocheting.

Round 6 :

6 dec (6)

Round 7 :

(change to red yarn) 6sc (6) (Image 1)

Round 8 :

(1sc, inc)*3 times (9)

Round 9 :

(change to white yarn) (2sc, inc)*3 times (12)

Round 10 :

(3sc, inc)*3 times (15)

Round 11 :

(change to red yarn) (4sc, inc)*3 times (18)

Round 12 :

(5sc, inc)*3 times (21)

Round 13 :

(change to white yarn) (6sc, inc)*3 times (24)

Round 14 :

(7sc, inc)*3 times (27)

Round 15 :

(change to red yarn) (8sc, inc)*3 times (30)

Round 16 :

(9sc, inc)*3 times (33)

Round 17 :

(change to white yarn) (10sc, inc)*3 times (36)

Round 18 :

36sc

Round 19 :

(change to red yarn) 36sc

Round 20 :

36sc

Round 21 :

36sc

Round 22 :

(change to dark green yarn) 36sc

Round 23 :

BLO 36sc

Round 24 :

36sc

Info :

Thread secure, hide the end of the thread (Image 2-6).

— Brim :

Info :

Join dark green yarn with a slip knot in the last front loop remaining of rnd 23 at the bottom of the elf`s hat (Image 7) and work along the remaining front loops: (skip 1, crochet in one stitch: 2hdc + ch2 + slst in 1st ch (Image 8) + 2hdc)*9 times, slst into the stitch where you started crocheting the brim.

Info :

Cut the yarn and hide the end of the thread (Image 9).

— Santa hat :

Info :

Use the white yarn.

Round 1 :

6sc in MR (6)

Round 2 :

BLO 6 inc (12)

Round 3-5 :

BLO 12sc (3 rounds) Stuff detail with stuffing material, continue crocheting.

Round 6 :

BLO 6 dec (6)

Round 7 :

BLO (change to dark red yarn) 6sc (6) (Image 10)

Round 8 :

(1sc, inc)*3 times (9)

Round 9 :

9sc

Round 10 :

(2sc, inc)*3 times (12)

Round 11 :

12sc

Round 12 :

(3sc, inc)*3 times (15)

Round 13 :

15sc

Round 14 :

(4sc, inc)*3 times (18)

Round 15 :

18sc

Round 16 :

(5sc, inc)*3 times (21)

Round 17 :

21sc

Round 18 :

(6sc, inc)*3 times (24)

Round 19 :

24sc

Round 20 :

(7sc, inc)*3 times (27)

Round 21 :

27sc

Round 22 :

(8sc, inc)*3 times (30)

Round 23 :

30sc

Round 24 :

(9sc, inc)*3 times (33)

Round 25 :

(10sc, inc)*3 times (36)

Round 26 :

36sc

Round 27 :

36sc

Round 28 :

(change to white yarn) 36sc

Round 29 :

BLO 36sc

Round 30 :

BLO 36sc

Round 31 :

BLO 36sc, slst. (Image 11)

Info :

Cut the yarn and hide the end of the yarn (Image 12-15).

— Curls on the pompon :

Info :

Hold the hat with pompon facing upward, find the last remaining front loop of the 7th round, and insert the hook as show on Image 16.

Info :

Join white yarn and crochet: (ch1, 1slst in the next front loop)* repeat crochet curls in spiral into all front loops of the pompon, until you crochet the last front loop on the top. Crochet ch1 more and pull the end of yarn through the last stitch completely. Weave in the end of yarn of that ch1 into the pompon, using a needle. Don`t forget to weave in the end of the yarn sticking out from where you started crocheting the curls (Image 17-19).

— Curls on the Santa hat :

Info :

Hold the hat with pompon facing upward, find the last remaining front loop of the 31st round, and insert the hook as show on Image 20.

Info :

Join white yarn and crochet: (ch1, 1slst in the next front loop)* repeat crochet curls in spiral into all front loops of the 29th-31st rounds. Weave in the end of yarn from the beginning and the end of crocheting the curls on the wrong side of the hat (Image 21-22).

Info :

Bend the hat a little and sew it in place with a few stitches if you wish (Image 23-25).

— Christmas tree hat :

Info :

Use the dark green yarn.

Round 1 :

6sc in MR (6)

Round 2 :

(1sc, inc)*3 times (9)

Round 3 :

BLO 9sc

Round 4 :

(2sc, inc)*3 times (12)

Round 5 :

BLO 12sc

Round 6 :

(1sc, inc)*6 times (18)

Round 7 :

BLO 18sc

Round 8 :

(2sc, inc)*6 times (24)

Round 9 :

BLO 24sc

Round 10 :

(3sc, inc)*6 times (30)

Round 11 :

BLO 30sc

Round 12 :

(4sc, inc)*6 times (36)

Round 13 :

BLO 36sc

Round 14 :

36sc

Round 15 :

BLO 36sc

Round 16 :

36sc

Round 17 :

BLO 36sc, slst. (Image 26)

Info :

Cut the yarn and hide the end of the yarn (Image 27-31).

— Curls on the Christmas tree hat :

Info :

Hold the hat with the top facing down, find the first front loop of the 3rd round and insert the hook as shown on Image 32.

Info :

Join white yarn and crochet: (ch1, 1slst in the next front loop)* repeat crochet curls in spiral into all front loops of the 3rd-17th rounds (Image 33-35).

Info :

Weave in the end of yarn from the beginning and the end of crocheting the curls on the wrong side of the hat (Image 36-38).

— Star :

Info :

Use the yellow yarn. Crochet in MR: (1sc, picot stitch*, 1sc)* 5 times (Image 39-43).

Info :

picot stitch*: 1. Crochet 2 chains; 2. Insert your hook in the second chain from the hook; 3. Yarn over and draw the yarn through the stitch and through the loop on the hook.

Info :

Tighten the MR, bring the end of the yarn to the back of the star, fasten and cut off (Image 44-46). Leave the other end of the yarn for sewing on the hat.

Info :

Sew the star to the top of the hat (Image 47-49).

— Cookie hat :

Info :

Use the white yarn.

Round 1 :

6sc in MR (6)

Round 2 :

(1sc, inc)*3 times (9)

Round 3 :

(2sc, inc)*3 times (12)

Round 4 :

(3sc, inc)*3 times (15)

Round 5 :

(4sc, inc)*3 times (18)

Round 6 :

(5sc, inc)*3 times (21)

Round 7 :

(6sc, inc)*3 times (24)

Round 8 :

(7sc, inc)*3 times (27)

Round 9 :

(8sc, inc)*3 times (30)

Round 10 :

(9sc, inc)*3 times (33)

Round 11 :

(10sc, inc)*3 times (36)

Round 12 :

BLO (change to beige yarn) 36sc (Image 50-52)

Round 13-17 :

36sc (5 rounds), slst.

Info :

Cut the yarn and hide the end of the yarn.

— Glaze :

Info :

Hold the hat with the top facing down, find the first front loop of the 12th round, join white yarn and crochet: (ch4, stat in second chain from the hook: 3sc, 1slst in the next front loop, 2sc, ch2, stat in second chain from the hook: 1sc, 1slst in the next front loop, 2sc)* repeat 5 times, ch4, stat in second chain from the hook: 3sc, 1slst in the next front loop, 2sc, ch2, stat in second chain from the hook: 1sc, 1slst in the next front loop, 1sc (Image 53-58). Fasten off and leave a long yarn tail for sewing.

Info :

Sew the glaze to the hat (Image 59-61).

— Bead (decoration) :

Info :

Use the dark red yarn.

Round 1 :

6sc in the MR

Round 2 :

(1sc, inc)*3 times (9)

Round 3-4 :

9sc (2 rounds)

Round 5 :

(1sc, dec)*3 times (6), stuff detail with stuffing material.

Info :

Cut the yarn and guide it into each front loop of the last round using a needle inserted from the outer part of the detail (Image 62). Cut the yarn, fasten off the hole and leave a long yarn tail for sewing. (Image 63-64)

— Leaves (decoration) (make 2) :

Info :

Use the green yarn. Stitches are worked around both sides of the foundation chain. Ch4, in second chain from the hook:

Round 1 :

sc, picot stitch*, sc in next 2 stitches, picot stitch; another side of the chain: sc, picot stitch, sc in next 2 stitches, picot stitch, slst into the same sc (Image 65-67).

Info :

Sew the decoration to the hat (Image 68-69).

— Scarf (make 4) :

Info :

Use the green, dark red, dark green yarn. Crochet ch41:

Round 1 :

40 sc, ch1, turn the detail

Round 2 :

40 sc, ch1, turn the detail

Round 3 :

40sc.

Info :

Thread secure, hide the end of the thread (Image 70).

Assembly Instructions

  • Sew the star to the top of the Christmas tree hat using the yarn tail left from closing the MR, securing firmly through the top stitches (Image 47-49).
  • Sew the glaze piece to the cookie hat around the opening, matching the picot points and securing with small blind stitches so the glaze sits evenly (Image 59-61).
  • Attach the bead decoration by guiding the long yarn tail through the outer front loops as instructed, then sew the bead to the hat and hide ends inside the detail (Image 62-64).
  • Join brim to the elf hat by crocheting the brim along the remaining front loops (skip 1, 2hdc+ch2+slst in first ch+2hdc)*9 and finish with a slst to the start point, cut and hide ends (Image 7-9).
  • Sew leaves next to the bead or glaze using small stitches and position symmetrically; hide all ends inside the hat to finish the decoration (Image 65-69).

Important Notes

  • 💡The pattern is appropriate for those with basic-intermediate crochet and amigurumi skills, including how to switch and change yarn color and basic sewing.
  • 💡The pattern is written using US crochet terminology and is worked in a continuous spiral unless otherwise stated.
  • 💡SIZES: these hats are for toys with a head coverage of 14.5 cm (5.7-inches).
  • 💡Use a stitch marker or a piece of yarn to mark the beginning of a round and stuff your amigurumi as you go; stuffing used is hollowfibre.
  • 💡Fasten off your work always with needle join for a neat result and weave in ends as you go for tidy finishing.

These miniature Christmas hats are designed to dress up your mini penguins with instant festive charm. Each tiny hat is full of detail from brims and curls to glazed icing and tiny stars, handcrafted with simple crochet techniques. Make a set for gifts, tree decorations, or a playful seasonal display — they are delightful to give and even more fun to make! 🎄🧶✨

You ask,

we answer.

FAQs

What size will the finished piece be?

The hats are sized to fit toys with a head coverage of approximately 14.5 cm (5.7 inches) when using the recommended yarn and 2.25 mm hook.

Can I use different yarn weights for this pattern?

Yes, you can use different yarn weights, but this will change the final hat size. Adjust your hook size accordingly and make a gauge test to match dimensions.

Do I need prior crochet experience for this pattern?

This pattern is rated intermediate; you should be comfortable with single crochet, working in the round, increases and decreases, and basic finishing techniques.

How long does this project typically take to complete?

Most crafters can make a single mini hat in a short session; completing the full set of hats and decorations typically takes 5-7 hours overall depending on speed and detail work.