๐Ÿงถ Beautiful โœจ Detailed ๐Ÿ’ Adorable

Caron Crochet Halter Top Pattern

Caron Crochet Halter Top Pattern
4.9โ˜… Rating
5-7 Hours Time Needed
1.5K Made This
โœ‚๏ธ

Beginner Friendly Level

Perfect for those just starting their crochet journey, with clear instructions and simple techniques

โฑ๏ธ

Weekend Treat

Takes 5-7 hours, making it an enjoyable project to finish over a couple of days.

๐Ÿ‘•

Casual Chic

Relaxed style with a modern twist, perfect for everyday wear while maintaining that handcrafted uniqueness.

About This Caron Crochet Halter Top Pattern

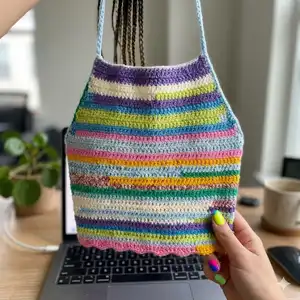
This pattern creates a striped crochet halter top worked flat and finished with side ties and neck ties. It uses simple double crochet rows and an easy stripe pattern to build shape and size. The design is written for multiple sizes and uses Caron Cinnamon Swirl Cakes for fun color changes.

Caron Crochet Halter Top Pattern crochet pattern - detailed view of completed project

The instructions include detailed row counts for XS/S up to 4/5XL and clear finishing steps for side ties and neck ties. Perfect for making a seasonal, handmade wardrobe piece.

Why You'll Love This Caron Crochet Halter Top Pattern

I absolutely love this pattern because it combines simple stitches with a striking striped look that lets the yarn do the work. The Caron Cinnamon Swirl Cakes give instant variegated color without complicated color changes, which makes the top both fun and fast to crochet. I appreciate how wearable and customizable the design is โ€” you can easily adjust length or stripe placement to suit your style. The finishing with side ties and neck ties creates a flattering, adjustable fit that works for many body types. Making one of these always feels like a small celebration of color and texture.

Caron Crochet Halter Top Pattern step 1 - construction progress Caron Crochet Halter Top Pattern step 2 - assembly progress Caron Crochet Halter Top Pattern step 3 - details and accessories Caron Crochet Halter Top Pattern step 4 - final assembly and finishing

Switch Things Up

I love changing the yarn to alter the look of this halter top; try a solid worsted weight for a classic look or a self-striping cake for built-in color changes.

You can easily adjust the length by working more or fewer repeat rows of the stripe pattern to create a crop or a longer tunic-style top.

To make a fitted version, go down a hook size and check your gauge; this will create a denser fabric with more shape.

For a breezier, more open look, use a larger hook and a lighter DK or sport weight yarn and adjust your stitch counts to maintain proportions.

I often add a decorative edging along the bottom like reverse single crochet or picot to make the hem pop and feel finished.

Swap the side ties for fitted straps by sewing or crocheting short straps into place if you prefer a permanent fit rather than ties.

Try embroidering small motifs or adding beads in selected stripes to personalize the top and add subtle texture and shine.

For festival-ready styling, make longer neck ties and braid the ends with contrasting yarns or add tassels for a playful finish.

I sometimes make matching accessories such as a headband or scrunchie using leftover yarn to create a coordinated set.

Want pockets or a built-in shelf bra? You can crochet a small lining or a separate shelf piece and sew it securely inside for added support and function.

Common Mistakes & How to Fix Them

โœ— Skipping the gauge check can dramatically change the finished fit; always make a swatch of 15 dc and 8 rows to match 4" (10 cm) before starting. โœ— Ignoring the Stripe Pattern sequence will make colors fall unevenly; follow With A 2 rows, With B 2 rows exactly to maintain consistent striping. โœ— Fastening off at the wrong time will prevent finishing ties correctly; do not fasten off and do not turn at end of last row as instructed. โœ— Not counting stitches after increases causes shaping errors; count stitches after each increase row and confirm totals for your size. โœ— Crocheting with inconsistent tension alters drape and size; maintain even tension throughout and adjust hook if necessary.

Caron Crochet Halter Top Pattern

Make a breezy, colorful halter top using Caron Cinnamon Swirl Cakes. This easy crochet pattern guides you through stripe placement, shaping and finishing so you can create a flattering, handmade top for warm weather. Perfect for making custom colorways and quick wardrobe updates.

Beginner Friendly 5-7 Hours

Materials Needed for Caron Crochet Halter Top Pattern

โ€” Main Fabric

  • 01
    Caron Cinnamon Swirl Cakes (8 oz/227 g; 407 yds/372 m)
  • 02
    Contrast A: Jellybeans (33049) - XS/S 1 ball, M 1 ball, L 1 ball, XL 1 ball, 2/3XL 1 ball, 4/5XL 2 balls
  • 03
    Contrast B: Sour Lime (33054) - XS/S 1 ball, M 1 ball, L 1 ball, XL 1 ball, 2/3XL 1 ball, 4/5XL 2 balls

โ€” Tools Required

  • 01
    Size U.S. G/6 [4 mm] Susan Bates Silvalume crochet hook or size needed to obtain gauge
  • 02
    Susan Bates yarn needle

Progress Tracker

0% Complete

โ€” Abbreviations :

Infos :

Beg = Beginning. Ch = Chain(s). Cont = Continue(ity). Dc = Double crochet. Pat = Pattern. Rem = Remain(ing). Rep = Repeat. Sc = Single crochet. Sl st = Slip stitch. St(s) = Stitch(es).

โ€” Materials :

Item :

Caronยฎ Cinnamon Swirl Cakesโ„ข (8 oz/227 g; 407 yds/372 m).

Infos :

Contrast A Jellybeans (33049): XS/S 1, M 1, L 1, XL 1, 2/3XL 1, 4/5XL 2 ball(s). Contrast B Sour Lime (33054): XS/S 1, M 1, L 1, XL 1, 2/3XL 1, 4/5XL 2 ball(s). Size U.S. G/6 [4 mm] Susan Batesยฎ Silvalumeยฎ crochet hook or size needed to obtain gauge. Susan Batesยฎ yarn needle.

โ€” Sizes :

Info :

To fit chest measurement XS/S 28-34" [71-86.5 cm] M 36-38" [91.5-96.5 cm] L 40-42" [101.5-106.5 cm] XL 44-46" [112-117 cm] 2/3XL 48-54" [122-137 cm] 4/5XL 56-62" [142-157.5 cm].

โ€” Gauge :

Info :

15 dc and 8 rows = 4" [10 cm].

โ€” Instructions :

Info :

The instructions are written for XS/S. If changes are necessary for larger sizes the instructions will be written XS/S (M-L-XL-2/3XL-4/5XL). When only one number is given, it applies to all sizes.

โ€” Stripe Pat :

Info :

With A, work 2 rows. With B, work 2 rows. These 4 rows form Stripe Pat. Note: Ch 2 at beg of rows does not count as st.

โ€” Body :

Round 1 :

With A, ch 36 (40-43-47-49-51).

Round 2 :

1 dc in 3rd ch from hook. 1 dc in each ch to end of chain. Turn. 34 (38-41-45-47-49) dc.

Info :

First row of Stripe Pat is now in place.

Info :

Proceed as follows, keeping cont of Stripe Pat:

Info :

Sizes M, L, XL, 2/3XL and 4/5XL only:

Next row :

Ch 2. 1 dc in first dc. 3 dc in next dc. 1 dc in each st to last 2 sts. 3 dc in next st. 1 dc in last st. Turn. (42-45-49-51-53) dc.

Repeat :

Rep last row (3-7-10-15-22) times more. (54-73-89-111-141) dc.

Next row :

All sizes: Ch 2. 1 dc in first st. 2 dc in next st. 1 dc in each st to last 2 sts. 2 dc in next sc. 1 dc in last st. Turn. 36 (56-75-91-113-143) dc.

Repeat :

Rep last row 26 (23-21-20-17-13) times more. 88 (102-117-131-147-169) dc. Do not fasten off and do not turn at end of last row.

โ€” Side Ties :

Item Name (P1) :

Ch 45 (45-51-60-68-75). Fasten off. Do not turn. With same side of work facing as last row, re-join appropriate yarn with sl st to first dc. Ch 47 (47-53-62-70-77).

Next row :

1 dc in 3rd ch from hook. 1 dc in each of next 44 (44-50-59-67-74) ch. 1 dc in each of next 88 (102-117-131-147-169) dc. 1 dc in each of next 45 (45-51-60-68-75) ch. Fasten off.

โ€” Side Finishing and Neck Ties :

Info :

With same side of work facing as last row, join B with sl st to top corner of Body.

1st row :

Ch 46 (46-52-61-69-75) for Neck Tie. 1 sc in 2nd ch from hook. 1 sc in each of next 44 (44-50-59-67-73) ch. Work sc evenly down side of Body to Side Tie. Work 1 sc in back loop only of next 45 (45-51-60-68-75) foundation ch of Side Tie. Fasten off.

Info :

With opposite side of work facing, rep instructions for 1st row on opposite side of Body.

Assembly Instructions

  • Do not fasten off at end of last body row; this allows you to create Side Ties by chaining from the live edge as instructed.
  • Make Side Ties by chaining the specified number for your size, fasten off, then rejoin and work back across ties and body to secure edges.
  • Join Contrast B with a slip stitch to the top corner of the Body to begin Neck Tie finishing, then work single crochet along the neck tie chain and down the body side.
  • Work single crochet in back loop only of the foundation chain of the Side Tie to create a finished edge before fastening off.
  • Repeat the neck tie finishing on the opposite side with the other end of the body so both sides are symmetrical and secure.

Important Notes

  • ๐Ÿ’กNote that Ch 2 at the beginning of rows does not count as a stitch for this pattern.
  • ๐Ÿ’กDo not fasten off and do not turn at the end of the last body row when instructed, so you can create side ties from the live edge.
  • ๐Ÿ’กKeep continuity of the Stripe Pattern (2 rows A, 2 rows B) throughout to maintain consistent striping.
  • ๐Ÿ’กWork sc in back loop only on the foundation chain of the side tie when finishing to create a neat edge.

This cheerful halter top pattern combines easy double crochet shaping with bright, swirled color from Caron Cinnamon Swirl Cakes. It is perfect for warm-weather wardrobes and makes a quick, satisfying make for dedicated crocheters. Customize colors and length to make a truly unique, handmade piece. ๐Ÿงถโœจ

You ask,

we answer.

FAQs

What size will the finished piece be?

The pattern is written to fit chest measurements from XS/S (28-34") up to 4/5XL (56-62"). See the sizes section for exact measurements per size.

Can I use different yarn weights for this pattern?

You can substitute yarn, but the finished size and drape will change. If using a different weight, make a gauge swatch and adjust hook size to match 15 dc and 8 rows = 4" (10 cm).

Do I need prior crochet experience for this pattern?

This pattern is beginner friendly and primarily uses double crochet and single crochet, but basic knowledge of increases and reading size brackets is recommended.

How long does this project typically take to complete?

Most crocheters complete this project in 5-7 hours, though time may vary depending on size and experience level.