🧢 Beautiful ✨ Detailed πŸ’ Adorable

Caron Crochet Hair Bandana Pattern

Caron Crochet Hair Bandana Pattern
4.5β˜… Rating
2-3 Hours Time Needed
1.5K Made This
βœ‚οΈ

Beginner Friendly Level

Perfect for those just starting their crochet journey, with clear instructions and simple techniques

⏱️

Bite-Sized Project

Finishes in 2-4 hoursβ€”perfect for an afternoon of creative relaxation.

🧣

Snug Essential

Everyday comfort with practical charm, designed for both functionality and style through changing seasons.

About This Caron Crochet Hair Bandana Pattern

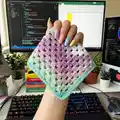
This pattern creates a lightweight, triangular crochet hair bandana worked in Caron Skinny Cakes yarn for a lovely gradient effect. The design uses simple double crochet groups and chain spaces to form the triangle, finishing with single crochet ties. It is an easy project well-suited to beginners wanting a quick wearable accessory.

Caron Crochet Hair Bandana Pattern crochet pattern - detailed view of completed project

Worked from the top centre out to the long bottom edge, the bandana measures approximately 11" deep by 22" long excluding ties. The pattern includes a clear diagram for rows 1-4 and written instructions for continuing the pattern to the desired length.

Why You'll Love This Caron Crochet Hair Bandana Pattern

I absolutely love this pattern because it turns a single ball of gradient yarn into a fashionable and functional accessory. I enjoy how quickly the triangle grows with simple double crochet groups, making progress very satisfying to see. The Caron Skinny Cakes color transitions add beautiful visual interest without changing yarn. I also appreciate that the ties are worked simply with single crochet for a neat, durable finish.

Caron Crochet Hair Bandana Pattern step 1 - construction progress Caron Crochet Hair Bandana Pattern step 2 - assembly progress Caron Crochet Hair Bandana Pattern step 3 - details and accessories Caron Crochet Hair Bandana Pattern step 4 - final assembly and finishing

Switch Things Up

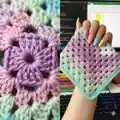
I love experimenting with colorways for this bandana pattern; using a different Caron Skinny Cakes shade completely changes the look.

I sometimes make the triangle larger by adding more rows until the bottom edge reaches the size I want.

I also try smaller versions by using thinner yarn and a smaller hook to create mini bandanas or headscarves for dolls.

I often change the ties to braided cords instead of single crochet chains for a different finish and texture.

I like to add a contrasting single crochet border around the triangle to frame the colors and give a neat finished edge.

I sometimes embroider a small motif near one corner for personalization, which gives each piece a handmade signature.

I recommend trying tassels or pom-poms on the ends of the ties for a playful boho look that suits summer styles.

I will occasionally block the bandana to open the stitches and get a smoother triangle shape, especially when using acrylic yarn.

I sometimes substitute a light sport-weight yarn and increase hook size slightly to make a softer, drapier bandana ideal for spring weather.

I encourage you to mix solids and gradients by working a few rows in a solid color for a band of contrast within the gradient cake.

Common Mistakes & How to Fix Them

βœ— Joining the initial chain into a ring too tightly can distort the center point; leave a small opening and adjust the tail to close neatly when you turn the first round. βœ— Forgetting to count stitches at the end of each row will throw off the pattern shaping; count the dc groups and chain spaces each row to ensure correct increases at the corners. βœ— Working inconsistent tension during the pattern causes uneven edges and an irregular triangle; maintain even tension and match the gauge by using the recommended hook or adjusting size. βœ— Skipping the chain-1 spaces between dc groups will change the stitch count and shape; always work the ch-1 spaces exactly where instructed to preserve the pattern geometry. βœ— Attaching ties unevenly or with mismatched lengths can make the bandana sit crooked; measure and mark the center and ends before working ties so they line up symmetrically.

Caron Crochet Hair Bandana Pattern

Make a stylish, lightweight crochet hair bandana using Caron Skinny Cakes for an easy, colorful accessory. This pattern creates a triangular bandana with neat ties that frame your hairstyle perfectly. Youll follow a simple granny-style double crochet pattern and finish with single crochet ties for a secure fit. Perfect for gifting or adding a handmade accent to your wardrobe.

Beginner Friendly 2-3 Hours

Materials Needed for Caron Crochet Hair Bandana Pattern

β€” Main Fabric

  • 01
    Caron Skinny Cakes (8.8 oz/250 g; 795 yds/727 m) - Cupcake (18072) - 1 ball (one ball will make 6 Hair Bandanas)
  • 02
    Use main gradient color shown or choose any Cake-style gradient yarn for similar effect

β€” Tools Required

  • 01
    Crochet hook size H/8 (5 mm) Susan Bates Silvalume or size needed to obtain gauge
  • 02
    Susan Bates yarn needle
  • 03
    Scissors
  • 04
    Measuring tape or ruler
  • 05
    Stitch markers (optional for marking bottom edge or center)

Progress Tracker

0% Complete

β€” Abbreviations :

Infos :

Approx = Approximately. Beg = Beginning. Ch = Chain(s). Dc = Double crochet. Pat = Pattern. Rep = Repeat. RS = Right side. Sc = Single crochet. Sl st = Slip stitch. Sp = Space.

β€” Measurements :

Info :

Approx 11" [28 cm] deep x 22" [56 cm] long, excluding ties.

β€” Gauges :

Info :

15 sc and 16 rows = 4" [10 cm]. 5 dc-groups and 9 rows = 4" [10 cm] in pat.

β€” Instructions :

Info :

See diagram on page 2. Ch 5. Join with sl st to first ch to form ring.

1st row :

(RS). Ch 3 (counts as dc here and throughout). (2 dc. Ch 2. 3 dc) in ring. Turn.

2nd row :

Ch 3. 2 dc in first dc. Ch 1. (3 dc. Ch 2. 3 dc) in next ch-2 sp (corner). Ch 1. 3 dc in last dc. Turn.

3rd row :

Ch 3. 2 dc in first dc. Ch 1. 3 dc in next ch-1 sp. Ch 1. (3 dc. Ch 2. 3 dc) in corner ch-2 sp. Ch 1. 3 dc in next ch-1 sp. Ch 1. 3 dc in top of beg ch. Turn.

4th row :

Ch 3. 2 dc in first dc. (Ch 1. 3 dc in next ch-1 sp) to corner ch-2 sp. Ch 1. (3 dc. Ch 2. 3 dc) in corner ch-2 sp. Ch 1. (3 dc in next ch-1 sp) to beg ch 3. 3 dc in top of beg ch. Turn.

Info :

Rep last row for pat until piece measures approx 22" [56 cm] along bottom edge. Fasten off.

β€” Ties :

Info :

Ch 50. With RS facing, work 1 row of sc evenly across bottom edge of Bandana. Ch 51. Turn.

1st row :

1 sc in 2nd ch from hook. 1 sc in each of next 49 ch. 1 sc in each sc across bottom edge of Bandana. 1 sc in each of next 50 ch. Fasten off.

β€” Stitch Key :

Infos :

o = chain (ch). β€’ = slip stitch (sl st). T (vertical) = double crochet (dc).

Assembly Instructions

  • Work ties as instructed: Chain 50 for each tie and, with RS facing, work a row of single crochet evenly across the bottom edge to join each tie into place, then finish the chains for the free ends and fasten off.
  • Block the bandana lightly to even out the triangle shape and open up the stitch pattern before weaving in ends for a neater finish.
  • Weave in all yarn tails using the Susan Bates yarn needle, burying ends into the bandana and trimming flush so they do not show on the RS.
  • Center the bandana on your head with the point facing back and tie the ends in a secure knot; adjust tie lengths before trimming any excess.
  • If wearing as a headscarf, ensure ties are of even length on both sides; measure and adjust while the bandana is flat to keep symmetry.

Important Notes

  • πŸ’‘Use the recommended hook size or adjust to achieve gauge; a different hook will change finished size and drape.
  • πŸ’‘Place a stitch marker at the center of the starting ring if you need to keep track of the beginning of the rows.
  • πŸ’‘Work the chain-2 corners and ch-1 spaces exactly as written to maintain the correct triangular shape.

This crochet hair bandana pattern turns one ball of gradient yarn into a wearable, colorful accessory that is quick and satisfying to make. The simple double crochet groups create a classic triangular shape that flatters every hairstyle and is easy to customize. Have fun making multiple colorways and gifting them to friends and family β€” happy crocheting! 🧢✨

You ask,

we answer.

FAQs

What size will the finished piece be?

The finished bandana measures approximately 11" (28 cm) deep by 22" (56 cm) long along the bottom edge, excluding ties, when using the recommended yarn and hook size.

Can I use different yarn weights for this pattern?

Yes, you can use different yarn weights, but this will affect the final size and drape; adjust your hook size accordingly and check gauge to ensure a similar finished measurement.

Do I need prior crochet experience for this pattern?

This pattern is rated beginner friendly and uses basic stitches like double crochet, chain, and single crochet, so basic crochet knowledge is recommended.

How long does this project typically take to complete?

Most crocheters finish this bandana in about 2-3 hours, though time may vary based on experience level and working speed.