🧢 Beautiful ✨ Detailed πŸ’ Adorable

Bunny Garland Pattern

Bunny Garland Pattern
4.4β˜… Rating
2-3 Hours Time Needed
2.7K Made This
βœ‚οΈ

Beginner Friendly Level

Perfect for those just starting their crochet journey, with clear instructions and simple techniques

⏱️

Bite-Sized Project

Finishes in 2-4 hoursβ€”perfect for an afternoon of creative relaxation.

🏑

Cozy Accent

A warm touch for your space that transforms ordinary corners into inviting nooks filled with handmade charm.

About This Bunny Garland Pattern

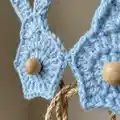
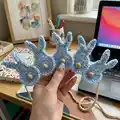
This pattern creates a small bunny-shaped crochet motif that you can attach to a cord to make a decorative garland. Each bunny is quick to make and uses only a few grams of yarn, perfect for using up scraps. The finished garland is charming for nurseries, baby showers, seasonal displays, or as a heartfelt handmade gift.

Bunny Garland Pattern crochet pattern - detailed view of completed project

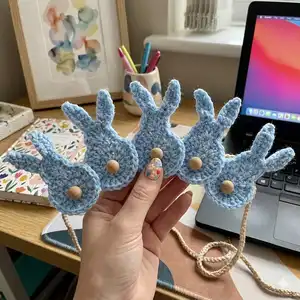
Includes step-by-step instructions for the body, ears and how to attach each bunny to a cord. Photographs accompany the instructions to help you visualise each stage and finish with a pompom tail.

Why You'll Love This Bunny Garland Pattern

I absolutely love this pattern because it is quick, satisfying, and uses very little yarn for a delightful result. I enjoy how easily you can make several bunnies in one sitting and turn them into a beautiful garland. The simplicity of the design makes it accessible for beginners while still producing a charming finished piece. I also love that you can customise the colours and spacing to suit any decor or occasion.

Bunny Garland Pattern step 1 - construction progress Bunny Garland Pattern step 2 - assembly progress Bunny Garland Pattern step 3 - details and accessories Bunny Garland Pattern step 4 - final assembly and finishing

Switch Things Up

I love that you can personalise this pattern in so many ways β€” change colours to match a nursery theme or seasonal palette.

You can make the bunnies bigger or smaller by using a different yarn weight and adjusting your hook size; for a chunkier garland try a bulkier yarn and a larger hook.

I often vary the pompom colour or use tiny felt circles instead for a different texture on the tail.

You can also swap the chain cord for a braided yarn cord or ribbon to create a softer hanging option that matches your room decor.

I sometimes add a tiny embroidered nose or eyes with contrasting yarn to give each bunny a personality.

If you want an even cuter look, make mini scarves or little bows to glue under each pompom tail β€” quick, decorative extras.

Try alternating two colours of bunnies for a striped effect across the garland; alternate placement as you stitch them on the cord.

I recommend testing the spacing on a mock-up before attaching all bunnies so you can visualise the finished length and adjust chain counts accordingly.

For gifting, I like to make a set of three bunnies and package them with a matching small card β€” it makes a beautiful handmade present.

Finally, consider hanging dozens for a party backdrop or a single row for subtle nursery decor β€” the pattern adapts easily to different projects.

Common Mistakes & How to Fix Them

βœ— Skipping the magic ring closure can leave a visible hole in the centre; pull the tail tightly to close the ring and join with a slip stitch to secure the centre. βœ— Starting rounds without marking the beginning stitch can cause uneven stitch counts; place a stitch marker at the first stitch of each round to keep track of your rounds. βœ— Forgetting to place the ears in the correct Tc positions will make them look off-centre; count carefully and place ears in the 3rd and 5th Tc as instructed. βœ— Attaching the cord too tight can bend the bunny neck and distort the shape; use a gentle slip stitch to attach and maintain a relaxed cord tension. βœ— Using too-large pompoms will overwhelm the bunny body; choose small pompoms approximately 1 cm in diameter and secure with fabric glue. βœ— Not weaving in ends neatly makes the back look messy; weave in ends carefully and trim excess yarn for a tidy finish.

Bunny Garland Pattern

Make a sweet, simple bunny garland to decorate a nursery, baby shower, or seasonal display. This pattern is quick to work up and uses very small amounts of yarn for each bunny, making it ideal for gift sets or multiple decorations. Clear step-by-step photos and instructions guide you through each stitch and assembly step so you can create a charming handmade garland with ease.

Beginner Friendly 2-3 Hours

Materials Needed for Bunny Garland Pattern

β€” Main Fabric

  • 01
    Cotton yarn suitable for a 3.5 mm crochet hook (main bunny colour)
  • 02
    Approximately 5 grams of blue yarn for each bunny
  • 03
    Approximately 5 grams of soft brown (or desired colour) yarn for the cord
  • 04
    Small pompoms, approx 1 cm diameter (for tails)
  • 05
    Fabric or crafts glue to secure pompoms

β€” Tools Required

  • 01
    Crochet hook 3.5 mm
  • 02
    Cotton yarn (small amounts per bunny)
  • 03
    Small pompoms (approx 1 cm diameter)
  • 04
    Fabric or crafts glue
  • 05
    Yarn needle for weaving in ends
  • 06
    Scissors

Progress Tracker

0% Complete

β€” Bunny :

Row 1 :

On a magic ring Ch 2 (counts as a double crochet) and then add 11 Dc into the ring (12 stitches in total). Pull the thread to close the ring and join with a Sst.

Row 2 :

Ch 2 (counts as a double crochet) and then add 1 Dc in the same stitch from Row 1. Continue adding two Dc over each of the stitches from Row 1 (24 stitches in total). Join with a Sst.

Row 3 :

Now you need to make the head of the bunny. Skip one stitch from previous row and in the next stitch add 7 Tc (into the same stitch). Skip one stitch and Sst in the following one.

Info :

The ears will be located in the 3rd and 5th Tc (from left to right) of the bunny head, as shown in the photos.

β€” Ears :

Step 1 :

Turn the back side of the bunny body towards you and Sst back from where you ended the bunny head to where you will start your first ear (3 Sst).

Step 2 :

Ch 7

Step 3 :

Skip the first chain and then Sc on the next two chains from hook and Dc in the following four chains (6 stitches in total over the chain). Sst in the same stitch from previous row (exactly where you started the chain).

Step 4 :

Sst over the next two stitches from previous row (effectively positioning your crochet hook in place to start the second ear).

Step 5 :

Make the second ear just as you made the first one.

Info :

Weave in ends and your bunny is finished! Turn it back to the front before adding the pompom tail.

Info :

Now glue the pompom over the center of the body of the bunny.

Info :

Make as many bunnies as you want for your garland.

β€” Garland :

Step 1 :

To make the garland, Ch 50 and then Sst over the back of the first bunny, at the "neck" area.

Step 2 :

Ch 30 and do the same to the next bunny.

Step 3 :

Repeat until you have all the bunnies attached to the cord. Finish with a Ch 50 to match the initial chain. You may or may not want to weave in the ends of the cord on either side.

Info :

If you need a longer or shorter piece of cord at each end or a wider/smaller space between the bunnies, adjust the number of chains accordingly.

Assembly Instructions

  • Glue a small pompom to the centre of each bunny body using fabric or crafts glue and allow to dry completely.
  • For each bunny, attach the cord by making a chain (see chaining instructions) and slip stitching over the back at the neck area so the bunny hangs at the desired position.
  • Space bunnies along the cord with approximately Ch 30 between bunny attachments as shown, adjusting chain length to suit your spacing preference.
  • Finish the garland by chaining to match the initial Ch 50 on both ends, then weave in ends or trim as desired for a clean finish.

Important Notes

  • πŸ’‘Use the recommended 3.5 mm hook for best gauge and to keep the bunnies small and crisp.
  • πŸ’‘Place ears carefully in the 3rd and 5th Tc of the head to keep them centred and symmetrical.
  • πŸ’‘Allow glue to fully dry before handling the garland to prevent pompoms from shifting or falling off.
  • πŸ’‘Adjust chain lengths between bunnies to change spacing and overall garland length to suit your display area.

This charming Bunny Garland Pattern is a delightful and easy-to-make decoration for nurseries and seasonal displays. Each bunny uses only a tiny amount of yarn, making it perfect for scrap yarn and quick gifts. Create a string of bunnies to hang across a mantel, window, or party backdrop and enjoy your handmade decor. 🐰✨🧢

You ask,

we answer.

FAQs

What size will the finished piece be?

Each bunny measures approximately 11 cm (4.3 inches) tall and 5 cm (1.9 inches) wide; the sample garland with 5 bunnies is about 95 cm (37.4 inches) long including the cord.

What hook and yarn should I use?

Use a 3.5 mm crochet hook with cotton yarn suitable for that hook size to achieve the sample size and stitch definition shown in the photos.

Can I change the spacing between bunnies?

Yes, adjust the number of chains between each bunny (the pattern suggests Ch 30 between attachments) to increase or decrease spacing as needed.

Is this pattern suitable for beginners?

Yes, this is beginner friendly and uses basic stitches (Ch, Sc, Dc, Tc, Sst) with step-by-step photos to guide you through each stage.