🧶 Beautiful ✨ Detailed 💝 Adorable

Bunny Bag Pattern

Bunny Bag Pattern
4.8★ Rating
2-4 Hours Time Needed
1.7K Made This
✂️

Intermediate Level

Ideal for those with basic crochet experience, featuring slightly more advanced stitches and techniques to expand your skills.

⏱️

Bite-Sized Project

Finishes in 2-4 hours—perfect for an afternoon of creative relaxation.

Stylish Touch

An elegant detail to elevate any look, combining traditional techniques with contemporary design sensibilities.

About This Bunny Bag Pattern

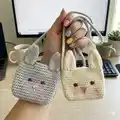
This pattern creates a small, adorable bunny-shaped crossbody bag worked mainly in half double crochet. It includes instructions for the body, tiny closure flap, ears, cord strap, embroidered nose and sewn-on eyes. The design uses a cord crochet strap and a little wooden button closure to keep things secure and child-friendly.

Bunny Bag Pattern crochet pattern - detailed view of completed project

Clear step-by-step rounds and supporting photos guide you through each piece and the final assembly. The finished bag measures approximately 11cm by 13cm when using the suggested materials.

Why You'll Love This Bunny Bag Pattern

I absolutely love this pattern because the little bunny face is both simple and full of personality — the embroidered nose and blush bring it to life. I enjoy the cord strap technique; it makes a neat, durable strap that feels high-quality. Sewing the ears into the flap gives a charming raised effect that kids adore. The project is compact so I can finish one in an afternoon and gift it immediately.

Bunny Bag Pattern step 1 - construction progress Bunny Bag Pattern step 2 - assembly progress Bunny Bag Pattern step 3 - details and accessories Bunny Bag Pattern step 4 - final assembly and finishing

Switch Things Up

I love to change colors — try pastel pinks, mint greens, or even stripes for a playful twist on the bunny bag.

I sometimes swap the main yarn for a slightly thicker cotton to make a chunkier bag; use a larger hook and expect a bigger finished size.

I also experiment with different strap styles: use a braided cord, a chain strap, or a stitched strap for varied looks.

I add felt inner linings for extra durability and to protect small objects inside the bag.

I often embroider little patterns on the flap, like tiny hearts or initials, to personalize each bag as a gift.

I switch eye styles too — either embroidered eyes, small safety eyes (for older children), or tiny crocheted circles for a softer look.

I vary ear shapes: make them longer and floppy or shorter and rounded to change the bag's character.

I sometimes add a keyring or clip to the strap so the bag can attach to larger bags or strollers for convenience.

I recommend trying metallic or textured yarn for a dressier version that shines for special occasions.

I also play with closure types: a snap button, magnetic clasp, or a decorative toggle instead of the wooden button for different finishes.

Common Mistakes & How to Fix Them

✗ Skipping the slip stitch at the end of rounds can make your row join inconsistent; always finish rounds with a slst and begin new rounds as instructed. ✗ Not counting chains when starting the foundation can cause incorrect stitch counts later; count carefully and start into the third chain when instructed. ✗ Cutting the strap yarn before sewing can make assembly awkward and fragile; leave enough yarn and sew the strap without cutting until the ears are secured. ✗ Attaching ears without matching front and back loops will look untidy; sew the back of the ear to the back loop and the front to the front loop for a clean finish. ✗ Placing eyes too high or too close together will unbalance the face; count rows from the top and space eyes as instructed (sew to the 7th row with a distance of 7 hdc).

Bunny Bag Pattern

Make a charming little bunny-shaped bag that doubles as a cute accessory for kids and bunny lovers. This pattern walks you through each step — body, closure, ears, strap, eyes and nose — with clear photos and simple shaping. Youll enjoy the cord strap technique and the tiny embroidered details that bring the bunny to life. Perfect for gifting or carrying small treasures.

Intermediate 2-4 Hours

Materials Needed for Bunny Bag Pattern

— Main Fabric

  • 01
    Alize Cotton Gold Practica yarn - Color 63 Cream - 220m/100g (main color, approximately one skein or equivalent)
  • 02
    Catania brand pink yarn - small amount for nose and blush details (or similar thin yarn)
  • 03
    Catania brand brown yarn - small amount for eyes (or similar thin yarn)
  • 04
    Optional: additional colors for variations (small amounts)

— Tools Required

  • 01
    Crochet hook size 3.0 mm
  • 02
    Crochet hook size 3.5 mm
  • 03
    Crochet hook size 2.2 mm
  • 04
    Wooden button (for closure)
  • 05
    Needle for sewing/embroidery
  • 06
    Scissors
  • 07
    Powder crayon or powder blush for cheek and ear coloring (optional)
  • 08
    Stitch markers (useful to mark beginning of rounds)
  • 09
    Yarn tail for sewing and assembly

Progress Tracker

0% Complete

— Bunny Body :

Info :

-- Make a slst at the end of each round and begin with ch2 at the beginnings new round. With cream color yarn and 3mm hook;

Info :

-- Ch22, turn back and starting from 3rd;

Round 1 :

1- 19hdc, into same st; 4hdc, Continue with otherside 18hdc, into last st; 3hdc (44)

Round 2 :

2- (20hdc, 2hdcinc)*2 (48)

Round 3-14 :

3-14 (12 rounds) 48hdc (48)

Info :

-- Fasten off and cut the yarn.

— Tiny Closure Piece :

Info :

-- Now we're going to crochet a tiny closure piece for the bag. -- Make a slst at the end of each round and begin with ch2 at the beginnings new round.

Info :

-- Count back at the finishing point and add yarn to the 15th stitch.

Round 1-6 :

1-6 (6 rounds) 8hdc

Round 7 :

7- 2hdc, ch3 (skip 3sts) starting from 4th; 3hdc.

Info :

-- Now sew a wooden button on the back. Now you can close your bag whenever you want

— Bunny Ears :

Info :

-- Make 2 of them. With cream color yarn and 3mm hook; -- Make a slst at the end of each round and begin with ch2 at the beginnings new round.

Round 1 :

1- Into MR 6hdc (6)

Round 2 :

2- (2hdc, 1hdcinc)*2 (8)

Round 3 :

3- (3hdc, 1hdcinc)*2 (10)

Round 4 :

4- (1hdc, 1hdcinc)*5 (15)

Round 5-10 :

5-10 (6 rounds) 15hdc (15)

Info :

-- Fasten off with a slst and cut the yarn long for sewing.

Info :

-- Fasten the ears to the 7 loops on both sides of the tiny flap in the middle of the bag. Sew the back of the ear to the back loop and the front to the front loop. You can get support from the photos.

— Bag Strap :

Info :

-- With cream color yarn and 3.5mm hook; I crocheted with the cord technique -> When starting, leave enough yarn for sewing. Ch2, skip first st and crochet 1sc. Rotate the cord and crochet 1sc into the loop I showed in the photo. Turn it again and from two loops insert your hook under them, crochet 1sc. We will do the same until we reach 85cm in length. -- You can get support from photos.

Info :

-- My friend's youtube video will help you with this. Link is here. https://youtu.be/9VfL0iB7308

Info :

-- Sew the strap just side the ears. Don't cut the yarn! Sew the strap with two rows of ears and fasten them together. This way the ears will not fall off.

— Bunny Eyes :

Info :

-- Make 2 of them. With brown color yarn and 2.2mm hook;

Round 1 :

1- Into MR 6sc

Info :

-- Fasten off and cut the yarn long for sewing. Count from top to bottom. Sew the eyes to the 7th row with a distance of 7hdc

— Nose :

Info :

-- Embroider a tiny nose as in the photo with pink yarn and needle.

Info :

-- Finally, you can color the cheeks and ears if you want. I used make-up blush because I didn't want it to be permanent.

Assembly Instructions

  • Sew the tiny closure flap to the back top edge and attach a wooden button on the back to match the flap so the bag closes securely.
  • Fasten each ear to the 7 loops on both sides of the tiny flap in the middle of the bag; sew the back of the ear to the back loop and the front of the ear to the front loop for a tidy, raised effect.
  • Sew the cord strap to the bag beside the ears, without cutting the strap yarn; secure the strap with two rows of stitching through the ear rows so the ears and strap are fastened together and wont fall off.
  • Sew the small crocheted brown eyes to the 7th row down from the top, spacing them 7 hdc apart, using long yarn tails left after fastening off.
  • Embroider the tiny pink nose centered between the eyes using pink yarn and a needle; finish by adding optional blush to cheeks and inner ears with powder crayon or removable makeup.
  • Weave in and tidy all ends behind the face and trim any excess threads for a clean finished look.

Important Notes

  • 💡Make a slip stitch at the end of each round and begin new rounds with ch2 as specified to keep row joins neat.
  • 💡Chains at the beginning of the rounds won't be counted as hdc, so start your stitches into the correct chain or stitch as directed.
  • 💡Use a stitch marker or a short piece of contrasting yarn to mark the beginning of rounds to avoid losing track of your stitch placement.
  • 💡Leave long tails when fastening off pieces intended for sewing so you have enough yarn for secure attachment during assembly.
  • 💡When sewing the strap beside the ears, do not cut the yarn before securing to ensure the strap and ear rows are fastened together strongly.

This sweet Bunny Bag pattern is a lovely little project that makes a perfect gift or a fun accessory for little ones. 🐰🧶 The cord strap and tiny embroidered face give it a professional, handmade touch that youll be proud to gift. Try making a few in different colors to create a whole bunny family! 😊

You ask,

we answer.

FAQs

What size will the finished piece be?

The finished bag will be approximately 11cm length and 13cm width when using the recommended yarn and hooks (ears not included in width).

Can I use a different yarn weight?

Yes, you can use a different yarn weight but the final size and stitch counts will change; adjust your hook accordingly and expect a different finished measurement.

Do I need to know special stitches for this pattern?

This pattern uses basic stitches like chain, single crochet and half double crochet along with increases and working in the magic ring; basic experience with these is recommended.

How long does this project typically take?

Most crocheters finish this bite-sized project in about 2-4 hours depending on experience and whether you make both ears and the strap the first time.

Is the blush on cheeks permanent?

No, the pattern suggests using powder crayon or removable makeup blush so the coloring is optional and not permanent.