🧢 Beautiful ✨ Detailed πŸ’ Adorable

Bumble Blossom Black Eyed Susan Amigurumi Pattern

Bumble Blossom Black Eyed Susan Amigurumi Pattern
4.7β˜… Rating
5-7 Hours Time Needed
3.8K Made This
βœ‚οΈ

Intermediate Level

Ideal for those with basic crochet experience, featuring slightly more advanced stitches and techniques to expand your skills.

⏱️

Weekend Treat

Takes 5-7 hours, making it an enjoyable project to finish over a couple of days.

🧸

Cute Companion

An adorable friend to cherish, handcrafted with love to bring comfort and joy for years to come.

About This Bumble Blossom Black Eyed Susan Amigurumi Pattern

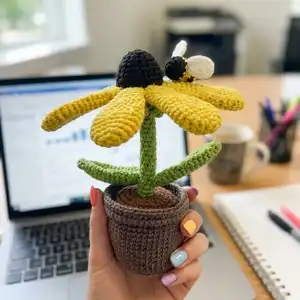
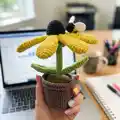
This pattern teaches you to crochet a Black Eyed Susan blossom with seven petals, a textured center, stem, leaves, a potted base with removable dirt, and a tiny bumblebee. The design uses sport weight yarn and simple shaping to create sculpted petals and a sturdy stem. Photographs and step-by-step assembly notes help you position petals and leaves for a polished finish.

Bumble Blossom Black Eyed Susan Amigurumi Pattern crochet pattern - detailed view of completed project

All pieces are worked in the round with clear round counts and finishing instructions. The pot includes a cardboard base for extra stability and a sewn-in dirt piece to anchor the flower.

Why You'll Love This Bumble Blossom Black Eyed Susan Amigurumi Pattern

I absolutely love this pattern because it captures a small burst of summer in a tidy, handmade object that brightens any shelf or windowsill. I enjoy the simple shaping used for the petals which creates a charming, sculpted look without complicated techniques. The little bumblebee adds personality and a playful finishing touch that always makes me smile. I also love that the pot is stabilised with cardboard and a sewn dirt insert so the finished piece stands up reliably.

Bumble Blossom Black Eyed Susan Amigurumi Pattern step 1 - construction progress Bumble Blossom Black Eyed Susan Amigurumi Pattern step 2 - assembly progress Bumble Blossom Black Eyed Susan Amigurumi Pattern step 3 - details and accessories Bumble Blossom Black Eyed Susan Amigurumi Pattern step 4 - final assembly and finishing

Switch Things Up

I love that you can easily customise this pattern to make different flowers by changing petal shapes or colours; try pastel shades for a soft look or bright jewel tones for a bold display.

If you want a larger version, use a bulkier yarn and a larger hookβ€”your finished blossom will grow proportionally and make a great statement piece.

For a miniature keychain version, use thinner yarn and a smaller hook and reduce the number of rounds to create tiny petals and a short stem.

I often add embroidered details to the flower center or use seeded beads for texture and extra sparkle on special gifts.

Try using a wire core inside the stem if you want the flower to be posable; insert the wire before you finish stuffing and shape the stem as desired.

You can make a whole bouquet by repeating the pattern in complementary colours and arranging several stems in a single, larger pot or vase.

Consider adding a small felt backing under each petal for extra stiffness if your chosen yarn creates floppy petals.

Swap out the cardboard base for a wooden disc if you'd like a more durable or weighted pot foundation for display on shelves or tables.

I also like to make the bee removable with a small snap or sew it onto a petal for a fixed decorative touch depending on whether I want it to be play-friendly.

Finally, experiment with variegated yarn for the petals or center to create an organic, hand-dyed appearance without extra finishing work.

Common Mistakes & How to Fix Them

βœ— Skipping the stuffing step for the stem causes the flower to flop over; add stuffing gradually starting after round 10 and ensure it is firm for support. βœ— Forgetting to leave long tails when instructed makes assembly and sewing difficult; always leave a long tail for sewing and fastening off to allow neat joining. βœ— Not using stitch markers during long rounds can cause you to lose your place and miscount stitches; place a marker at the first stitch of each round to keep accurate counts. βœ— Sewing petals with inconsistent spacing results in gaps or crowding between petals; pin each petal in place before sewing to ensure even spacing around the center. βœ— Overstuffing the petals and center can distort the shapes and make sewing awkward; stuff lightly and add small amounts at a time to maintain the intended silhouette.

Bumble Blossom Black Eyed Susan Amigurumi Pattern

Bring a sunny windowsill to life with this charming Bumble Blossom Black Eyed Susan amigurumi. You will crochet a cheerful flower, leaves, a pot with dirt insert, and a tiny bumblebee friend using sport weight yarn. The pattern includes clear, photographed assembly steps and full round-by-round instructions to guide you. Perfect for gifting or brightening your home with handmade decor.

Intermediate 5-7 Hours

Materials Needed for Bumble Blossom Black Eyed Susan Amigurumi Pattern

β€” Main Fabric

  • 01
    Schachenmayr Catania sport weight yarn (#2) - less than a 125m/50g ball of each color used
  • 02
    Color Apfel (green) 00205 - for stem and leaves (approx one ball or less)
  • 03
    Color Sonne (yellow) 00208 - for petals (approx one ball or less)
  • 04
    Color Schwarz (black) 00110 - for flower center and bumblebee (small amount)
  • 05
    Color Marone (brown) 00157 - for dirt (small amount)
  • 06
    Color Teddy 00161 - for pot accent if desired (small amount)
  • 07
    Color Weize (white) 00106 - for bumblebee wings (small amount)

β€” Tools Required

  • 01
    Crochet hook size 2.0mm (often labeled 2mm)
  • 02
    Sport weight yarn (#2) in listed colors
  • 03
    Sewing needle for assembly
  • 04
    Stitch marker
  • 05
    Scissors
  • 06
    Polyester stuffing
  • 07
    Cardboard to stabilize the base of the pot
  • 08
    Pins for positioning pieces while sewing

Progress Tracker

0% Complete

β€” Stem (Make 1) :

rnd 1 :

8 Sc in MR (8)

rnd 2-30 :

8 Sc (8) (29 rounds)

Info :

Add stuffing to the stem for added support starting after round 10. Continue to add stuffing as you go.

rnd 31 :

BLO (1 Sc, 1 INC) x 4 (12)

rnd 32 :

12 INC (24)

rnd 33 :

(3 Sc, 1 INC) x 6 (30)

rnd 34 :

30 Sc (30)

Info :

Cut yarn and fasten off invisibly.

Info :

Add the sepal to the stem. Holding the stem with the bottom facing up, insert the hook into last stitch of the remaining loops of round 31 and attach the yarn.

Info :

Ch 9, starting in the 2nd chain from the hook Sc 8. Slst into the next loop in the row.

Info :

Repeat in the remaining 11 loops of round 31. Cut yarn and fasten off invisibly.

β€” Flower Center (Make 1) :

rnd 1 :

6 Sc in MR (6)

rnd 2 :

6 INC (12)

rnd 3 :

12 Sc (12)

rnd 4 :

(1 Sc, 1 INC) x 6 (18)

rnd 5 :

18 Sc (18)

rnd 6 :

(1 Sc, 1 INC, 1 Sc) x 6 (24)

rnd 7 :

24 Sc (24)

rnd 8 :

(3 Sc, 1 INC) x 6 (30)

rnd 9 :

30 Sc (30)

Info :

Cut yarn and fasten off invisibly.

β€” Petal (Make 7) :

rnd 1 :

6 Sc in MR (6)

rnd 2 :

6 INC (12)

rnd 3 :

(1 Sc, 1 INC) x 6 (18)

rnd 4-7 :

18 Sc (18) (4 rounds)

rnd 8 :

(2 Sc, 1 DEC, 2 Sc) x 3 (15)

rnd 9-12 :

15 Sc (15) (4 rounds)

rnd 13 :

(3 Sc, 1 DEC) x 3 (12)

rnd 14-17 :

12 Sc (12) (4 rounds)

rnd 18 :

(1 Sc, 1 DEC, 1 Sc) x 3 (9)

Info :

Cut yarn and fasten off. Leave a long tail for sewing.

β€” Leaf (Make 2) :

rnd 1 :

6 Sc in MR (6)

rnd 2 :

1 INC, 5 Sc (7)

rnd 3 :

(1 Sc, 1 INC, 1 Sc) x 2, 1 Sc (9)

rnd 4 :

(1 Sc, 1 INC, 1 Sc) x 3 (12)

rnd 5 :

(3 Sc, 1 INC) x 3 (15)

rnd 6 :

(2 Sc, 1 INC, 2 Sc) x 3 (18)

rnd 7-16 :

18 Sc (18) (10 rounds)

rnd 17 :

(1 Sc, 1 DEC) x 6 (12)

rnd 18 :

6 DEC (6)

Info :

Cut yarn and fasten off. Leave a long tail for sewing.

β€” Pot (Make 1) :

rnd 1 :

6 Sc in MR (6)

rnd 2 :

6 INC (12)

rnd 3 :

(1 Sc, 1 INC) x 6 (18)

rnd 4 :

(1 Sc, 1 INC, 1 Sc) x 6 (24)

rnd 5 :

(3 Sc, 1 INC) x 6 (30)

rnd 6 :

(2 Sc, 1 INC, 2 Sc) x 6 (36)

rnd 7 :

(5 Sc, 1 INC) x 6 (42)

rnd 8 :

BLO 42 Sc (42)

rnd 9-11 :

42 Sc (42) (3 rounds)

rnd 12 :

(13 Sc, 1 INC) x 3 (45)

rnd 13-15 :

45 Sc (45) (3 rounds)

rnd 16 :

(7 Sc, 1 INC, 7 Sc) x 3 (48)

rnd 17-19 :

48 Sc (48) (3 rounds)

rnd 20 :

FLO (7 Dc, 1 DcINC) x 6 (54)

rnd 21 :

54 Sc (54)

Info :

Cut yarn and fasten off invisibly.

β€” Dirt (Make 1) :

Info :

Using brown yarn. The dirt for the pot is created in two parts: the hole in which the flower will be inserted and the top of the dirt. Begin with the dirt hole.

rnd 1 :

6 Sc in MR (6)

rnd 2 :

6 INC (12)

rnd 3-14 :

12 Sc (12) (12 rounds)

Info :

Cut yarn and fasten off invisibly.

Info :

Begin to crochet the dirt top by holding the hole with the opening facing up. Reattach the yarn and continue crocheting the dirt top.

rnd 15 :

(1 Sc, 1 INC) x 6 (18)

rnd 16 :

(1 Sc, 1 INC, 1 Sc) x 6 (24)

rnd 17 :

(3 Sc, 1 INC) x 6 (30)

rnd 18 :

(2 Sc, 1 INC, 2 Sc) x 6 (36)

rnd 19 :

(5 Sc, 1 INC) x 6 (42)

rnd 20 :

(3 Sc, 1 INC, 3 Sc) x 6 (48)

Info :

Cut yarn and fasten off. Leave a long tail for sewing.

β€” Bumblebee Body (Make 1) :

Info :

Starting with black yarn.

rnd 1 :

6 Sc in MR (6)

rnd 2 :

6 INC (12)

rnd 3 :

12 Sc (12)

Info :

Switch to yellow yarn.

rnd 4-5 :

12 Sc (12) (2 rounds)

Info :

Switch to black yarn.

rnd 6-7 :

12 Sc (12) (2 rounds)

Info :

Switch to yellow yarn.

rnd 8 :

6 DEC (6)

Info :

Cut yarn and use the yarn end to close the remaining stitches.

β€” Bumblebee Wing (Make 2) :

Info :

Using white yarn. Ch 4, starting in the 2nd chain from the hook.

rnd 1 :

1 Sc, 1 HDC, 5 Dc in the same stitch, 1 HDC, 1 Sc (9)

Info :

Cut yarn and fasten off. Leave a long tail for sewing.

β€” Flower Assembly :

Info :

Begin to assemble the flower by attaching the stem to the center piece. Place the center piece on the stem and sew the pieces together using the yarn tail of the center piece.

Info :

Add stuffing before sewing the last remaining stitches closed.

Info :

Attach the petals by sewing along the rounds where the stem and center piece were connected. The petals will fit closely next to one another when attached, with very little space between one another.

Info :

Use pins to help position the petals and leaves before sewing in place.

Info :

Attach the leaves to the stem by sewing into place near the 11th round of the stem.

β€” Pot Assembly :

Info :

Add a piece of cardboard to the bottom of the pot for extra stability before sewing.

Info :

Attach the dirt to the pot by sewing into the remaining loops of round 20 of the pot. Add stuffing before sewing the last remaining loops closed.

β€” Bumblebee Assembly :

Info :

Sew the wings to the body of the bumblebee between rounds 4 and 5.

Assembly Instructions

  • Place the flower center onto the stem and sew the center piece to the stem using the yarn tail of the center piece to secure it firmly.
  • Attach each petal by sewing along the rounds where the stem and center piece were connected, pinning petals in place so they sit closely with even spacing.
  • Sew the two leaves to the stem near round 11 of the stem to match the pattern photos and ensure balance.
  • Insert a circular piece of cardboard into the bottom of the pot for stability before completing the pot assembly and sewing the dirt piece in place.
  • Attach the dirt to the pot by sewing into the remaining loops of round 20 of the pot, then add stuffing before closing the final stitches.
  • Sew the bumblebee wings to the bee body between rounds 4 and 5, and attach the finished bumblebee to a petal or the center as desired.

Important Notes

  • πŸ’‘Use stitch markers to mark the beginning of each round, especially on the stem and pot, to maintain accurate stitch counts.
  • πŸ’‘Stuff the stem gradually starting after round 10 and keep the stuffing firm but not overstuffed to maintain the shape and stability.
  • πŸ’‘Pin pieces in place before sewing so you can adjust spacing and placement without committing to stitches immediately.
  • πŸ’‘Weave in tails as you sew parts together to keep the back of the work tidy and secure the joins with multiple passes if needed.

This Bumble Blossom pattern brings a sunny, handcrafted centerpiece to your windowsill or deskβ€”perfect for gifting or brightening your own home. The compact pot with cardboard base keeps the flower stable while the removable dirt insert helps anchor the stem securely. Add the tiny bumblebee for a playful finishing touch and enjoy a happy splash of handmade color. 🧢🌼

You ask,

we answer.

FAQs

What size will the finished piece be?

The finished blossom measures approximately 12.5 cm tall by 10 cm wide from petal to petal using the recommended sport weight yarn and 2mm hook.

Can I use different yarn weights for this pattern?

Yes, you can use different yarn weights, but this will change the final size and may require a different hook size; adjust your hook to suit the yarn and note that pieces like the stem may need extra stuffing for stability.

Do I need prior crochet experience for this pattern?

This pattern is rated intermediate, so basic knowledge of working in the round, increases, decreases, and switching colors is recommended for best results.

How long does this project typically take to complete?

Most crocheters complete this project in 5-7 hours, though your time may vary depending on experience, speed, and how much time you spend on assembly and finishing.