๐Ÿงถ Beautiful โœจ Detailed ๐Ÿ’ Adorable

Bull Amigurumi Pattern

Bull Amigurumi Pattern
4.2โ˜… Rating
5-7 Hours Time Needed
1.9K Made This
โœ‚๏ธ

Intermediate Level

Ideal for those with basic crochet experience, featuring slightly more advanced stitches and techniques to expand your skills.

โฑ๏ธ

Weekend Treat

Takes 5-7 hours, making it an enjoyable project to finish over a couple of days.

๐Ÿงธ

Cute Companion

An adorable friend to cherish, handcrafted with love to bring comfort and joy for years to come.

About This Bull Amigurumi Pattern

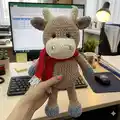
This pattern creates a soft, 39 cm tall bull amigurumi crocheted in plush yarn with two-strand detail work. It includes full instructions for head, muzzle, horns, ears, arms, legs, tail and body, plus assembly and finishing. Photos throughout the pattern help you place eyes and sew parts accurately.

Bull Amigurumi Pattern crochet pattern - detailed view of completed project

Designed to be made with Alize Softy yarn and a 4.5 mm hook, the bull has embroidered nostrils and a tassel tail. The pattern uses spiral rounds and advises marking the beginning of each round for consistent shaping.

Why You'll Love This Bull Amigurumi Pattern

I absolutely love this pattern because it turns simple shapes into a charming character with personality. I enjoy how the plush yarn creates a soft, cuddly texture that kids and adults both adore. The step-by-step rounds make shaping predictable, and the small details like the muzzle and horns really bring the bull to life. I find assembling the parts and adding embroidered nostrils to be a rewarding finishing touch that personalizes each toy.

Bull Amigurumi Pattern step 1 - construction progress Bull Amigurumi Pattern step 2 - assembly progress Bull Amigurumi Pattern step 3 - details and accessories Bull Amigurumi Pattern step 4 - final assembly and finishing

Switch Things Up

I love how easy it is to customize this pattern by changing the yarn colors; switch the beige to white or brown for a different look.

I often use thinner yarn and a smaller hook to create a mini keychain version of the bull that makes a great gift.

Want a chunkier, cuddlier toy? Try a bulkier plush yarn with a larger hook and adjust stuffing for softness.

I also experiment with embroidered expressions โ€” moving the nostrils or mouth slightly changes the bull's personality.

Try adding a tiny crocheted scarf, bow, or bell for seasonal variations and to give the bull character.

For a more realistic look, use a different yarn texture for the hooves and muzzle; contrast yarns create neat accents.

I sometimes add wire in the limbs for posability; if you do, cover wire ends securely and use caution when sewing.

Use safety eyes of different sizes (e.g. 10 mm or 8 mm) to change the facial proportions and the toy's expression.

Make a family set by crocheting several bulls in coordinating colors and sizes โ€” they look great as a group display.

I recommend practicing the muzzle and horn shapes first on scrap yarn to find the placement you like before sewing them onto the final head.

For a washable toy, consider stitching eyes from yarn instead of using safety eyes and secure all seams tightly before gifting to small children.

Common Mistakes & How to Fix Them

โœ— Skipping stitch markers at the start of each spiral round causes lost stitch counts; mark the beginning of every round with a marker or contrast thread to stay accurate. โœ— Not stuffing as you go creates lumps or floppy limbs; stuff gradually and evenly during shaping and use small amounts to achieve the correct silhouette. โœ— Changing color without securing ends neatly will cause unraveling later; fasten off securely and weave in ends before stuffing and sewing pieces together. โœ— Forgetting to place safety eyes at the right row will misalign the face; attach safety eyes between rows 11 and 12 and leave 4 single crochet stitches between them for correct spacing.

Bull Amigurumi Pattern

Create a cuddly bull amigurumi with clear step-by-step instructions and helpful photos. This pattern uses soft plush yarn to make a huggable toy with removable details and embroidered nostrils. You will learn shaping techniques for head, body, limbs, ears and horns, and how to assemble everything neatly. Perfect for gifting or decorating a nursery.

Intermediate 5-7 Hours

Materials Needed for Bull Amigurumi Pattern

โ€” Main Fabric

  • 01
    Alize Softy (115m/50g) - 3 skeins color 617 (beige)
  • 02
    Alize Softy (115m/50g) - less than half skein color 62 (cream) for muzzle and horns
  • 03
    Alize Softy (115m/50g) - less than half skein color 119 (gray) for hooves and tail tassel
  • 04
    Use yarn held in two strands for all toy details as directed

โ€” Tools Required

  • 01
    Crochet hook size 4.5 mm
  • 02
    Safety eyes 12 mm (2 pieces)
  • 03
    Filler for toys - holofiber
  • 04
    Wide-eye needle for sewing on parts
  • 05
    Scissors
  • 06
    Stitch markers or contrasting thread for marking rounds
  • 07
    Yarn/tapestry needle for weaving in ends and sewing pieces

Progress Tracker

0% Complete

Infos :

Reductions: mr - magic ring. sc - single crochet. inc - increase (2sc). dec - decrease (sc2tog). ch - chain. sl st - slip stitch. number in brackets - number of stitch in row. ( )*n - repeat n times. Crochet all the details of the toy with yarn in two strands.

โ€” Head :

Round 1 :

6 sc in mr

Round 2 :

6 inc (12)

Round 3 :

(1 sc, inc)*6 (18)

Round 4 :

(2 sc, inc)*6 (24)

Round 5 :

(3 sc, inc)*6 (30)

Round 6 :

(4 sc, inc)*6 (36)

Round 7 :

(5 sc, inc)*6 (42)

Round 8 :

(6 sc, inc)*6 (48)

Round 9-16 :

48 sc in each row

Round 17 :

(6 sc, dec)*6 (42)

Round 18 :

(5 sc, dec)*6 (36)

Round 19 :

(4 sc, dec)*6 (30)

Round 20 :

(3 sc, dec)*6 (24)

Info :

Finish crocheting. Leave a long thread for sewing the head to the body later.

Info :

Attach safe eyes between 11 and 12 rows, the distance between the eyes is 4 sc. Stuff head tight with holofiber.

โ€” Muzzle :

Info :

Cream color. Crochet 9 ch, from the second loop from the hook:

Round 1 :

7 sc, 3 sc in one loop, 6 sc, inc (18)

Round 2 :

inc, 6 sc, 3 inc, 6 sc, 2 inc (24)

Round 3 :

1 sc, inc, 6 sc, (1 sc, inc)*3, 6 sc, (1 sc, inc)*2 (30)

Round 4-6 :

30 sc in each row

Info :

Finish crocheting. Leave a long thread for sewing to the head later.

โ€” Horns :

Info :

Cream color

Round 1 :

4 sc in mr

Round 2 :

4 sc

Round 3 :

(1 sc, inc)*2 (6)

Round 4 :

6 sc

Round 5 :

5 sc, inc (7)

Round 6 :

6 sc, inc (8)

Info :

1 sl st and finish crocheting. Leave a long thread for sewing to the head.

โ€” Ears :

Info :

Beige color

Round 1 :

4 sc in mr

Round 2 :

4 inc (8)

Round 3 :

(3 sc, inc)*2 (10)

Round 4 :

(4 sc, inc)*2 (12)

Round 5 :

(5 sc, inc)*2 (14)

Round 6 :

14 sc

Info :

Fold in half and crochet 7 sc. Leave a long thread for sewing to the head.

โ€” Arms :

Info :

First: Start gray yarn

Round 1 :

7 sc in mr

Round 2 :

7 inc (14)

Round 3-5 :

14 sc in each row

Round 6 :

2 sc, dec, 10 sc (13)

Round 7 :

2 sc, dec, 9 sc (12)

Info :

change color to beige

Round 8-18 :

12 sc in each row

Info :

2 sc, then fold in half and crochet 6 sc. Leave a long thread for sewing to the body. Stuff arm to half.

Info :

Second: Start gray yarn

Round 1 :

7 sc in mr

Round 2 :

7 inc (14)

Round 3-5 :

14 sc in each row

Round 6 :

6 sc, dec, 6 sc (13)

Round 7 :

6 sc, dec, 5 sc (12)

Info :

change color to beige

Round 8-18 :

12 sc in each row

Info :

1 sc, then fold in half and crochet 6 sc. Leave a long thread for sewing to the body. Stuff arm to half.

โ€” Legs :

Info :

Start gray yarn

Round 1 :

6 sc in mr

Round 2 :

6 inc (12)

Round 3 :

(1 sc, inc)*6 (18)

Round 4 :

(2 sc, inc)*6 (24)

Round 5-7 :

24 sc in each row

Round 8 :

4 sc, 6 dec, 6 sc, change color to beige and crochet 2 sc (18)

Round 9 :

5 sc, 2 dec, 9 sc (16)

Round 10 :

5 sc, dec, 9 sc (15)

Round 11 :

3 sc, 2 dec, 8 sc (13)

Round 12 :

3 sc, dec, 8 sc (12)

Round 13-23 :

12 sc in each row

Info :

1 sc, fold in half and crochet 6 sc. Leave a long thread for sewing to the body.

Info :

In the second leg after the 23 row, crochet 2 sc, fold in half and crochet 6 sc. Leave a long thread for sewing to the body. Add stuffing.

Info :

Embroider imitation hooves.

โ€” Tail :

Info :

Beige color

Round 1 :

Crochet 11 ch, from the second loop from the hook crochet 10 sc. Finish crocheting. Leave a long thread for sewing to the body.

Info :

Tail tip in the form of a brush: 1. cut the gray yarn into pieces of about 8-10 cm. 2. fold these pieces in half and pull out with a hook at the end of the tail, forming a loop. 3. pull all the ends into the resulting loop.

โ€” Body :

Round 1 :

6 sc in mr

Round 2 :

6 inc (12)

Round 3 :

(1 sc, inc)*6 (18)

Round 4 :

(2 sc, inc)*6 (24)

Round 5 :

(3 sc, inc)*6 (30)

Round 6 :

(4 sc, inc)*6 (36)

Round 7 :

(5 sc, inc)*6 (42)

Round 8 :

(6 sc, inc)*6 (48)

Round 9-14 :

48 sc in each row

Round 15 :

(6 sc, dec)*6 (42)

Round 16-17 :

42 sc in each row

Round 18 :

(5 sc, dec)*6 (36)

Round 19-20 :

36 sc in each row

Round 21 :

(4 sc, dec)*6 (30)

Round 22 :

30 sc

Round 21 :

(3 sc, dec)*6 (24)

Info :

Finish crocheting. Cut off the tip, fasten inside. Add stuffing.

โ€” Assembly :

Info :

Stuff muzzle tight with holofiber. Sew a muzzle, ears (fold in half and sew), horns. Embroider nostrils.

Info :

Sew head to body.

Info :

Then sew arms and legs.

Info :

Sew the tail. Add any additional accessories as desired.

Assembly Instructions

  • Attach safety eyes between rounds 11 and 12 on the head, spacing them 4 single crochet stitches apart, then stuff the head tightly with holofiber before closing.
  • Sew the muzzle to the front of the head firmly using the long tail left from finishing; position centered over the lower face and tack in place before permanent sewing.
  • Sew ears (folded and crocheted 7 sc edge) and horns to the top of the head, folding ears in half as instructed and using the long threads to secure them tightly.
  • Sew the head to the body using the long thread left from the head, matching the neck opening and securing with even stitches all around for a neat join.
  • Position and sew arms and legs symmetrically to the sides and bottom of the body, then sew the tail to the back and add the tassel tail tip as directed.

Important Notes

  • ๐Ÿ’กWork in spiral rounds and mark the beginning of each round with a stitch marker or contrasting thread for accurate counts.
  • ๐Ÿ’กCrochet all the small details (muzzle, ears, horns) with yarn in two strands as specified to match the plush texture and size.
  • ๐Ÿ’กStuff firmly but evenly - overstuffing can distort shaping while understuffing creates floppy results, so add stuffing gradually while shaping.

This little bull was designed to be cuddly, soft, and full of personality โ€” a perfect handmade friend for any child or collector. Make one in original colors or customize with different yarns and accents to match your style. Enjoy the crocheting process and share your finished bull with pride! ๐Ÿงถ๐Ÿฎ

You ask,

we answer.

FAQs

What size will the finished piece be?

The finished amigurumi measures approximately 39 cm tall when using the recommended Alize Softy yarn held in two strands and a 4.5 mm hook.

Can I use different yarn weights for this pattern?

Yes, you can use other yarn types, but the final size will vary; use a hook appropriate for your yarn and be prepared to adjust stuffing and placement.

Do I need prior crochet experience for this pattern?

This pattern is rated intermediate, so basic knowledge of single crochet, increases, decreases and working in spiral rounds is recommended.

How long does this project typically take to complete?

Most crocheters complete this project in 5-7 hours, though time may vary depending on experience level and how much detailing and assembly you do.