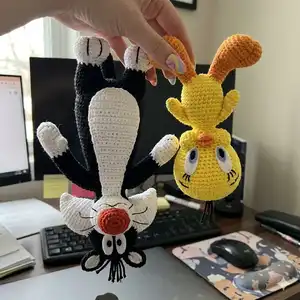
Crochet three classic Looney Tunes pals — Tweety, Sylvester and Bugs Bunny — with this detailed amigurumi pattern. Youll get clear, photo-referenced instructions for each body part, facial features, and finishing touches. Perfect for gifting or growing your plush collection with nostalgic charm. Follow the complete rounds, materials, and assembly notes to make lifelike, sturdy toys.
Progress Tracker
0% Complete
— Tweety :
Gauge :
16 sc and 16 rows = 4" (10 cm)
Gauge Swatch :
4" (10 cm) square With Yellow, ch 17. Row 1: Sc in second ch from hook and in each ch across: 16 sc. Rows 2-16: Ch 1, turn; sc in each sc across. Finish off.
BODY Rnd 1 :
(Right side): With Yellow, ch 2, 8 sc in second ch from hook; do not join, place marker (see Markers, page 35).
BODY Rnd 2 :
2 Sc in each sc around: 16 sc.
BODY Rnd 3 :
(Sc in next sc, 2 sc in next sc) around: 24 sc.
BODY Rnd 4 :
(Sc in next 11 sc, 2 sc in next sc) twice: 26 sc.
BODY Rnds 5-9 :
Sc in each sc around.
BODY Rnd 10 :
[Decrease (see Sc Decrease, page 35), sc in next 11 sc] twice: 24 sc.
BODY Rnd 11 :
Sc in next 5 sc, decrease, sc in next 10 sc, decrease, sc in next 5 sc: 22 sc.
BODY Rnd 12 :
(Decrease, sc in next 9 sc) twice: 20 sc.
BODY Rnd 13 :
Sc in next 3 sc, decrease, sc in next 8 sc, decrease, sc in next 5 sc: 18 sc.
BODY Rnd 14 :
(Sc in next 7 sc, decrease) twice: 16 sc.
BODY Rnd 15 :
Sc in next 4 sc, decrease, sc in next 6 sc, decrease, sc in next 2 sc: 14 sc.
BODY Rnd 16 :
(Decrease, sc in next 5 sc) twice; slip st in next sc, finish off: 12 sts.
Info :
Stuff Body firmly with polyester fiberfill, adding extra stuffing to "bottom" area.
HEAD Rnd 1 :
(Right side): Sc in second ch from hook and in next 2 chs, 3 sc in last ch; working in free loops of beginning ch (Fig. 1, page 35), sc in next 2 chs, 2 sc in next ch; do not join, place marker: 10 sc.
HEAD Rnd 2 :
2 Sc in next sc, sc in next 2 sc, 2 sc in each of next 3 sc, sc in next 2 sc, 2 sc in each of next 2 sc: 16 sc.
HEAD Rnd 3 :
2 Sc in next sc, sc in next 4 sc, 2 sc in each of next 4 sc, sc in next 4 sc, 2 sc in each of next 3 sc: 24 sc.
HEAD Rnd 4 :
Sc in next sc, 2 sc in next sc, sc in next 4 sc, (2 sc in next sc, sc in next sc) 3 times, 2 sc in next sc, sc in next 5 sc, (2 sc in next sc, sc in next sc) 3 times: 32 sc.
HEAD Rnd 5 :
Sc in next 6 sc, loop a short piece of contrasting color yarn around last sc made to mark front of Head, sc in next 4 sc, (2 sc in next sc, sc in next 2 sc) twice, (2 sc in next sc, sc in next 3 sc) 3 times, 2 sc in next sc, sc in next 2 sc, 2 sc in next sc: 39 sc.
HEAD Rnd 6 :
Sc in next 12 sc, (2 sc in next sc, sc in next 2 sc) around: 48 sc.
HEAD Rnds 7-9 :
Sc in each sc around.
HEAD Rnd 10 :
(Decrease, sc in next 14 sc) around: 45 sc.
HEAD Rnd 11 :
Sc in next 8 sc, decrease, sc in next sc, sc in each sc around: 30 sc.
HEAD Rnd 12 :
(Decrease, sc in next 9 sc) twice: 20 sc.
HEAD Rnd 13 :
Sc in next 6 sc, decrease, (sc in next 11 sc, decrease) twice, sc in next 5 sc: 36 sc.
HEAD Rnd 14 :
(Decrease, sc in next 10 sc) around: 33 sc.
HEAD Rnd 15 :
Sc in next 2 sc, decrease, (sc in next 9 sc, decrease) twice, sc in next 7 sc: 30 sc.
HEAD Rnd 16 :
(Decrease, sc in next 8 sc) around: 27 sc.
HEAD Rnd 17 :
Sc in next 4 sc, decrease, (sc in next 7 sc, decrease) twice, sc in next 3 sc: 24 sc.
HEAD Rnds 18-21 :
Sc in each sc around.
HEAD Rnd 22 :
Decrease around; slip st in next sc, finish off leaving a long end for sewing: 12 sts.
Info :
Stuff Head firmly with polyester fiberfill, making front of Head flat and back more rounded.
CHEEK (Make 2) Rnd 1 :
(Right side): With Yellow, ch 2, 8 sc in second ch from hook; do not join, place marker.
CHEEK Rnd 2 :
2 Sc in each sc around: 16 sc.
CHEEK Rnd 3 :
(2 Sc in next sc, sc in next 3 sc) around; slip st in next sc, finish off leaving a long end for sewing: 20 sts.
Info :
Using photo as a guide for placement, sew Cheeks to Rnds 18-21 of Head, leaving 3 sts between Cheeks and adding polyester fiberfill before closing.
BEAK Rnd 1 :
Sc in second ch from hook and in next 2 chs, 5 sc in last ch; working in free loops of beginning ch, sc in next 3 chs, 2 sc in last ch; join with slip st to first sc, finish off: 13 sc.
Beak Finishing :
Fold Beak in half widthwise with wider end on top. Sew Beak to Head between Cheeks.
FOOT AND LEG (Make 2) SOLE :
With Orange, ch 3.
SOLE Row 1 :
Sc in second ch from hook and in last ch: 2 sc.
SOLE Rows 2 and 3 :
Ch 1, turn; sc in each sc.
SOLE Row 4 :
Ch 1, turn; 2 sc in each sc: 4 sc.
SOLE Rows 5 and 6 :
Ch 1, turn; sc in each sc across.
SOLE Row 7 :
Ch 1, turn; 2 sc in first sc, sc in next 2 sc, 2 sc in last sc: 6 sc.
SOLE Row 8 :
Ch 1, turn; sc in each sc across.
SOLE Row 9 :
Ch 1, turn; decrease 3 times; do not finish off: 3 sc.
SIDES Rnd 1 :
(Right side): Ch 1, turn; sc in first sc, 2 sc in next sc, sc in last sc; work 8 sc evenly spaced across end of rows; working in free loops of beginning ch, sc in next 2 chs; work 8 sc evenly spaced across end of rows; join with slip st to first sc: 22 sc.
SIDES Rnd 2 :
Ch 1, do not turn; hdc in first sc, 2 hdc in each of next 2 sc, hdc in next 4 sc, sc in next 12 sc, hdc in last 3 sc; join with slip st to first hdc: 24 sts.
SIDES Rnd 3 :
Ch 1, hdc in first 9 hdc, sc in next 12 sc, hdc in last 3 hdc; join with slip st to first hdc; do not finish off.
INSTep Row 1 :
Ch 1, hdc in first hdc, * (YO, insert hook in next hdc, YO and pull up a loop) twice, YO and draw through all 5 loops on hook; repeat from * once more, hdc in next hdc, slip st in next 2 hdc, leave remaining 16 sts unworked: 6 sts.
INSTep Rows 2-5 :
Ch 1, turn; skip first 2 slip sts, sc in next 4 sts, slip st in next 2 sts on Sides: 6 sts.
INSTep Row 6 :
Ch 1, turn; skip first 2 slip sts, decrease twice, slip st in next 2 sts on Sides; do not finish off: 4 sts.
LEG Rnd 1 :
Ch 1, turn; skip first 2 slip sts, sc in next 2 sc, hdc in same sc as next slip st and in next 6 sc on Sides; do not join, place marker: 9 sts.
LEG Rnds 2 and 3 :
Sc in each st around.
LEG Rnd 4 :
Sc in each sc around; slip st in next sc, finish off leaving a long end for sewing.
Foot & Leg Finishing :
Stuff Foot and Leg with polyester fiberfill. Sew Leg to Body. To shape toes, thread yarn needle with cut ends of a doubled strand of Orange and follow photo guide inserting and pulling to form toe definition; secure inside foot and trim end close to the Foot.
ARM (Make 2) :
With Yellow and leaving a long end for sewing, ch 8; join with slip st to form a ring.
ARM Rnd 1 :
(Right side): Ch 1, sc in each ch around; do not join, place marker: 8 sc.
ARM Rnds 2-4 :
Sc in each sc around.
ARM Rnd 5 :
5 Dc in next sc, sc in next 7 sc: 12 sts.
ARM Rnd 6 :
Pull up a loop in next 5 dc, YO and draw through all 6 loops on hook (thumb made), sc in next 7 sc: 8 sts.
ARM Rnd 7 :
Decrease 4 times; slip st in next st, finish off leaving a long end for sewing.
ARM Finishing :
Sew remaining sts closed. Stuff Arm with polyester fiberfill. Flatten Arm having thumbs at side and sew across beginning ch to close; sew Arm to Body with thumbs pointing upward.
TAIL :
With Yellow and leaving a long end for sewing, ch 6; join with slip st to form a ring.
TAIL Rnd 1 :
(Right side): Ch 1, sc in each ch around; do not join, place marker: 6 sc.
TAIL Rnds 2 and 3 :
Sc in each sc around.
TAIL Rnd 4 :
(Decrease, sc in next sc) twice; slip st in next sc, finish off leaving a long end for sewing.
TAIL Finishing :
Sew remaining sts closed, forming a point. Using photo as a guide, flatten Tail and sew beginning ch to Body at center back of Rnd 8.
EYE PATTERNS :
Trace eye shapes from pattern and cut 2 pieces of each shape from felt: Black (pupil), Lt Blue (iris) and White (eye). Glue layers: glue White to face, Lt Blue to White, Black to Lt Blue as photo shows.
FINISHING :
For hair, cut one 10" (25.5 cm) length and one 5" (12.5 cm) length of Black. Tie the short length in a knot around the other length, about 2 1/2" (6.5 cm) from one end. Trim ends of the short length to about 1 1/2" (4 cm) and 2" (5 cm). Thread yarn needle with the long end. Insert needle around st at center of Rnd 2 at front of Head and secure yarn at the knot. Insert the needle inside the Head and push it out the back so the yarn does not show; cut the end close to the Head.
FINISHING EYES & DETAILS :
Trace eye patterns and cut 2 pieces of each pattern from felt. Using photo as a guide, glue White Eyes to face placing bottom just to the outside of halfway point between Cheek and beak and top curve angling outward slightly. Glue the Lt Blue pieces to the White pieces and the Black pieces to the Lt Blue pieces. Cut a 16" (40.5 cm) length of Black and separate plies in half. Thread needle with 2 ply and add eyelashes using 3 straight stitches and eyebrows using one straight stitch for each eye.
Assembly Instructions
- Sew Head to Body, adding extra polyester fiberfill before closing to make neck firm.
- Sew Cheeks to Rnds 18-21 of Head, leaving 3 sts between Cheeks and add polyester fiberfill before closing.
- Attach Beak between Cheeks, sew firmly and secure stuffing before finishing.
- Position Arms to Body with thumbs pointing upward and sew thru beginning ch to close; secure firmly with hidden stitches.
- Sew Legs to bottom of Body, shaping toes as described and ensuring weight is balanced for standing pieces.
- Glue felt eye layers following photo reference, then add embroidered eyelashes and eyebrows with two-ply black yarn.
- Add hair tufts by inserting a crochet hook through the top of the head, pulling yarn loops through and tying a knot; trim to size.
Important Notes
- 💡Use stitch markers to mark the first stitch of each round, especially when the pattern says "do not join" so you keep track of the beginning of rounds.
- 💡Stuff parts as you go to avoid having to force stuffing into small openings later; use small amounts to shape the piece gradually.
- 💡Check gauge before starting larger pieces so final sizes match the pattern; changing yarn weight or hook will affect finished dimensions.
- 💡When gluing felt eyes, allow glue to dry completely before adding additional layers or handling the doll to avoid shifting.
- 💡For toes and facial shaping, insert needles and hide yarn ends inside the piece to keep the outside neat and avoid visible ends.
This gorgeous Bugs & Pals set captures the charm of Tweety, Sylvester and Bugs Bunny in cuddly crochet form. Each pattern includes detailed shaping, assembly tips, and felt templates for lifelike eyes and expressions. Perfect for collectors, gifts, or nostalgic handmade decor — bring your favorite cartoon pals to life with yarn and love! 🧶🧵