🧶 Beautiful ✨ Detailed 💝 Adorable

Bucket Hat Amigurumi Pattern

Bucket Hat Amigurumi Pattern
4.6★ Rating
2-3 Hours Time Needed
1.9K Made This
✂️

Intermediate Level

Ideal for those with basic crochet experience, featuring slightly more advanced stitches and techniques to expand your skills.

⏱️

Bite-Sized Project

Finishes in 2-4 hours—perfect for an afternoon of creative relaxation.

👕

Casual Chic

Relaxed style with a modern twist, perfect for everyday wear while maintaining that handcrafted uniqueness.

About This Bucket Hat Amigurumi Pattern

This pattern creates a structured bucket hat worked in the round with both strands of worsted weight yarn held together. It features an instant brim created with a front post single crochet round and an optional removable band for quick style changes. Sizes are provided for small, medium, and large and the hat is finished with a neat, wearable brim. The pattern uses basic stitches with one fpsc round to shape the brim.

Bucket Hat Amigurumi Pattern crochet pattern - detailed view of completed project

Youll work in a spiral (no joins) and use a 6.00mm (J) hook while holding two strands together. The hat band is made separately with one strand and slips on for easy swapping of colors.

Why You'll Love This Bucket Hat Amigurumi Pattern

I absolutely love this pattern because it turns simple materials into a chic, wearable accessory youll be proud to wear. I enjoy how quickly the crown grows when holding two strands together, giving a satisfying, sturdy fabric. The single round of front post single crochets creates a crisp brim that instantly defines the hat’s silhouette, which always thrills me. I also love the removable band concept — it lets me customize the hat for different outfits without making a whole new piece. Making these is relaxing and rewarding, and the results look professional even with straightforward techniques.

Bucket Hat Amigurumi Pattern step 1 - construction progress Bucket Hat Amigurumi Pattern step 2 - assembly progress Bucket Hat Amigurumi Pattern step 3 - details and accessories Bucket Hat Amigurumi Pattern step 4 - final assembly and finishing

Switch Things Up

I love customizing this bucket hat by changing the band color for different looks; try bright contrasts or subtle neutrals.

You can make a smaller or larger hat by changing where you stop increasing—add or remove increase rounds to get in-between sizes.

Swap yarn weight and hook size to alter the scale: bulky yarn and a larger hook create a chunky, slouchier hat.

Use a single strand doubled with a different fiber for a lighter or more breathable summer hat.

Try decorative stitches for the band like surface slip stitch, embroidery, or a small crocheted flower for added interest.

I sometimes add a small brim wire or lightweight plastic inside the brim to make it hold a sharper shape when needed.

Experiment with holding one strand from two different yarns together for a marled look and subtle texture.

For a child-sized version, reduce the number of increase rounds and chain fewer stitches for the band to achieve the smaller circumference.

Try blocking the brim over a bowl to create a rounded, flared profile for a vintage look.

I often add a removable bow or clip-on embellishment to the band so I can change styles without re-making the band.

Common Mistakes & How to Fix Them

✗ Skipping the stitch marker in the spiral rounds causes you to lose track of where the round begins; place a marker after the initial round and move it up after each round to maintain correct stitch counts. ✗ Holding only one strand by accident makes the fabric too floppy and changes the hat size; make sure to hold two strands together as instructed for the body of the hat to obtain correct gauge and structure. ✗ Forgetting to try the chain for the band around the hat before joining can result in an ill-fitting band; wrap the chain around your hat and adjust chain length before joining to ensure a proper fit. ✗ Pulling increases too tight will distort the crown and create unsightly puckers; keep increases even and slightly loose so the crown lays flat and smooth. ✗ Not hiding ends or weaving them properly causes the hat to look unfinished and may catch on clothing; weave in and hide ends neatly inside the hat for a clean finish.

Bucket Hat Amigurumi Pattern

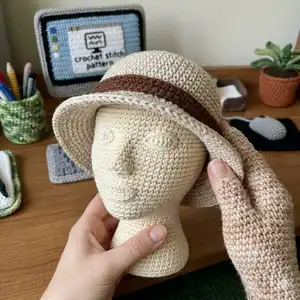
Create a stylish, wearable bucket hat with this easy-to-follow crochet pattern. Youll work in the round holding two strands together for a firm, structured hat with a crisp brim and an optional decorative band. The pattern includes full round-by-round instructions, sizing guidance, and a simple band tutorial so you can customize the look. Perfect for gifting or making a wardrobe staple youll reach for all season.

Intermediate 2-3 Hours

Materials Needed for Bucket Hat Amigurumi Pattern

— Main Fabric

  • 01
    Worsted weight yarn (#4) - 4 oz each of two colors (main color for hat body and contrasting color for band), hold two strands together for the hat body
  • 02
    Worsted weight yarn (#4) - one strand of chosen color for hat band (approximately 10-20g depending on band width)

— Tools Required

  • 01
    Crochet hook size J / 6.00mm
  • 02
    Crochet hook size J / 6.00mm (for hat band with one strand)
  • 03
    Stitch marker (to mark rounds)
  • 04
    Tapestry/yarn needle for weaving ends and sewing band
  • 05
    Scissors
  • 06
    Measuring tape to check head circumference and chain fit
  • 07
    Optional: blocking tools or hat form to shape brim

Progress Tracker

0% Complete

— Hat :

Info :

Materials: 4oz each of two colors of worsted weight yarn, size J or 6.00mm crochet hook.

Info :

Gauge: 3 sts + 4 rows = 1 inch with two strands held together

Info :

Sizes: small-18”, medium- 20”, large-22”

Infos :

Abbreviations: ch - chain. sc – single crochet. fpsc – front post single crochet (single crochet around the post of the single crochets in the previous round, not the top). Rnd - round.

Info :

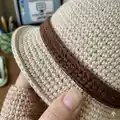
Notes: This hat is made in the round with no joins (spiral) with both strands of yarn held together throughout. To start you can use the magic ring or if you'd like you can just chain 2 and crochet the first 6 single crochets in the second chain from hook. There is one round of front post single crochets to start the brim, this gives it a brim that instantly stands out and doesn't gradually increase. Each increase round adds 2 inches to this hat, for in between sizes (19”, 21”, 23” etc) you can add a round and only increase by 3 stitches skipping every other increase stitch.

Info :

Starting with both strands of yarn held together and magic loop: Single crochet 6 inside ring. Place a marker after this last sc and move it up with every round.

Round 1 :

2 sc in each sc around.

Round 2 :

(sc 1, 2 sc in next sc) around.

Round 3 :

(sc 2, 2 sc in next sc) around.

Round 4 :

(sc 3, 2 sc in next sc) around.

Round 5 :

(sc 4, 2 sc in next sc) around.

Round 6 :

(sc 5, 2 sc in next sc) around.

Round 7 :

(sc 6, 2 sc in next sc) around.

Round 8 :

(sc 7, 2 sc in next sc) around. For small sizes end increase here and skip down to Rnd 11.

Round 9 :

(sc 8, 2 sc in next sc) around. For medium size end increase here and skip down to Rnd 11.

Round 10 :

(sc 9, 2 sc in next sc) around.

Round 11-24 :

sc around.

Round 12 :

(fpsc 10, 2 fpsc in next st) around.

Round 13 :

(sc 11, 2 sc in next st) around.

Round 14 :

sc 6, 2 sc in next st, (sc 12, 2 sc in next st) 5 times, sc to end.

Round 15 :

sc 3, 2 sc in next st, (sc 13, 2 sc in next st) 5 times, sc to end.

Round 16 :

(sc 14, 2 sc in next st) around.

Round 17 :

sc 7, 2 sc in next st, (sc 15, 2 sc in next st) 5 times, sc to end. Break yarn, hide end.

— Hat Band :

Info :

With one strand of your choice color of worsted weight yarn and size j or 6.00mm crochet hook

Round 1 :

ch 66, join with a slip stitch to the first chain. (Try this chain out around your hat to make sure it fits before joining, if it's to long pull out some chains, if it's to short add some. The number of chains is not important here, fit is!)

Round 2 :

ch 1, sc in each ch around, join with a slip stitch to the first SINGLE CROCHET, skipping the ch 1.

Round 3 :

ch 1, sc around, join in the same way.

Round 4 :

Reverse single crochet around.

Round 5 :

You can cut the yarn and rejoin it to the bottom of the band on the chain round or you can slip stitch down the inside of the band and turn it around so that the bottom is the top and continue.

Info :

Reverse single crochet around along the bottom of the band. Cut and hide yarn.

Info :

Slip this band down around the hat and you can use a strand of the same color of yarn and sew it in place or just let it be there and make a bunch of different colors of bands and change them to match whatever accessories your wearing that day. : D

Assembly Instructions

  • Try the chain used for the band around the finished hat before joining to confirm correct circumference and adjust chain length as needed.
  • Slip the completed band down around the hat brim; position it evenly and either sew in place with a strand of matching yarn or leave it removable for swapping colors.
  • After finishing the brim rounds, weave in and hide all ends on the inside of the hat to keep the outside clean and prevent catching on clothing.
  • If you choose to sew the band, use small whipstitches or ladder stitch to secure it invisibly to the hat, spacing stitches evenly so the band sits flat.
  • Block the brim gently over a hat form or by hand to shape it, and pin into position while damp if you want a firmer, set brim shape.

Important Notes

  • 💡Work the hat in a spiral (no joins) and move a stitch marker up each round to keep track of the beginning of each round.
  • 💡Hold two strands of yarn together throughout the hat body for correct gauge and a sturdy fabric; use one strand only for the decorative band.
  • 💡Try the band chain on the hat before joining—adjust the chain length to ensure the band fits comfortably without pulling.
  • 💡Make the front post single crochet round as instructed for an instantly defined brim edge that stands out without gradual increases.
  • 💡Weave and hide yarn ends neatly to ensure a professional finish and to avoid loose ends catching on clothing.

This Bucket Hat pattern creates a charming, wearable accessory that dresses up any outfit with handmade style.🧶 The structured crown and crisp brim are achieved quickly by holding two strands together and working in the round.✨ Make multiple bands to change colors and personalize your look for every season.🎀

You ask,

we answer.

FAQs

What size will the finished hat be?

Sizes listed are small (18"), medium (20"), and large (22"). Final size depends on yarn tension and whether you hold two strands as instructed.

Can I use a different yarn weight or hook?

Yes, but changing yarn weight or hook size will alter the finished size and drape. Use recommended worsted weight and a 6.00mm (J) hook for best results or adjust pattern and gauge accordingly.

How do I start the hat—magic ring or chain?

You can use a magic ring or chain 2 and work the first 6 single crochets into the second chain from hook. Either method works; just place a stitch marker and work in a spiral.

Is the hat band removable and how do I make it fit?

Yes, the band is made separately with one strand and slips over the hat. Chain the band, try it around your hat before joining, and adjust chain length until it fits comfortably, then join and finish.