🧢 Beautiful ✨ Detailed πŸ’ Adorable

Boho Bunny Amigurumi Pattern

Boho Bunny Amigurumi Pattern
4.4β˜… Rating
5-7 Hours Time Needed
1.3K Made This
βœ‚οΈ

Intermediate Level

Ideal for those with basic crochet experience, featuring slightly more advanced stitches and techniques to expand your skills.

⏱️

Weekend Treat

Takes 5-7 hours, making it an enjoyable project to finish over a couple of days.

🧸

Cute Companion

An adorable friend to cherish, handcrafted with love to bring comfort and joy for years to come.

About This Boho Bunny Amigurumi Pattern

This pattern creates a boho-style bunny lovey with a stuffed head, floppy ears, and a soft blanket body finished with pom corners. It uses super bulky yarn for a plush, cuddly texture and simple assembly techniques for secure attachment. You will learn continuous-round shaping for the head and ears as well as an easy blanket stitch pattern.
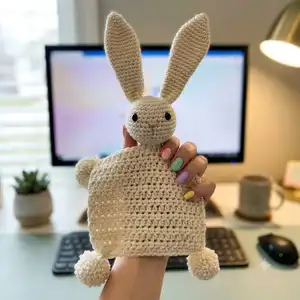
Boho Bunny Amigurumi Pattern crochet pattern - detailed view of completed project

Perfect for gift-making or a nursery keepsake, the Boho Bunny is cozy and quick to make. The pattern includes detailed rounds, materials, and step-by-step assembly instructions.

Why You'll Love This Boho Bunny Amigurumi Pattern

I absolutely love this pattern because it turns simple stitches into a sweet, wearable toy that both kids and parents adore. I enjoy the cozy texture you get with super bulky yarn and how quickly the blanket portion grows on a large hook. The floppy ears and pom corners give this lovey charming personality, and the assembly is satisfying without being fussy. I find it rewarding to customize colors and small details to make each bunny special and unique.

Boho Bunny Amigurumi Pattern step 1 - construction progress Boho Bunny Amigurumi Pattern step 2 - assembly progress Boho Bunny Amigurumi Pattern step 3 - details and accessories Boho Bunny Amigurumi Pattern step 4 - final assembly and finishing

Switch Things Up

I love experimenting with colors when I make this Boho Bunny; try soft pastels for a baby-friendly look or earthy neutrals for a modern boho vibe.

If you want a smaller lovey, use a lighter weight yarn and a smaller hook to create a miniature version perfect for keychains or tiny hands.

For a chunkier, cuddlier lovey, switch to a thicker super bulky yarn and a larger hook to speed up the blanket portion and create a plush finish.

I often swap safety eyes for embroidered eyes for a fully baby-safe version; embroidery also gives you lots of expression options.

Try different pom styles β€” felt balls, tassels, or larger yarn poms β€” to change the overall personality of the lovey.

I sometimes crochet a small scarf or hat for the bunny head to create a seasonal outfit and add extra charm as a gift.

To make the limbs or ears poseable, you can insert thin wire inside before sealing the pieces, but be mindful and secure wire ends safely for children.

Experiment with surface embroidery on the blanket for names or small motifs to personalize it as a gift.

Play with stitch patterns on the blanket β€” alternating HDC with rows of DC or textured stitches β€” to create a different drape and look.

I recommend testing yarn combinations on a small swatch first so you can see how the fibers behave and decide what gives you the best feel and appearance.

Common Mistakes & How to Fix Them

βœ— Skipping a stitch marker during continuous rounds can cause misplaced increases and uneven shaping; place a marker at the start of each round and move it up as you work to keep track. βœ— Overstuffing the head makes shaping difficult and can distort the face; stuff gradually, add small amounts at a time, and stop when the head feels firm but squeezable. βœ— Not counting stitches after increases or decreases will lead to the wrong stitch count; count your stitches at the end of each round, especially after rounds with INC or DEC. βœ— Using inconsistent tension between the head/ears and the blanket changes scale; use the recommended hook sizes and keep tension steady to ensure pieces fit together properly.
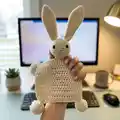
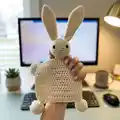
Boho Bunny Amigurumi Pattern

Create a soft, cuddly Boho Bunny lovey that is perfect for gifting or snuggling. This pattern walks you through crocheting a rounded head, floppy ears, a cozy blanket portion, and cute pom pom corners. You will enjoy making a handmade toy with charming boho details that feels warm and timeless. Clear instructions and helpful assembly notes guide you from start to finish.

Intermediate 5-7 Hours

Materials Needed for Boho Bunny Amigurumi Pattern

β€” Main Fabric

  • 01
    Wool-Ease Thick & Quick (Super Bulky #6) - 2 skeins in color 'Fisherman' (used for main body and blanket)
  • 02
    Yarn Bee Soft & Sleek Chunky (or similar chunky yarn) - small amount in color 'Linen' for nose embroidery and small details
  • 03
    Optional: Additional Super Bulky (6) yarn in contrast colors for pom corners or accents (approximately 50g each if desired)

β€” Tools Required

  • 01
    Crochet hook size J (6mm) for head & ears
  • 02
    Crochet hook size P (11.5mm) for blanket portion
  • 03
    Amigurumi safety eyes 15mm (2 pieces) - optional if you prefer to embroider eyes
  • 04
    Polyester fiberfill for stuffing head
  • 05
    Stitch marker
  • 06
    Darning needle for sewing
  • 07
    Pom maker (optional) I used size 6.8cm/2.7inch
  • 08
    Scissors

Progress Tracker

0% Complete

β€” Head :

Info :

The head is worked in continuous rounds, so you may choose to use a stitch marker at the start of each round.

Info :

With 6mm hook; Start with a MC, CH 1. (does not count as a ST)

Round 1 :

6 SC into MC. Pull Circle Tight. (6)

Round 2 :

INC in each ST around. (12)

Round 3 :

( SC 1, INC ) x 6 around. (18)

Round 4 :

( SC 2, INC ) x 6 around. (24)

Round 5 :

( SC 3, INC ) x 6 around. (30)

Round 6-8 :

SC 1 in each ST around. (30)

Round 9 :

( SC 4, INC ) x 6 around. (36)

Round 10-12 :

SC 1 in each ST around. (36)

Info :

Place amigurumi eyes between rounds 8 & 9 about 7 stitches apart. You can also start stuffing the head here and keep adding stuffing as you continue along.

Round 13 :

( SC 4, DEC ) x 6 around. (30)

Round 14 :

( SC 3, DEC ) x 6 around. (24)

Round 15 :

( SC 2, DEC ) x 6 around. (18)

Round 16 :

( SC 1, DEC ) x 6 around. (12)

Round 17 :

DEC in each ST around. (6)

Info :

Fasten off & leave long tail; Sew opening shut by weaving tail in & out of remaining stitches with yarn needle. Keep tail long & move on to blanket portion.

β€” Ear (Make Two) :

Info :

The ears are worked in continuous rounds, so you may choose to use a stitch marker at the start of each round.

Info :

With 6mm hook; Start with MC, CH 1. (does not count as ST)

Round 1 :

4 SC into MC. Pull Circle Tight. (4)

Round 2 :

INC in each ST around. (8)

Round 3 :

SC 1 in each ST around. (8)

Round 4 :

( SC 1, INC ) x 4 around. (12)

Round 5 :

( SC 3, INC ) x 3 around. (15)

Round 6 :

( SC 4, INC ) x 3 around. (18)

Round 7-11 :

SC 1 in each ST around. (18)

Round 12 :

( SC 4, DEC ) x 3 around. (15)

Round 13-17 :

SC 1 in each ST around. (15)

Round 18 :

( SC 3, DEC ) x 3 around. (12)

Round 19-24 :

SC 1 in each ST around. (12)

Round 25 :

( SC 2, DEC ) x 3 around. (9)

Round 26 & 27 :

SC 1 in each ST around. (9)

Info :

Press the top together & crochet 4 SC across (through both sides). Fasten off & leave long tail for sewing.

β€” Blanket :

Info :

With 11.5mm hook

Row 1 :

CH 21.

Row 1 :

Turn & HDC in second CH from hook & in each across, CH 1. (20)

Row 2-15 :

Repeat Row 1

Info :

Fast Off.

β€” Poms :

Poms (P1) :

Make 4 (One for each corner of blanket)

Info :

Next, Attach one pom to each corner of the blanket. I like to do this by first tying tails of poms through a stitch at the corner; double knotting that tie, and then sewing in ends to blanket.

Info :

Grab your contrasting nose color & needle. Your last step is to embroider the nose onto the head. I like to bring the yarn from the "chin" area of the head (leaving some excess hanging out) and bring the yarn up and out between rounds 9 & 10 about 2 stitches from the right eye. I bring the yarn loosely straight across 3 stitches to the left and enter back into the head. I bring the yarn out at the center & one round down. I bring it over the yarn that is running across and stitch the yarn back into the head at the center 2 rounds below. Bring the yarn back out of the head at the same spot you started at the chin. Tie a knot with the beginning tail and end tail & sew ends into head.

β€” Assembly :

Info :

Attach ears to head between rounds 5 & 6 centered to back of head with about five stitches between them. See photos below.

Info :

Once ears are attached to the head.

Info :

Attach head to center four stitches of blanket by weaving long tail of head through the stitches and into the head over and over until you feel satisfied with your attachment.

Info :

Sew in & trim all ends.

Info :

You have completed your Boho Bunny! & Just like you, it is unique & beautiful!

Assembly Instructions

  • Attach ears to head between rounds 5 & 6, centered to the back of the head with about five stitches between them; use the long tail and a yarn needle to sew securely.
  • Attach the head to the center four stitches of the blanket by weaving the long tail of the head through the blanket stitches and into the head repeatedly until secure.
  • Tie and sew pom tails to each corner of the blanket: thread pom tails through a corner stitch, double knot, then sew in ends for extra security.
  • Embroider the nose using a contrasting color: bring the yarn from the chin, bring up between rounds 9 & 10 about 2 stitches from the right eye, travel across and stitch as described in the pattern, then knot and weave in ends.
  • Press and shape the ears as desired before final sewing so they sit naturally; pin in place and adjust spacing before securing.
  • Weave in all remaining tails into the head and blanket, trim neatly, and inspect all joins for firmness before gifting or use.

Important Notes

  • πŸ’‘Use a stitch marker when working continuous rounds on the head and ears to keep track of the start of each round.
  • πŸ’‘Stuff the head gradually and evenly, adding small amounts of fiberfill at a time to avoid lumps and maintain shape.
  • πŸ’‘Pin parts in position before sewing to ensure correct placement and symmetry for ears and head on the blanket.
  • πŸ’‘When attaching poms, double knot the tail through the corner stitch and then sew in ends for a secure finish.

This Boho Bunny pattern is a delightful mix of cuddly texture and charming details that makes a thoughtful handmade gift. Customize colors and pom choices to match your nursery or style, and enjoy the cozy process of creating something unique. Happy crocheting and remember each stitch is made with love! 🧢🐰

You ask,

we answer.

FAQs

What size will the finished piece be?

The finished lovey measures approximately 12-14 inches across including ears when using super bulky yarn and the recommended hook sizes; exact size will vary with yarn and tension.

Can I use different yarn weights for this pattern?

Yes, you can use different yarn weights, but this will affect the final size and texture. Use an appropriate hook for your chosen yarn and adjust stitch counts if necessary.

Do I need prior crochet experience for this pattern?

This pattern is rated intermediate, so basic knowledge of single crochet, increases, decreases, and working in rounds is recommended for best results.

How long does this project typically take to complete?

Most crocheters complete this project in 5-7 hours, though time may vary based on experience level, customization, and how quickly you work.