🧢 Beautiful ✨ Detailed πŸ’ Adorable

Bobble Sheep Amigurumi Pattern

Bobble Sheep Amigurumi Pattern
4.6β˜… Rating
5-7 Hours Time Needed
1.5K Made This
βœ‚οΈ

Intermediate Level

Ideal for those with basic crochet experience, featuring slightly more advanced stitches and techniques to expand your skills.

⏱️

Weekend Treat

Takes 5-7 hours, making it an enjoyable project to finish over a couple of days.

🧸

Cute Companion

An adorable friend to cherish, handcrafted with love to bring comfort and joy for years to come.

About This Bobble Sheep Amigurumi Pattern

This pattern creates a textured bobble sheep amigurumi with a soft fleece and contrast face, ears, arms and legs. The design uses the bobble stitch to create a fluffy body and clear step-by-step rounds for all parts. Included are assembly instructions and tips for shaping, attaching safety eyes, and finishing details. Photography guides make the finishing and sewing steps easy to follow.

Bobble Sheep Amigurumi Pattern crochet pattern - detailed view of completed project

The pattern uses DK weight yarn and a small hook to make a compact, detailed toy about 30 cm (12") tall. Techniques include magic ring, bobble stitch, invisible decrease and whip stitch assembly for a neat finish.

Why You'll Love This Bobble Sheep Amigurumi Pattern

I absolutely love this pattern because the bobble stitch gives the sheep an irresistibly fluffy texture that looks professional yet fun to crochet. I enjoy the clear step-by-step rounds which make shaping predictable and satisfying. The balance of simple amigurumi stitches with textured bobbles keeps the work interesting without being overwhelming. I also love how customizable the design isβ€”change colors or yarn weight to create totally different characters.

Bobble Sheep Amigurumi Pattern step 1 - construction progress Bobble Sheep Amigurumi Pattern step 2 - assembly progress Bobble Sheep Amigurumi Pattern step 3 - details and accessories Bobble Sheep Amigurumi Pattern step 4 - final assembly and finishing

Switch Things Up

I love how easy it is to personalize this patternβ€”try bright pastel fleece colors for a nursery-friendly version or deep neutrals for a rustic look.

To change size, switch yarn weight and hook size: bulky yarn with a larger hook creates a chunky plush, while fingering weight makes a tiny collectible.

I often swap the safety eyes for embroidered eyes for baby-safe toys, using the same placement guidelines but embroidering before closing the head.

Try adding little accessories like a crocheted scarf or tiny bell around the neck for seasonal or themed sheep variations.

Experiment with different bobble sizes by adjusting yarn tension or using an alternate bobble stitch patternβ€”this creates playful texture differences.

You can change the face color and ear shape to make other animals; a rounded muzzle and different ear placement can transform the pattern into a cow or a pig variant.

I sometimes add wire inside the limbs for posable arms and legsβ€”just use thin craft wire and wrap it before stuffing for safety and comfort.

For a softer, more plush fleece, use a brushed or halo yarn for the bobble rounds while keeping the face and limbs in smooth yarn for contrast.

If you want a keychain size, work with thread or light sport yarn and a smaller hook, and attach a keyring through the top of the head before closing.

Embroider different mouth expressions and eyebrows to change the personality; small changes in eye placement also dramatically alter the expression.

Common Mistakes & How to Fix Them

βœ— Skipping stitch markers when working in the round causes you to lose track of the beginning of rounds; use a stitch marker at the start of each round and move it as you work to maintain consistent counting. βœ— Not stuffing gradually leads to lumps or misshapen pieces; add stuffing a bit at a time, shape as you go and finish stuffing before closing the opening. βœ— Forgetting to attach safety eyes before closing can make placement difficult; attach eyes between the specified rounds and check spacing before securing the washers. βœ— Pulling the yarn too tight while closing openings distorts the shape; use a gentle, even tension when drawing up the last stitches and shape the piece by hand while closing. βœ— Not counting stitches after increases or decreases causes mismatched shaping; count after every shaping round to ensure the stitch totals match the pattern.

Bobble Sheep Amigurumi Pattern

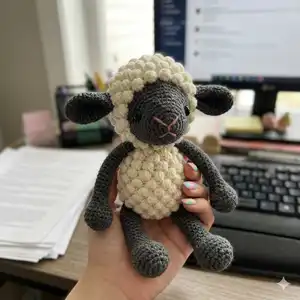
Make an adorable bobble-textured sheep with this detailed crochet pattern. You will create a cuddly amigurumi using the bobble stitch for a textured fleece and simple shaping for the head, body, legs and arms. The pattern includes step-by-step rounds, assembly instructions, and helpful photo tips so you can finish a charming handmade gift. Perfect for expanding your amigurumi skills and experimenting with texture.

Intermediate 5-7 Hours

Materials Needed for Bobble Sheep Amigurumi Pattern

β€” Main Fabric

  • 01
    DK weight alpaca wool (100 m = 50 g / 109 yd = 50 g) / 8 ply / 11 wpi
  • 02
    Approx. 90 g white for fleece
  • 03
    Approx. 40 g gray for head, face, arms and legs
  • 04
    Small amounts of pink and black embroidery floss for nose/mouth and details

β€” Tools Required

  • 01
    Crochet hook size 2.50mm - 3.00mm (US size 1/B - 3/D)
  • 02
    12 mm (1/2") safety eyes (2 pieces) or buttons/beads
  • 03
    Polyester fiberfill or wool wadding for stuffing
  • 04
    Cotton embroidery floss in black and pink
  • 05
    Yarn needle for sewing and embroidery
  • 06
    Scissors
  • 07
    Stitch markers
  • 08
    Pins for assembly (optional)

Progress Tracker

0% Complete

β€” Head :

Info :

The fleece is crocheted in rounds, starting each round with a ch and joining each round with a sl st through the first stitch. Do not count them as stitches. Start each round in the first stitch, the same one you slip stitched into earlier.

Round 1 :

mr, sc 10, sl st in 1st sc (10)

Round 2 :

ch, (sc, bo+sc) x 5, sl st in 1st sc (15)

Round 3 :

ch, (sc 2, inc) x 5, sl st in 1st sc (20)

Round 4 :

ch, (sc, bo+sc) x 10, sl st in 1st sc (30)

Round 5 :

ch, sc in each stitch, sl st in 1st sc (30)

Round 6 :

ch, (bo+sc, sc) x 15, sl st in 1st bo (45)

Round 7 :

ch, sc in each stitch, sl st in 1st sc (45)

Round 8 :

ch, (sc 2, bo) x 18, sl st in 1st sc (54)

Round 9 :

ch, sc in each stitch, sl st in 1st sc (54)

Round 10 :

ch, sc, bo, (sc 2, bo) x 17, sc, sl st in 1st sc (54)

Round 11 :

ch, sc in each stitch, sl st in 1st sc (54)

Round 12 :

ch, (bo, sc 2) x 18, sl st in 1st bo (54)

Round 13 :

ch, sc in each stitch, sl st in 1st sc (54)

Round 14 :

ch, (sc 2, bo) x 18, sl st in 1st sc (54)

Round 15 :

ch, sc in each stitch, sl st in 1st sc (54)

Round 16 :

ch, sc, bo, (sc 2, bo) x 17, sc, sl st in 1st sc (54)

Round 17 :

ch, sc in each stitch, sl st in 1st sc (54)

Round 18 :

ch, (bo, sc 2) x 18, sl st in 1st bo (54)

Round 19 :

ch, (sc 4, sc2tog) x 9, sl st in 1st sc (45)

Round 20 :

ch, (sc 2, bo) x 15, sl st in 1st sc (45)

Info :

Fasten off. Attach the gray yarn with a slip stitch in the first stitch and continue crocheting in spiral.

Round 21 :

sl st (counts as first stitch), sc 13, sc2tog, (sc 2, sc2tog) x 4, sc 13 (40)

Round 22 :

sc in each stitch (40)

Round 23 :

(sc 6, dec) x 5 (35)

Round 24-25 :

sc in each stitch (35)

Round 26 :

sc 2, dec, (sc 5, dec) x 4, sc 3 (30)

Round 27 :

sc in each stitch (30)

Info :

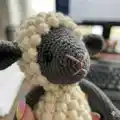
Attach safety eyes between rounds 24 and 25, leaving 14 stitches (count 13 holes) between them. Start stuffing the head. Keep adding a bit of fiberfill after every few rounds, stuffing the head firmly.

Round 28 :

(sc 4, dec) x 5 (25)

Round 29 :

sc in each stitch (25)

Round 30 :

sc, dec, (sc 3, dec) x 4, sc 2 (20)

Round 31 :

(dec, sc 8) x 2 (18)

Round 32 :

(sc, dec) x 6 (12)

Round 33 :

dec x 6 (6)

Info :

Finish stuffing. Cut the yarn, leaving a long yarn tail, fasten off and close the opening.

β€” EARS (make 2) :

Info :

With gray yarn:

Round 1 :

mr, sc 6 (6)

Round 2 :

(inc, sc) x 3 (9)

Round 3 :

(sc 2, inc) x 3 (12)

Round 4 :

sc, inc, (sc 3, inc) x 2, sc 2 (15)

Round 5 :

(sc 4, inc) x 3 (18)

Round 6 :

sc 2, inc, (sc 5, inc) x 2, sc 3 (21)

Round 7-12 :

sc in each stitch (21)

Round 13 :

dec, sc 9, dec, sc 8 (19)

Round 14 :

sc in each stitch (19)

Round 15 :

sc 14, dec, sc 3 (18)

Round 16 :

dec, sc 6, dec, sc 8 (16)

Info :

Fold the ear in half and crochet over the top with single crochet stitches (see photo). Cut the yarn, leaving a long yarn tail for sewing, and fasten off.

β€” Body :

Info :

The fleece is crocheted in rounds, starting each round with a ch and joining each round with a sl st through the first stitch. Do not count them as stitches. Start each round in the first stitch, the same one you slip stitched into earlier.

With white yarn - Round 1 :

mr, sc 10, sl st in 1st sc (10)

Round 2 :

ch, (sc, bo+sc) x 5, sl st in 1st sc (15)

Round 3 :

ch, (sc 2, inc) x 5, sl st in 1st sc (20)

Round 4 :

ch, (sc, bo+sc) x 10, sl st in 1st sc (30)

Round 5 :

ch, sc in each stitch, sl st in 1st sc (30)

Round 6 :

ch, (bo+sc, sc) x 15, sl st in 1st bo (45)

Round 7 :

ch, sc in each stitch, sl st in 1st sc (45)

Round 8 :

ch, (sc 2, bo) x 15, sl st in 1st sc (45)

Round 9 :

ch, sc in each stitch, sl st in 1st sc (45)

Round 10 :

ch, sc, bo, (sc 2, bo) x 14, sc, sl st in 1st sc (45)

Round 11 :

ch, sc in each stitch, sl st in 1st sc (45)

Round 12 :

ch, (bo, sc 2) x 15, sl st in 1st bo (45)

Round 13 :

ch, sc in each stitch, sl st in 1st sc (45)

Round 14 :

ch, (sc 2, bo) x 15, sl st in 1st sc (45)

Round 15 :

ch, sc in each stitch, sl st in 1st sc (45)

Round 16 :

ch, sc, bo, (sc 2, bo) x 14, sc, sl st in 1st sc (45)

Round 17 :

ch, sc in each stitch, sl st in 1st sc (45)

Round 18 :

ch, (bo, sc 2) x 15, sl st in 1st bo (45)

Round 19 :

ch, (sc 13, sc2tog) x 3, sl st in 1st sc (42)

Round 20 :

ch, (sc 2, bo) x 14, sl st in 1st sc (42)

Round 21 :

ch, sc 4, sc2tog, (sc 2, sc2tog) x 8, sc 4, sl st in 1st sc (33)

Round 22 :

ch, sc, bo, (sc 2, bo) x 10, sc, sl st in 1st sc (33)

Round 23 :

ch, (sc 3, sc2tog) x 6, sc 3, sl st in 1st sc (27)

Round 24 :

ch, (bo, sc 2) x 9, sl st in 1st bo (27)

Round 25 :

ch, sc in each stitch, sl st in 1st sc (27)

Info :

Cut the yarn, leaving a long yarn tail for sewing, and fasten off. Stuff the body firmly.

β€” ARMS (make 2) :

Info :

With gray yarn:

Round 1 :

mr, sc 6 (6)

Round 2 :

inc x 6 (12)

Round 3 :

(sc, inc) x 6 (18)

Round 4 :

(inc, sc 2) x 6 (24)

Round 5 :

sc 8, dec, (sc, dec) x 2, sc 8 (21)

Round 6 :

sc in each stitch (21)

Round 7 :

sc 10, dec, sc 9 (20)

Round 8 :

sc 7, dec, sc 3, dec, sc 6 (18)

Round 9 :

(dec, sc 7) x 2 (16)

Round 10 :

sc 7, dec, sc 7 (15)

Round 11 :

sc 4, dec, sc 3, dec, sc 4 (13)

Round 12-14 :

sc in each stitch (13)

Round 15 :

sc 6, dec, sc 5 (12)

Round 16-18 :

sc in each stitch (12)

Round 19 :

sc 6, dec, sc 4 (11)

Round 20-28 :

sc in each stitch (11)

Round 29 :

sc 9, dec (10)

Info :

Sl st in next stitch. Cut the yarn, leaving a long yarn tail for sewing, and fasten off. Stuff the hands firmly. Make a long vertical stitch along the front of the hoof, draw it very tight and knot the yarn ends together. Keep adding a bit of fiberfill after every few rounds, stuffing the arms lightly about 2/3 way up.

β€” LEGS (make 2) :

Info :

With gray yarn:

Round 1 :

mr, sc 6 (6)

Round 2 :

inc x 6 (12)

Round 3 :

(sc, inc) x 6 (18)

Round 4 :

(inc, sc 2) x 6 (24)

Round 5 :

(sc 3, inc) x 6 (30)

Round 6 :

sc 10, dec, (sc 2, dec) x 2, sc 10 (27)

Round 7 :

sc 11, dec, sc, dec, sc 11 (25)

Round 8 :

(sc 7, dec) x 2, sc 7 (23)

Round 9 :

dec, sc 9, dec, sc 10 (21)

Round 10 :

sc 9, dec, sc 10 (20)

Round 11 :

(sc 5, dec) x 2, sc 6 (18)

Round 12 :

sc 8, dec, sc 8 (17)

Info :

Stuff the feet firmly. Make a long vertical stitch along the front of the hoof, draw it very tight and knot the yarn ends together (see photos). Keep adding a bit of fiberfill after every few rounds, stuffing the legs lightly.

Round 13 :

sc 7, dec, sc 8 (16)

Round 14-15 :

sc in each stitch (16)

Round 16 :

sc 7, dec, sc 7 (15)

Round 17-19 :

sc in each stitch (15)

Round 20 :

sc 7, dec, sc 6 (14)

Round 21-31 :

sc in each stitch (14)

Round 32 :

(sc, dec) x 4, sc 2 (10)

Info :

Sl st in next stitch. Cut the yarn, leaving a long yarn tail for sewing, and fasten off. Finish stuffing.
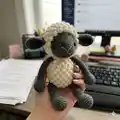
β€” Assembly & Finishing :

Info :

Attach safety eyes after finishing round 27 (or between rounds 24 and 25 for head fleece). Use a yarn needle and the long tails to close openings and shape the head and body. See photos for detailed shaping and embroidery instructions.

Item Name (P1) :

Sew the head to the body so the front edge of the body is just behind the last row of bobbles; use whip stitch and add extra stuffing before closing.

Assembly Instructions

  • Sew the head to the body with whip stitch, placing it so the front edge of the body is just behind the last row of bobbles and adding a bit more stuffing before closing the seam.
  • Place the arms to the sides of the body just below the last round of bobbles and push the top of the arms flat before sewing them in place, sewing through both layers for a secure attachment.
  • Place the legs over the third round of bobbles, leaving 4-5 bobbles between them, and sew the legs to the body with the opening positioned over a bobble for a neat finish.
  • Attach the ears to the sides of the head just behind the second-to-last round of bobbles and sew them securely using the long tail for sewing.
  • Attach safety eyes before finishing stuffing the head; place them between the specified rounds and secure washers only after confirming placement.

Important Notes

  • πŸ’‘Work in a continuous spiral; do not join rounds or turn your work unless instructed otherwise in the pattern.
  • πŸ’‘Use a stitch marker or a piece of yarn to mark the end or the beginning of a round for accurate counting.
  • πŸ’‘Work all stitches in both loops unless the pattern instructs otherwise, and stuff gradually to maintain even shaping.

This bobble sheep pattern combines a cute bobble-textured fleece with simple amigurumi shaping for a charming handmade toy. Whether you make it as a gift or for your own collection, the detailed rounds and finishing tips will help you achieve a professional look. Have fun experimenting with colors and yarns to make each sheep unique! πŸ§ΆπŸ‘

You ask,

we answer.

FAQs

What size will the finished piece be?

The finished amigurumi measures approximately 30 cm (12") from head to toe when crocheted with DK weight alpaca yarn and a 2.50 mm crochet hook.

Can I use different yarn weights for this pattern?

Yes, you can use different yarn weights; note that the final size will change. Use an appropriate hook for your chosen yarn and expect the texture and bobble size to vary.

Do I need prior crochet experience for this pattern?

This pattern is rated intermediate, so basic knowledge of amigurumi stitches, working in spiral, increases and decreases is recommended for best results.

How long does this project typically take to complete?

Most crocheters complete this project in 5-7 hours, though time may vary based on experience, yarn choice, and assembly complexity.