๐Ÿงถ Beautiful โœจ Detailed ๐Ÿ’ Adorable

Bobble Clutch Crochet Pattern

Bobble Clutch Crochet Pattern
3.9โ˜… Rating
5-7 Hours Time Needed
3.6K Made This
โœ‚๏ธ

Intermediate Level

Ideal for those with basic crochet experience, featuring slightly more advanced stitches and techniques to expand your skills.

โฑ๏ธ

Weekend Treat

Takes 5-7 hours, making it an enjoyable project to finish over a couple of days.

โœจ

Stylish Touch

An elegant detail to elevate any look, combining traditional techniques with contemporary design sensibilities.

About This Bobble Clutch Crochet Pattern

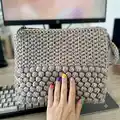
This pattern makes a bobble-textured clutch using Debbie Bliss Cashmerino Chunky yarn and a 6mm hook. It teaches the bobble stitch and crochet moss stitch to create a padded lower panel and a neat upper panel. Youll finish the clutch with a zipper and a simple crocheted handle for a polished accessory.
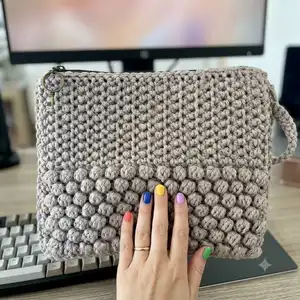
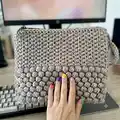
Bobble Clutch Crochet Pattern crochet pattern - detailed view of completed project

The pattern includes foundation row, bobble stitch repeats, crochet moss stitch section, finishing and handle instructions. Perfect for gifts or a handmade accessory to showcase chunky texture.

Why You'll Love This Bobble Clutch Crochet Pattern

I absolutely love this pattern because the bobble stitch creates such a satisfying, sculptural texture that stands out in a simple clutch design. I enjoy how quickly the chunky yarn works up, so you see big progress in a short time. The combination of bobble and moss stitches gives a lovely contrast and structure that makes the bag both tactile and polished. I also love that the finishing steps show how to add a zipper and handle for a truly professional result.

Bobble Clutch Crochet Pattern step 1 - construction progress Bobble Clutch Crochet Pattern step 2 - assembly progress Bobble Clutch Crochet Pattern step 3 - details and accessories Bobble Clutch Crochet Pattern step 4 - final assembly and finishing

Switch Things Up

I love making variations of this clutch by changing the yarn color or combining two colors for a bold stripe effect.

I sometimes swap the chunky yarn for a slightly lighter weight and a smaller hook to create a slimmer, more delicate clutch.

I often line the inside with a simple fabric lining for extra durability and to hide finishing stitchesโ€”this also gives a cleaner inside finish.

For a wristlet version, reduce the handle chain length and sew the handle more securely to prevent stretching with use.

Try adding a leather tab or metal ring to the zipper pull for a more polished, boutique finish.

If you want extra structure, add a thin interfacing or fabric panel between the bobble and moss panels before joining the bag faces together.

I also experiment with slightly different bobble sizes by adjusting how tightly I pull the loops during the MB step to create varied textures.

To make a matching set, crochet a small coin purse using the same bobble stitch scaled down with fewer foundation chains.

Change the placement of the bobble panelโ€”center it or make it cover the whole faceโ€”for different visual effects and styles.

If you prefer a softer look, block the finished clutch gently to relax the bobbles slightly and flatten the overall shape to your liking.

Common Mistakes & How to Fix Them

โœ— Skipping the foundation chain count causes uneven edge length; carefully count ch 30 at the start and verify you have 29 usable stitches after the foundation row. โœ— Not securing bobbles correctly will make them loose or fall apart; follow the MB instruction exactly and ch 1 to secure each bobble so they remain stable. โœ— Failing to press or block the bag leads to warped edges and poor zipper fit; press or block the work using the yarn ball band as a guide before attaching the zipper. โœ— Joining bag faces without aligning edges can misplace the zipper; pin the zipper to both bag faces and check alignment before running a joining stitch. โœ— Working with inconsistent tension produces uneven bobbles and stitch height; maintain steady tension throughout and check gauge for the bobble and moss stitch sections.
Bobble Clutch Crochet Pattern

Make a stylish, textured bobble clutch using chunky yarn and a simple set of stitches. This pattern guides you through the bobble stitch and crochet moss stitch to create a padded, structured clutch you can finish with a zipper and handle. Youll enjoy the tactile bobble texture and clean lines that make this clutch a perfect handmade gift or everyday accessory. Clear instructions and finishing tips are included so you can create a professional-looking result.

Intermediate 5-7 Hours

Materials Needed for Bobble Clutch Crochet Pattern

โ€” Main Fabric

  • 01
    Debbie Bliss Cashmerino Chunky - Shade: Pebble x 4, 50g balls (as specified)
  • 02
    Chunky weight yarn suitable for 6mm hook (Debbie Bliss Cashmerino Chunky recommended)

โ€” Tools Required

  • 01
    Crochet hook 6mm
  • 02
    Open ended zipper (cut to length as needed)
  • 03
    Large eyed sewing needle
  • 04
    Scissors

Progress Tracker

0% Complete

โ€” Bag face :

Make :

Using 6mm hook, ch 30.

Foundation row :

1 dc in 2nd ch from hook, 1 dc in every ch, turn. 29sts

Row 1 :

Ch 1, 1 dc in first st, *MB in next st, 1 dc in next st; rep from * to end, turn.

Row 2 :

Ch 1, 1 dc in first st, *miss ch to secure bobble, 1 dc in next 2 sts; rep from * to end, turn.

Row 3 :

Ch 1, 1 dc in first 2 sts, *MB, 1 dc; rep from * to last st, 1 dc, turn.

Row 4 :

Ch 1, 1 dc in first 2 sts, * miss ch to secure bobble, 1 dc in next 2 sts; rep from * to last st, 1 dc, turn.

Info :

These 4 rows repeated form bobble stitch.

Info :

Repeat these 4 rows twice more, then rep rows 1 and 2 again.

Next row (WS) :

Ch 1, 1 dc in every st, turn.

Info :

Now work crochet moss st as folls:

Moss Row 1 :

Ch 1, *1 dc in next st, 1 dc in st on row below over next st; rep from * to last st, 1 dc in last st, turn.

Moss Row 2 :

Ch 1, *1 dc in st on row below over next st, 1 dc in next st; rep from * to last st, 1 dc in st on row below over last st, turn.

Info :

These 2 rows repeated form crochet moss st.

Info :

Repeat these 2 rows eight times more (18 rows in total)

Next row (WS) :

ch 1, 1 dc BLO in every st.

Info :

Fasten off.

โ€” Finishing :

Info :

Fasten off all loose ends.

Info :

Press/block work using yarn ball band as a guide or desired method.

Info :

Cut zipper to length, and join to fasten off edge of both bag faces using running stitch.

Info :

Using a 6mm hook, WS of bag faces together and dc stitch join both bag faces together beginning at top left corner and then working around bottom of bag and right side until bag is fully joined.

Info :

Join fasten off edge of bag before and after ending of the zipper just a couple of cm in from each bag edge.

โ€” Handle :

Handle - Step 1 :

Using 6mm hook, start from top left corner of bag with zipper fastened (Zip at right corner), insert hook and ch 32.

Handle - Step 2 :

Insert hook back into same place on bag and secure loop with a sl st to form handle.

Handle - Step 3 :

Work 1 dc in every ch.

Handle - Step 4 :

Fasten off.

Assembly Instructions

  • Cut the zipper to the length of the bag faces and tack it to the fasten off edge of both bag faces using a running stitch to hold it in place for final joining.
  • With WS (wrong sides) of bag faces together, use a 6mm hook and dc stitch to join both bag faces beginning at the top left corner; work around the bottom and up the opposite side until fully joined.
  • Leave a couple of centimetres free before and after the end of the zipper when joining so the zipper can open and close without catching the joining seam.
  • Attach the handle by inserting the hook at the top left corner (zipper fastened at right), ch 32, secure the loop with a sl st back into the same place, then work 1 dc in every ch and fasten off securely.
  • Weave in and fasten off all loose ends and press or block the completed clutch using the yarn ball band as a guide for shape and size.

Important Notes

  • ๐Ÿ’กCheck your tension for both the bobble stitch (11 sts x 14 rows = 10cm) and crochet moss stitch (12 sts x 20 rows = 10cm) before starting to ensure accurate final size.
  • ๐Ÿ’กSecure each bobble (MB) by chaining 1 after creating the 11 loops and finishing the bobble to avoid loose or unstable bobbles.
  • ๐Ÿ’กPress or block work before attaching the zipper to ensure edges are even and the zipper sits flat for a professional finish.

This bobble clutch pattern combines sculptural texture with practical finishing for a beautifully handmade accessory. Try it as a gift or keep it as your new favourite bagโ€”its chunky stitches work up quickly and feel wonderful to make. Happy crocheting and enjoy creating your tactile, textured clutch! ๐Ÿงถโœจ

You ask,

we answer.

FAQs

What size will the finished piece be?

The finished clutch measures approximately W 26cm x L 21cm as specified using the recommended yarn and 6mm hook.

Can I use different yarn weights for this pattern?

Yes, but changing yarn weight will alter the final size and texture. If you use a different weight, adjust your hook size and check gauge for the bobble and moss stitch sections.
Do I need prior crochet experience for this pattern?

This pattern is rated intermediate because it uses the MB bobble technique, crochet moss stitch, and requires sewing a zipper; basic familiarity with dc, BLO, and finishing techniques is recommended.

How long does this project typically take to complete?

Most crocheters complete this project in 5-7 hours, though time may vary based on experience, speed, and whether you block and attach the zipper carefully.