🧶 Beautiful ✨ Detailed 💝 Adorable

Biscuits Pattern

Biscuits Pattern
4.6★ Rating
2-3 Hours Time Needed
1.7K Made This
✂️

Beginner Friendly Level

Perfect for those just starting their crochet journey, with clear instructions and simple techniques

⏱️

Bite-Sized Project

Finishes in 2-4 hours—perfect for an afternoon of creative relaxation.

🎁

Tiny Treasure

Small, sweet, and gift-worthy creations that fit perfectly in the palm of your hand with detailed charm.

About This Biscuits Pattern

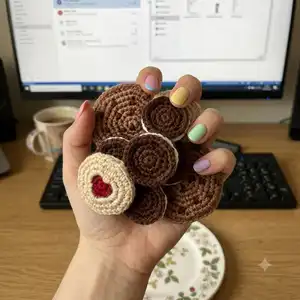
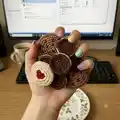
This pattern creates three different crochet biscuits: a Choc Chip Cookie, a Jammie Dodger, and an Oreo Cookie, each made from layered round pieces. You will work simple rounds of double crochet in DK yarn to form tops, bases and centres, then sew the layers together for the finished biscuit. These small biscuit motifs are ideal for play food, keyring additions, or tiny handmade gifts.

Biscuits Pattern crochet pattern - detailed view of completed project

The instructions use UK crochet terminology and clear round-by-round steps for each biscuit. Photos and assembly notes help you place centres and sew layers accurately.

Why You'll Love This Biscuits Pattern

I absolutely love this pattern because it turns a few basic crochet rounds into charming, miniature treats that are delightful to make and display. I enjoy how quickly each biscuit comes together — they are perfect when you want a satisfying, fast project. The design lets me experiment with colour and texture, adding small details like a heart-shaped jam centre or contrasting cream layers. Making these biscuits always puts a smile on my face, and I hope they inspire you to make a whole tin of your own.

Biscuits Pattern step 1 - construction progress Biscuits Pattern step 2 - assembly progress Biscuits Pattern step 3 - details and accessories Biscuits Pattern step 4 - final assembly and finishing

Switch Things Up

I love how easily this pattern can be customized by swapping colours for different biscuit varieties; try pastel tones for a vintage tea set or bright candy colours for playful kids toys.

I often change the yarn weight and hook size to make different scales — using thicker yarn creates chunky, tactile biscuits while finer yarn makes dainty miniatures.

I recommend adding embroidered details like small sprinkles or textured surface stitches to the Choc Chip Cookie for more visual interest.

For the Jammie Dodger, you can change the heart centre to a small crocheted flower or star for a different look.

If you want a more realistic cream centre for the Oreo, try using fluffy or boucle yarn for the middle layer to increase puffiness.

I sometimes attach a small loop of yarn to make these into keyrings or bag charms — just sew a small loop into the seam when joining the layers.

Try mounting a set of biscuits onto a small felted mat or inside a clear jar for a cute display prop or gift presentation.

I also enjoy pairing these biscuits with tiny plates and cups for a full crochet tea-time set; mix and match colours to create sets that coordinate.

To make a garland, stitch a length of yarn running through multiple biscuits before finishing the joins so they hang evenly along the string.

Don’t be afraid to experiment with surface crochet or embroidery to personalise each biscuit with initials or small motifs for custom gifts.

Common Mistakes & How to Fix Them

✗ Skipping the chain starting stitch at the beginning of a round can change your stitch height and distort the round; always work the ch1 where specified so your rounds stay even. ✗ Not joining rounds with a slip stitch to the first dc can leave a visible gap at the join; be sure to join with ss to the first dc as instructed for a neat edge. ✗ Sewing layers too tightly when joining the top and base will squash the biscuit shape and make the cream centre narrow; sew with gentle tension and check the shape as you go to avoid over-tightening. ✗ Forgetting to leave a long tail on the Jammie Dodger top prevents you from securing the heart centre later; always leave the long cast on tail so you can join and shape the centre when assembling. ✗ Concentrating all choc chips in the centre of the cookie makes the design unbalanced; distribute small stitched chips across the round and include a couple in round 7 to spread them out.

Biscuits Pattern

Make a charming set of mini crochet biscuits — Choc Chip Cookie, Jammie Dodger and Oreo Cookie — perfect for play food, gifts, or small decorative projects. This pattern uses DK yarn and simple UK double crochet techniques, so you will create crisp, round biscuit layers and assemble them into delightful little treats. Clear step-by-step instructions and helpful assembly notes guide you through each piece.

Beginner Friendly 2-3 Hours

Materials Needed for Biscuits Pattern

— Main Fabric

  • 01
    Paintbox Yarns Simply DK (100% Acrylic; 276m/302yds per 100g ball)
  • 02
    A: Soft Fudge - 10g (for Choc Chip Cookie main colour)
  • 03
    B: Coffee Bean - 10g (for Oreo cookie biscuit layers and chocolate parts)
  • 04
    C: Vanilla Cream - 10g (for Jammie Dodger top and cream portions)
  • 05
    D: Red Wine - 5g (for Jammie Dodger heart centre)
  • 06
    E: Champagne White - 5g (for Oreo cream centre)

— Tools Required

  • 01
    Crochet hook size 4mm (G/6)
  • 02
    Tapestry needle for sewing in ends
  • 03
    Scissors

Progress Tracker

0% Complete

— Introduction :

Info :

YOU WILL NEED Paintbox Yarns Simply DK (100% Acrylic; 276m/302yds per 100g ball) A: Soft Fudge, 10g B: Coffee Bean, 10g C: Vanilla Cream, 10g D: Red Wine, 5g E: Champagne White, 5g Crochet hook size 4mm (G/6) Tapestry needle for sewing in ends Scissors

Info :

TENSION Specific tension is not too important for this pattern, as long as it is consistent throughout so that your top and base pieces for the biscuits are the same size. Please be aware that if you use different yarns you may need more than what is specified for the Paintbox yarns.

Info :

SIZE INFORMATION Choc Chip Cookie 9cm diameter; Jammie Dodger 6cm diameter; Oreo Cookie 5cm diameter.

Info :

ABBREVIATIONS & STITCHES This pattern is written and charted using standard UK crochet terminology. mc – magic circle ch – chain ss – slip stitch st – stitch dc – double crochet

— CHOC CHIP COOKIE :

Item Name (Top and base) :

make two

Round 1 :

with A dc7 into magic circle, join with ss to 1st dc (7).

Round 2 :

ch1, 2dc into same st, 2dc into each st around, join with ss to 1st dc (14).

Round 3 :

ch1, dc into same st, 2dc in next st, *dc, 2dc in next st* repeat from * to * 6 times, join with ss to 1st dc (21).

Round 4 :

ch1, dc into same st, dc, 2dc in next st, *dc2, 2dc in next st* repeat from * to * 6 times, join with ss to 1st dc (28).

Round 5 :

ch1, dc into same st, dc2, 2dc in next st, *dc3, 2dc in next st* repeat from * to * 6 times, join with ss to 1st dc (35).

Round 6 :

ch1, dc into same st, dc3, 2dc in next st, *dc4, 2dc in next st* repeat from * to * 6 times, join with ss to 1st dc (42).

Round 7 :

ch1, dc into same st, dc4, 2dc in next st, *dc5, 2dc in next st* repeat from * to * 6 times, join with ss to 1st dc (49). Fasten off and sew in ends.

Info :

Add choc chips: On right side of top piece, use B to stitch your choc chips randomly over the top. Make sure you put a couple in round 7 so that they are not concentrated in the centre of your cookie!

Info :

Join together: With wrong sides together join A through both sides and ch1, dc the two pieces together making sure you hook through both sides as you go around, join with ss to 1st dc, fasten off and sew in ends.

— JAMMIE DODGER :

Item Name (Base) :

using C

Round 1 :

with C dc7 into magic circle, join with ss to 1st dc (7).

Round 2 :

ch1, 2dc into same st, 2dc into each st around, join with ss to 1st dc (14).

Round 3 :

ch1, dc into same st, 2dc in next st, *dc, 2dc in next st* repeat from * to * 6 times, join with ss to 1st dc (21).

Round 4 :

ch1, dc into same st, dc, 2dc in next st, *dc2, 2dc in next st* repeat from * to * 6 times, join with ss to 1st dc (28).

Round 5 :

ch1, dc into same st, dc2, 2dc in next st, *dc3, 2dc in next st* repeat from * to * 6 times, join with ss to 1st dc (35). Fasten off and sew in ends.

Item Name (Centre) :

using D

Round 1 :

with D dc7 into magic circle, join with ss to 1st dc (7).

Round 2 :

ch1, 2dc into same st, 2dc into each st around, join with ss to 1st dc (14).

Round 3 :

ch1, dc into same st, 2dc in next st, *dc, 2dc in next st* repeat from * to * 6 times, join with ss to 1st dc (21).

Round 4 :

ch1, dc into same st, dc, 2dc in next st, *dc2, 2dc in next st* repeat from * to * 6 times, join with ss to 1st dc (28). Fasten off and sew in ends.

Item Name (Top) :

using C

Round 1 :

with C ch14, join ends with ss, ch1 and dc21 into the circle, join with ss to 1st dc (21).

Info :

Top tip: leave a long cast on tail so that you can use it later to secure the centre heart shape in place when sewing together.

Round 2 :

ch1, dc into same st, dc, 2dc in next st, *dc2, 2dc in next st* repeat from * to * 6 times, join with ss to 1st dc (28).

Round 3 :

ch1, dc into same st, dc2, 2dc in next st, *dc3, 2dc in next st* repeat from * to * 6 times, join with ss to 1st dc (35). Fasten off and sew in end.

Info :

Join together: Using the long cast on tail from your top piece, join the top and centre together by stitching around the central hole, shaping it into a heart as you sew around. Add a couple of stitches into the centre, to make the v-shape at the top of the heart. With wrong sides together, using A, sew through top and base to join around the edge.

— OREO COOKIE :

Item Name (Top and base) :

make two using B

Round 1 :

with B dc7 into magic circle, join with ss to 1st dc (7).

Round 2 :

ch1, 2dc into same st, 2dc into each st around, join with ss to 1st dc (14).

Round 3 :

ch1, dc into same st, 2dc in next st, *dc, 2dc in next st* repeat from * to * 6 times, join with ss to 1st dc (21).

Round 4 :

ch1, dc into same st, dc, 2dc in next st, *dc2, 2dc in next st* repeat from * to * 6 times, join with ss to 1st dc (28). Fasten off and sew in ends.

Item Name (Centre) :

using E

Round 1 :

with E dc7 into magic circle, join with ss to 1st dc (7).

Round 2 :

ch1, 2dc into same st, 2dc into each st around, join with ss to 1st dc (14).

Round 3 :

ch1, dc into same st, 2dc in next st, *dc, 2dc in next st* repeat from * to * 6 times, join with ss to 1st dc (21).

Round 4 :

ch1, dc into same st, dc, 2dc in next st, *dc2, 2dc in next st* repeat from * to * 6 times, join with ss to 1st dc (28). Fasten off and sew in ends.

Info :

Join together: Stack pieces with base upside down, centre and top right side up. Using B sew the layers together, being careful not to sew too close to the edge or you’ll squash the cream centre of your biscuit!

Assembly Instructions

  • Choc Chip Cookie: Place the two top and base pieces wrong sides together and join with A by ch1 and working dc through both layers around the edge; join with ss to 1st dc, fasten off and weave in ends.
  • Jammie Dodger: Use the long cast-on tail from the top piece to stitch the top to the centre, shaping the central hole into a heart as you sew; add a couple of stitches to form the V at the top of the heart, then with wrong sides together sew top and base together using A around the outer edge.
  • Oreo Cookie: Stack the base (upside down), the cream centre (right side up) and the top (right side up) and sew through the layers with B, taking care not to sew too close to the edge so the cream remains puffy.
  • Placement of details: For choc chips stitch small B-coloured spots across the right side of the top piece, including a couple in round 7 to avoid concentration in the centre.
  • Finishing: Fasten off and sew in all ends securely after joining; press gently with your hands to shape the biscuit if needed.

Important Notes

  • 💡Use consistent tension throughout the pattern so the top and base pieces match in size; inconsistent tension will change the biscuit diameter.
  • 💡Leave a long cast-on tail on the Jammie Dodger top so you can use it to secure and shape the heart centre when assembling.
  • 💡When sewing layered biscuits like the Oreo, avoid stitching too close to the edge or you will flatten the cream centre; sew gently and check shape as you go.

These tiny crochet biscuits are perfect little handmade gifts and playful decorations — quick to make and delightful to collect. They look great displayed in a jar or given as a sweet, thoughtful present to a friend. Happy crocheting and enjoy your little batch of biscuits! 🧶🍪
You ask,

we answer.

FAQs

What size will the finished piece be?

The Choc Chip Cookie measures approximately 9 cm diameter, the Jammie Dodger approximately 6 cm, and the Oreo Cookie approximately 5 cm when using the recommended yarn and 4mm hook.

Can I use different yarn weights for this pattern?

Yes, you can use different yarn weights, but the finished sizes will change; switch to an appropriate hook size for the chosen yarn and check your tension to match the desired diameter.

Do I need prior crochet experience for this pattern?

This pattern is beginner friendly and uses basic UK double crochet rounds, but you should be comfortable working in the round and joining rounds with slip stitch for best results.

How long does this project typically take to complete?

Most crocheters can complete a single biscuit in about 15-30 minutes; making a small set of biscuits typically takes 2-3 hours in total depending on experience and finishing time.