🧢 Beautiful ✨ Detailed πŸ’ Adorable

Bernat Pipsqueak Star Blanket Pattern

Bernat Pipsqueak Star Blanket Pattern
4.6β˜… Rating
10-12 Hours Time Needed
4.0K Made This
βœ‚οΈ

Intermediate Level

Ideal for those with basic crochet experience, featuring slightly more advanced stitches and techniques to expand your skills.

⏱️

Slow & Steady

A 10-12 hour projectβ€”great for savoring the process over several sessions.

πŸ€—

Soft Hug

Gentle, plush, and full of warmth, creating a sense of comfort and coziness wherever they find a home.

About This Bernat Pipsqueak Star Blanket Pattern

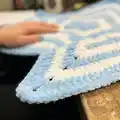
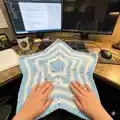
This pattern creates a plush star-shaped blanket using Bernat Pipsqueak yarn with alternating contrast colors. The design builds outward from the center using rounds of hdc and dc with defined points and chain-2 corner spaces. You will enjoy the tactile, velvety texture and cozy finish.

Bernat Pipsqueak Star Blanket Pattern crochet pattern - detailed view of completed project

Worked in rounds from the center out, this blanket alternates colors for a soft striped star effect. Techniques include hdc, dc, sc, sc2tog and simple shaping to form the star points.

Why You'll Love This Bernat Pipsqueak Star Blanket Pattern

I absolutely love this pattern because it transforms unbelievably soft Bernat Pipsqueak yarn into a striking star-shaped blanket that is both cozy and visually fun. I enjoy the rhythm of the rounds as the star grows outward and the satisfying symmetry as each point forms. The plush texture makes it a joy to work with and the finished blanket is perfect for babies or snuggling on the couch. I also appreciate how the alternating color rounds create a gentle, modern striped look without complicated colorwork.

Bernat Pipsqueak Star Blanket Pattern step 1 - construction progress Bernat Pipsqueak Star Blanket Pattern step 2 - assembly progress Bernat Pipsqueak Star Blanket Pattern step 3 - details and accessories Bernat Pipsqueak Star Blanket Pattern step 4 - final assembly and finishing

Switch Things Up

I love customizing this blanket by changing the color rhythm; try two rounds of one color and one of another to create different striping effects.

I often experiment with a neutral background and a bold contrast for the points to make the star really pop in photos and decor.

To make a larger blanket I simply continue the established sequence of rounds until I reach the desired radius, checking measurements as I go.

If you want a smaller, gift-sized version, switching to a lighter yarn and a smaller hook will produce a charming mini that still shows the star shape.

I enjoy adding a simple border in a third colorβ€”5–8 rounds of DC or a scallop edge adds a polished finish and frames the star nicely.

For texture, try substituting some rounds with HDC or a puff stitch round to introduce subtle ridges and tactile interest.

I sometimes embroider a small motif or initial in one point as a personalization for baby gifts; do this before final blocking for best results.

Want seasonal looks? Use holiday colors or pastel tones to match nursery themes, and the pattern adapts beautifully to palette changes.

I also recommend using a soft, bulky alternative yarn for an ultra-plush throwβ€”just be sure to swatch and match the gauge for consistent shaping.

Finally, I love to mix yarn textures (a fuzzy round between smoother rounds) to create a cozy stripe that invites touch and makes each blanket unique.

Common Mistakes & How to Fix Them

βœ— Skipping the chain-3 as a dc at the beginning of each round can change your stitch count and pattern shape; always count the starting chain as a dc throughout. βœ— Not joining the new color at the correct stitch can create an uneven color transition; join B or A exactly where the pattern instructs with a slip stitch to maintain clean color changes. βœ— Forgetting to create the chain-2 corner spaces will distort the star points and make the blanket lopsided; be sure to place (2 dc, ch 2, 2 dc) in each corner ch-2 space as written. βœ— Pulling yarn too tightly while making sc2tog decreases can cinch your work and block the star point shape; keep an even, gentle tension when drawing up loops and completing sc2tog.

Bernat Pipsqueak Star Blanket Pattern

Make a cuddly, star-shaped baby blanket using soft Bernat Pipsqueak yarn. This pattern gives you clear round-by-round instructions and color changes to create a striking striped star motif. Perfect for gifting or cozying up, the plush texture is delightful to work with and lovely to snuggle.

Intermediate 10-12 Hours

Materials Needed for Bernat Pipsqueak Star Blanket Pattern

β€” Main Fabric

  • 01
    Bernat Pipsqueak (100 g/3.5 oz; 109 m/120 yds) - 3 balls of A and 2 balls of B
  • 02
    Alternate yardage option shown: (250 g/8.8 oz; 274 m/300 yds) - 1 ball each of A and B
  • 03
    Contrast A (58730 or 59730 Silly Sea) 259 m / 283 yds
  • 04
    Contrast B (58005 or 59005 Whitey White) 208 m / 227 yds

β€” Tools Required

  • 01
    Size 6.5 mm (U.S. K or 10 1/2) crochet hook or size needed to obtain gauge

Progress Tracker

0% Complete

β€” Instructions :

Info :

Note: Ch 3 at beg of rnd counts as dc throughout.

Info :

Beg at center, with A, ch 5. Join with sl st to form ring.

Round 1 :

Ch 2 (does not count as st). 12 hdc in ring. Join with sl st to first hdc. 12 hdc.

Round 2 :

Ch 1. 1 sc in same sp as last sl st. *3 dc in next hdc. 1 sc in next hdc. Rep from * around to last hdc. 3 hdc in last hdc. Join B with sl st to first sc.

Round 3 :

With B, sl st in next dc. Ch 3. (2 dc. Ch 2. 2 dc) in next dc. 1 dc in next dc. *Miss next sc. 1 dc in next dc. (2 dc. Ch 2. 2 dc) in next dc. 1 dc in next dc. Rep from * 4 times more. Join A with sl st to top of ch 3.

Round 4 :

With A, sl st in next dc. Ch 3. 1 dc in next dc. *(2 dc. Ch 2. 2 dc) in next ch-2 sp. 1 dc in each of next 2 dc.** Draw up a loop in each of next 2 dc. Yoh and draw through all loops on hook - sc2tog made. 1 dc in each of next 2 dc. Rep from * 4 times more, then from * to ** once. Sc2tog over last 2 sts. Join with sl st to top of ch 3.

Round 5 :

Ch 3. 1 dc in each of next 3 dc. *(2 dc. Ch 2. 2 dc) in next ch-2 sp. 1 dc in each of next 4 dc.** Miss next st. 1 dc in each of next 4 dc. Rep from * 4 times more, then from * to ** once. Miss last st. Join B with sl st to top of ch 3.

Round 6 :

With B, sl st in next dc. Ch 3. 1 dc in each of next 4 dc. *(2 dc. Ch 2. 2 dc) in next ch-2 sp. 1 dc in each of next 5 dc.** Sc2tog over next 2 dc. 1 dc in each of next 5 dc. Rep from * 4 times more, then from * to ** once. Sc2tog over last 2 dc. Join A with sl st to top of ch 3.

Round 7 :

With A, ch 3. 1 dc in each of next 6 dc. *(2 dc. Ch 2. 2 dc) in next ch-2 sp. 1 dc in each of next 7 dc.** Miss next st. 1 dc in each of next 7 dc. Rep from * 4 times more, then from * to ** once. Miss last st. Join with sl st to top of ch 3.

Round 8 :

Sl st in next dc. Ch 3. 1 dc in each of next 7 dc. *(2 dc. Ch 2. 2 dc) in next ch-2 sp. 1 dc in each of next 8 dc.** Sc2tog over next 2 dc. 1 dc in each of next 8 dc. Rep from * 4 times more, then from * to ** once. Sc2tog over last 2 dc. Join B with sl st to top of ch 3.

Round 9 :

With B, sl st in next dc. Ch 3. 1 dc in each of next 9 dc. *(2 dc. Ch 2. 2 dc) in next ch-2 sp. 1 dc in each of next 10 dc.** Miss next st. 1 dc in each of next 10 dc. Rep from * 4 times more, then from * to ** once. Miss last st. Join A with sl st to top of ch 3.

Round 10 :

With A, sl st in next dc. Ch 3. 1 dc in each of next 10 dc. *(2 dc. Ch 2. 2 dc) in next ch-2 sp. 1 dc in each of next 11 dc.** Sc2tog over next 2 dc. 1 dc in each of next 11 dc. Rep from * 4 times more, then from * to ** once. Sc2tog over last 2 dc. Join with sl st to top of ch 3.

Round 11 :

Ch 3. 1 dc in each of next 12 dc. *(2 dc. Ch 2. 2 dc) in next ch-2 sp. 1 dc in each of next 13 dc.** Miss next st. 1 dc in each of next 13 dc. Rep from * 4 times more, then from * to ** once. Miss last st. Join B with sl st to top of ch 3.

Info :

Cont as established, (working 1 rnd B; 2 rnds A throughout) until work from center to outer point measures approx 20 ins [51 cm] ending with 2 rnds A. Fasten off.

Assembly Instructions

  • Fasten off after final round and weave in all yarn tails neatly on the wrong side to secure color changes.
  • Block the finished blanket gently to even out the star points and enhance the overall shape, pinning points to measurements as needed.
  • When joining new colors, secure the join with a slip stitch as directed and weave the ends inside the next few rounds for a tidy finish.
  • Check all sc2tog and corner ch-2 spaces for correct placement before finishing to ensure the star points are even and symmetrical.

Important Notes

  • πŸ’‘Use a stitch marker at the start of each round to keep track of the beginning and maintain correct stitch counts.
  • πŸ’‘Maintain consistent tension throughout to achieve the stated gauge and final blanket dimensions.
  • πŸ’‘Measure from the center to the outer point as you work so you can stop when your blanket reaches the desired size.

This cozy star blanket pattern is perfect for crafting a soft, modern accent that doubles as a warm hug for baby or couch cuddles. The plush Bernat Pipsqueak yarn makes every stitch feel luxurious and snuggly. Finish it in your favorite colorway and enjoy a handmade piece that brightens any room. 🧢🀍

You ask,

we answer.

FAQs

What size will the finished blanket be?

The finished blanket measures approximately 40 inches (101.5 cm) from point to point when worked to the sample gauge and size.

What hook size should I use to match the pattern gauge?

Use a 6.5 mm (U.S. K or 10 1/2) crochet hook or the size needed to obtain the stated gauge of 10 dc and 6 rows = 4 inches.

Can I change the yarn or colors?

Yes, you can substitute yarns but this will affect the final size and drape; choose a yarn with similar weight and adjust the hook to match the gauge.

How do I know when to stop adding rounds?

Continue working the established color sequence (1 rnd B; 2 rnds A) until the measurement from the center to the outer point is approximately 20 inches, then finish with 2 rounds of A and fasten off.