🧶 Beautiful ✨ Detailed 💝 Adorable

Bed Blanket Pillow and Toy Amigurumi Pattern

Bed Blanket Pillow and Toy Amigurumi Pattern
4.6★ Rating
5-7 Hours Time Needed
1.5K Made This
✂️

Intermediate Level

Ideal for those with basic crochet experience, featuring slightly more advanced stitches and techniques to expand your skills.

⏱️

Weekend Treat

Takes 5-7 hours, making it an enjoyable project to finish over a couple of days.

🧸

Cute Companion

An adorable friend to cherish, handcrafted with love to bring comfort and joy for years to come.

About This Bed Blanket Pillow and Toy Amigurumi Pattern

This pattern teaches you to crochet a complete tiny nursery set: a bed (choose gray or pink), a fringed blanket, a small pillow, and two tiny toys (a mouse and a whale). Clear step-by-step rounds and photo references guide you through shaping, joining, and finishing. Techniques include working in continuous rounds, half double crochet edging, and small amigurumi shaping.

Bed Blanket Pillow and Toy Amigurumi Pattern crochet pattern - detailed view of completed project

Perfect for making thoughtful gifts or adding a handmade touch to dollhouse scenes. The instructions include yarn recommendations and finishing tips for a professional result.

Why You'll Love This Bed Blanket Pillow and Toy Amigurumi Pattern

I absolutely love this pattern because it combines small-scale amigurumi with useful accessories for a charming finished set. I enjoy the mix of simple rectangular crochet for the bed and more detailed shaping for the toys — it keeps the project varied and satisfying. The photo sequence makes it easy to follow along and learn new finishing techniques. Every piece feels collectible and personal, and I love gifting the complete set to friends and family.

Bed Blanket Pillow and Toy Amigurumi Pattern step 1 - construction progress Bed Blanket Pillow and Toy Amigurumi Pattern step 2 - assembly progress Bed Blanket Pillow and Toy Amigurumi Pattern step 3 - details and accessories Bed Blanket Pillow and Toy Amigurumi Pattern step 4 - final assembly and finishing

Switch Things Up

I love how easy it is to customize colors in this pattern; I often use pastel palettes for a soft nursery look or bold hues for a playful set.

I sometimes swap yarn weight and hooks to make a mini keychain version or a larger cuddly version—lighter yarn and 1.25 mm hooks give tiny toys, while thicker yarn and larger hooks give chunky results.

I add embroidered details like tiny hearts or initials on the pillow to personalize gifts and make each set special.

Try switching stitch textures: use Hdc or Dc for the blanket rows to create a different drape and feel for the fringe edges.

I recommend experimenting with mixed fibers for different finishes—cotton gives crisp edges while acrylic adds softness and loft.

For a more durable toy, you can insert a small felt base inside the bed or add a piece of cardboard covered in fabric to help it keep shape.

I sometimes add tiny buttons or a ribbon bow to the blanket corner for visual interest and a handcrafted touch.

To change the personality of the toy, move the embroidered eyes slightly higher or lower; this simple shift changes expression dramatically.

I also enjoy creating sets with matching color stories—coordinate the bed, blanket, pillow, and toy with two main colors for a cohesive look.

Finally, try creating a mini wardrobe of tiny accessories—crochet a miniature hat or scarf for the mouse or whale to make playtime extra fun.

Common Mistakes & How to Fix Them

✗ Skipping stitch counts at the base chain will distort the bed shape; always count chains and stitches before proceeding. ✗ Crocheting too loosely with the recommended hook makes edges floppy; use correct hook size and maintain consistent tension. ✗ Overstuffing the toys results in a bloated look that loses shape; stuff gradually and lightly for smooth curves. ✗ Forgetting to place a stitch marker when working continuous rounds causes lost beginning-of-rounds; add a marker at round starts and move it each round.

Bed Blanket Pillow and Toy Amigurumi Pattern

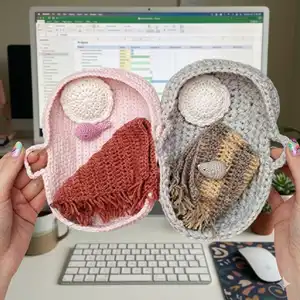
Create a cozy miniature nursery set with this complete crochet pattern. You will make a tiny bed (gray or pink), a fringed blanket, a plush pillow, and two pocket-sized toys (mouse and whale). The pattern is photo-rich and carefully written so you can follow along step by step. Perfect for gift-making, decor, or a charming project to practice small amigurumi techniques.

Intermediate 5-7 Hours

Materials Needed for Bed Blanket Pillow and Toy Amigurumi Pattern

— Main Fabric

  • 01
    ARN ART Ribbon (60% cotton/40% acrylic; 250g/125m - 8,8oz/136yd) - for gray bed
  • 02
    YARN ART Jeans Plus (55% cotton/45% acrylic; 100g/160m - 3,5oz/174yd) - for pink bed
  • 03
    YARN ART Cotton soft (55% cotton/45% acrylic; 100g/600m - 3,5oz/656yd) - for mouse and whale (or Alize Miss 100% cotton; 50g/280m - 1,7oz/306yd)
  • 04
    Alize Lana Gold Fine (49% wool/51% acrylic; 100g/390m - 3,5oz/426yd) - for pillow and blanket (or YARN ART Jeans 55% cotton/45% acrylic; 50g/160m - 1,8oz/174yd)
  • 05
    Holofiber (polyester stuffing) as a filler for toys and pillow

— Tools Required

  • 01
    Crochet hook size 5.0 mm
  • 02
    Crochet hook size 2.5 mm
  • 03
    Crochet hook size 1.25 mm
  • 04
    Scissors
  • 05
    Yarn needle for sewing
  • 06
    Black sewing thread for embroidery
  • 07
    Stitch markers
  • 08
    Pins for assembly (optional)
  • 09
    Polyester stuffing (holofiber) for toys and pillow

Progress Tracker

0% Complete

— Abbreviations :

Info :

ch - chain. sc st - single crochet stitch. sl st - slip stitch. inc - increase. dec(s) - decrease(s). rep - repeat. Hdc - half double crochet. Dc - double crochet.

— Supplies :

Infos :

For gray bed: ARN ART Ribbon (60% cotton/40% acrylic; 250g/125m - 8,8oz/136yd). For pink bed: YARN ART Jeans Plus (55% cotton/45% acrylic; 100g/160m - 3,5oz/174yd). For mouse and whale: YARN ART Cotton soft (55% cotton/45% acrylic; 100g/600m - 3,5oz/656yd) or Alize Miss (100% cotton; 50g/280m - 1,7oz/306yd). For pillow and blanket: Alize Lana Gold Fine (49% wool/51% acrylic; 100g/390m - 3,5oz/426yd) or YARN ART Jeans (55% cotton/45% acrylic; 50g/160m - 1,8oz/174yd). Holofiber as a filler for toys. Crochet hook 5 mm, 2.5 mm and 1.25 mm. Black sewing thread for embroidery.

Info :

Work in continuous rounds. Do not join or turn unless otherwise instructed. It would be wise to use a stitch marker and place it in the first stitch of each round to mark the beginning of it.

— Gray Bed :

Info :

Gray yarn, crochet hook 5 mm

Round 1 :

21 ch, turn

Round 2 :

Sc in each of next 20 ch, ch, turn

Round 3-10 :

Sc in each of next 20 sts, ch, turn

Round 11 :

Sc in each of next 20 sts, ch, turn, 2 ch, turn, then crochet in around:

Round 12 :

Hdc in each of next 20 sts

Info :

9 hdc on the side

Info :

20 hdc

Info :

9 hdc on the side = 58 hdc, sl st in the first hdc, 2 ch

Round 13 :

= 58 hdc around, sl st in the first hdc, 2 ch

Round 14 :

In this row crochet a small visor: hdc in each of next 36 sts, ch, turn

Info :

Sc in next st, hdc in each of next 21 sts, ch, turn

Info :

Sc in next st, hdc in each of next 20 sts, sc in next st, 2 sc st on the side visor, then crochet along the main part - hdc in each of next 22 sts, sl st in the first hdc, 2 ch

Round 15 :

Hdc in each of next 10 sts, 8 ch (or more if you want longer handles), skip 3 sts, hdc in next st, 2 sc st on the side visor, sc in each of next 24 sts, hdc in next st, 8 ch, skip 3 sts, hdc in each of next 18 sts, sl st in the first hdc

Info :

Cut the thread, fasten, hide.

— Pink Bed :

Info :

Pink yarn, crochet hook 2,5 mm (Crochet in the same way as the gray bed, but with a different number of loops)

Round 1 :

33 ch, turn

Round 2 :

Sc in each of next 32 ch, ch, turn

Round 3-20 :

Sc in each of next 32 sts = 32 sts, ch, turn

Round 21 :

Sc in each of next 32 sts = 32 sts, 2 ch, turn, then crochet in around

Round 22 :

Hdc in each of next 32 sts + hdc in each of next 19 sts on the side + hdc in each of next 32 sts + hdc in each of next 19 sts on the side, sl st in the first hdc, 2 ch = 102 sts

Round 23-24 :

hdc in each of next 102 sts, sl st in the first hdc, 2 ch

Round 25 :

dec, hdc in each of next 28 sts, dec, hdc in each of next 19 sts, dec, hdc in each of next 28 sts, dec, hdc in each of next 19 sts = 98 sts, sl st in the first hdc, 2 ch

Round 26 :

In this row crochet a small visor: hdc in each of next 63 sts, ch, turn, sc in next st, hdc in each of next 43 sts, ch, turn, sc in next st, hdc in each of next 42 sts, sc in next st, 2 sc on the side visor, hdc in each of next 35 sts, sl st in the first hdc, 2 ch

Round 27 :

Hdc in each of next 14 sts, 20 ch, skip 4 sts, hdc in next st, 2 sc on the side visor, sc in each of next 44 sts, 2 sc on the side, hdc in next st, 20 ch, skip 4 sts, hdc in each of next 30 sts, sl st in the first hdc

Info :

Cut the thread, fasten, hide.

— Blanket :

Info :

Wool yarn Alize or Yarn Art Jeans, crochet hook 2,5 mm

Round 1 :

Crochet 37 ch, turn

Round 2 :

Dc in each of next 35 ch, 2 ch, turn

Round 3-18 :

Dc in each of next 35 sts, 2 ch, turn

Info :

Cut the thread, make a fringe around the edges (in this version I made it by turning the canvas vertically)

— Pillow :

Info :

Wool yarn Alize or Yarn Art Jeans, crochet hook 2,5 mm

Round 1 :

Start 10 hdc in a magic ring, sl st in the first hdc, 2 ch

Round 2 :

2 hdc in each of next 10 sts = 20 sts, sl st in the first hdc, 2 ch

Round 3 :

(inc + hdc in next st) rep to the end = 30 sts, sl st in the first hdc, ch

Round 4 :

(sc in each of next 2 sts + inc) rep to the end = 40 sts, sl st in the first hdc, ch

Info :

Cut the thread, crochet the second part of the same (do not cut the thread) and then crochet through the two halves, connecting them: - sc in next st, 3 sc in next st (or hdc) - rep to the end, lightly fill the pillow with filler.

— Small Round Pieces (Pillow details) :

Round 1 :

(pictured) Make two small round discs as shown for pillow details; start with magic ring and increase rounds to create flat circles, then join and stuff lightly.

— Mouse :

Info :

Gray yarn, crochet hook 1,25 mm

Round 1 :

Start 6 sc in a magic ring.

Round 2 :

Work 2 sc in each st around [12]

Round 3 :

(inc, sc in next st) rep 6 times [18]

Round 4 :

(Sc in each of next 2 sts, inc) rep 6 times [24]

Round 5-9 :

Sc in each st around [24]

Round 10 :

2 dec, sc in each of next 18 sts, dec [21]

Round 11 :

(dec + sc in next st) rep 2 times, sc in each of next 12 sts, dec, sc in next st [18]

Round 12 :

Sc in each st around [18]

Round 13 :

(Sc in each of next 4 sts + dec) rep 3 times [15]

Round 14 :

(Sc in each of next 3 sts + dec) rep 3 times [12]

Info :

Fill with filler

Round 15 :

(Sc in each of next 2 sts + dec) rep 3 times [9]

Round 16 :

(Sc in next st + dec) rep 3 times [6]

Info :

Cut the thread, close the hole

— Ears :

Round 1 :

Start 6 sc in a magic ring.

Info :

Cut the thread, leaving for sewing

Info :

Sew on ears, on both sides, on row 9 from the beginning of crochet

Info :

For the tail: attach a thread between the first and second row and crochet 6 ch. Cut the thread.

Info :

On the last row, embroider the nose with black sewing threads, and step back 5 rows from it, embroider the eyes on both sides.

— Whale :

Info :

Pink yarn, crochet hook 1,25 mm

Round 1 :

Start 6 sc in a magic ring.

Round 2 :

Work 2 sc in each st around [12]

Round 3 :

(inc, sc in next st) rep 6 times [18]

Round 4 :

(Sc in each of next 2 sts, inc) rep 6 times [24]

Round 5-9 :

Sc in each st around [24]

Round 10 :

2 dec, sc in each of next 18 sts, dec [21]

Round 11 :

(dec + sc in next st) rep 2 times, sc in each of next 12 sts, dec, sc in next st [18]

Round 12 :

Sc in each st around [18]

Round 13 :

(Sc in each of next 4 sts + dec) rep 3 times [15]

Round 14 :

(Sc in each of next 3 sts + dec) rep 3 times [12]

Round 15 :

Sc in each st around [12]

Info :

Fill with filler

Round 16 :

(Sc in each of next 2 sts + dec) rep 3 times [9]

Round 17 :

Sc in each st around [9]

Round 18 :

(Sc in next st + dec) rep 3 times [6]

Round 19 :

ch, crochet a tail through two sides: hdc + dc + hdc in next st, sc in next st, hdc + dc + hdc in next st + sl st

Info :

Cut the thread. Embroider eyes on rows 6-7 from the beginning of crochet.

Assembly Instructions

  • Sew the two pillow halves together by crocheting through both edges (sc in next st, 3 sc in next st or hdc) and lightly fill the pillow with holofiber before closing.
  • Sew ears to the mouse on both sides at row 9 from the beginning of crochet to ensure symmetrical placement and stitch securely.
  • Attach the tail by inserting a thread between the first and second rows of the mouse and crocheting 6 ch, then secure and hide the ends.
  • Embroider the nose with black sewing thread on the last row, then step back five rows and embroider eyes on both sides to position facial details correctly.
  • For the bed, fold and crochet around the base to form sides and visor; add handles by chaining 8 ch (or desired length) as instructed in row 15, then fasten and weave in ends.
  • Place the blanket and pillow inside the finished bed and arrange the mouse or whale toy; tuck ends and secure any loose embellishments with a yarn needle.

Important Notes

  • 💡Work in continuous rounds and use a stitch marker to mark the first stitch of every round for accurate shaping.
  • 💡Use correct hook sizes (5 mm, 2.5 mm, 1.25 mm) for each piece to achieve the intended gauge and tidy edges.
  • 💡Stuff toys lightly and evenly as you go to maintain smooth curves and avoid lumps in the finished shapes.
  • 💡Cut, fasten and hide yarn ends after finishing sections to keep the project neat and ready for gifting.

This charming mini nursery set brings tiny cozy moments to life with handmade detail and love. Create a snug bed, fringed blanket, soft pillow, and two pocket-sized friends to treasure. Perfect for gifts, decor, or practicing small-scale amigurumi techniques. 🧶🧵

You ask,

we answer.

FAQs

What size will the finished pieces be?

The finished bed is small and pocket-sized; toys measure approximately 3-5 cm depending on yarn and hook choices.

Can I use different yarn weights for this pattern?

Yes, you can use different yarn weights but this will change the final size; match your hook to yarn weight and expect a different scale.

Do I need prior crochet experience for this pattern?

This pattern is rated intermediate, so basic knowledge of single crochet, increases, decreases, and working in the round is recommended.

How long does this project typically take to complete?

Most crocheters complete the full nursery set in about 5-7 hours, but time may vary depending on experience and whether you make one or multiple toys.