🧢 Beautiful ✨ Detailed πŸ’ Adorable

Bear Appliqued Baby Vest Amigurumi Pattern

Bear Appliqued Baby Vest Amigurumi Pattern
4.6β˜… Rating
5-7 Hours Time Needed
2.8K Made This
βœ‚οΈ

Intermediate Level

Ideal for those with basic crochet experience, featuring slightly more advanced stitches and techniques to expand your skills.

⏱️

Weekend Treat

Takes 5-7 hours, making it an enjoyable project to finish over a couple of days.

πŸ‘•

Casual Chic

Relaxed style with a modern twist, perfect for everyday wear while maintaining that handcrafted uniqueness.

About This Bear Appliqued Baby Vest Amigurumi Pattern

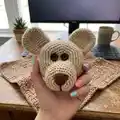
This pattern creates a sweet baby/toddler vest with two bear head appliques for a playful look. The vest is worked flat in simple crochet rounds and shaped for armholes and necklines. Bear heads, ears and noses are crocheted separately and sewn on for a three-dimensional accent. Clear round-by-round instructions are provided for each piece so you can assemble with confidence.

Bear Appliqued Baby Vest Amigurumi Pattern crochet pattern - detailed view of completed project

Designed using a 2.5 mm hook and light brown tones, the vest fits approximately 12-18 months (45-48 cm). The pattern includes all materials, abbreviations and finishing tips to help you complete a polished handmade garment.

Why You'll Love This Bear Appliqued Baby Vest Amigurumi Pattern

I absolutely love this pattern because it combines wearable crochet with adorable amigurumi details that bring a project to life. I love how a simple vest becomes special with the addition of sewn-on bear heads β€” it feels like making a gift and a toy at the same time. I enjoyed designing the shaping so the vest stays comfortable and practical for everyday wear. I also appreciate that the pattern gives clear, round-by-round instructions for both the garment and the tiny toys.

Bear Appliqued Baby Vest Amigurumi Pattern step 1 - construction progress Bear Appliqued Baby Vest Amigurumi Pattern step 2 - assembly progress Bear Appliqued Baby Vest Amigurumi Pattern step 3 - details and accessories Bear Appliqued Baby Vest Amigurumi Pattern step 4 - final assembly and finishing

Switch Things Up

I love how easy it is to customize this vest by changing colors β€” try pastels for a baby shower gift or bold colors for a playful look.

I sometimes make the bear heads in contrasting colors to make them pop; you could also embroider different expressions for variety.

If you want a chunkier vest, use a bulkier yarn and a larger hook and adjust the stitch counts as needed to keep proportions.

For a mini version suitable as a keychain or ornament, use finer yarn and a smaller hook to scale down the appliques.

I also like adding tiny crocheted bows or scarves to the bear heads for seasonal variations or to personalize for a child.

Try using safety eyes for durability on toys, or sew on small buttons if you prefer a vintage look β€” always secure them well for children's items.

To make the vest gender-neutral, choose earth tones or mixed tweed yarns for a modern, unisex finish.

I often alter the neckline depth by adding or subtracting rounds at the top before finishing to fit different sizes or styling preferences.

I recommend experimenting with textured stitches for the vest body, like alternating hdc and sc rows, to create a different fabric feel while keeping the bear appliques the same.

If you want the bears removable, sew them onto small buttons or snaps so they can be detached and reattached β€” great for washing or switching designs.

Common Mistakes & How to Fix Them

βœ— Skipping stitch markers when shaping the neckline can lead to uneven edges; mark the start and key stitch positions to maintain symmetry. βœ— Not counting stitches after increases and decreases causes misaligned rows; count at the end of each round and correct immediately if counts differ. βœ— Overstuffing the bear head creates a stiff, distorted applique; stuff gradually with small amounts and shape as you go for a smooth finish. βœ— Sewing ears or noses without pinning can result in crooked placement; pin parts in place and check positioning before permanently sewing.

Bear Appliqued Baby Vest Amigurumi Pattern

Create a cozy baby vest adorned with adorable bear heads using this detailed crochet pattern. You will make two front panels plus a back panel and small amigurumi bear parts to assemble into charming appliques. The pattern includes full round-by-round instructions for the garment and each bear piece so you can follow along step-by-step. Perfect for gifting or keeping as a handmade heirloom.

Intermediate 5-7 Hours

Materials Needed for Bear Appliqued Baby Vest Amigurumi Pattern

β€” Main Fabric

  • 01
    Yarn - Main Color: Light Brown & Dark Brown Mixed
  • 02
    A: Light Brown (for bear head, ears, nose and appliques)
  • 03
    Yarn weight not specified in pattern - choose a yarn that works with 2.5 mm hook

β€” Tools Required

  • 01
    Crochet hook size 2.5 mm (or size that fits your yarn)
  • 02
    Scissors
  • 03
    Polyester stuffing
  • 04
    Tapestry needle for sewing
  • 05
    Stitch marker
  • 06
    Pins for assembly
  • 07
    Buttons for eyes (optional)

Progress Tracker

0% Complete

β€” Information :

Infos :

Abbreviation/US terminology: blo - back loop. ch - chain. cr - crochet. dc - double crochet. dc3tog - double crochet three together. dec - decrease. flo - front loop. hdc - half double crochet. FO - Fasten Off. inc - increase. rnd(s) - round(s). sc - single crochet. sc3tog - single crochet three together. slst - slip stitch. st - stitch. tr - treble stitch. (...) - number in parentheses indicates the number of stitches at the end of the round. [...] - repeat instructions x times or to the end of the round. (...) - work the stitches all into the same stitch.

Infos :

Materials: Yarn. 2.5 mm hook size or a size that fits your yarn. Scissors, stuffing, tapestry needle, stitch marker and pins. Main Color: Light Brown & Dark Brown Mixed. A: Light Brown. FINISHED SIZE 12/18 months 18 - 19 inch (45-48 cm). You are welcome to sell items made from this pattern; please link back and credit the designer.

β€” Front :

Round 1-46 :

ch turn

Round 2 :

45 ch into sc(45 sc)1 ch turn

Round 3-7 :

-(5 times)sc into sc(45)1 ch turn

Round 8-9 :

sc into cr next inc(50 cr)2 ch turn

Round 9-35 :

(27 times) cr into cr(50)2 ch turn

Round 36-45 :

cr into cr 2 ch turn

Round 37-43 :

(7 times)cr into cr(45)2 ch turn

Round 44-44 :

cr into sc 1 ch turn

Round 45 :

sc into sc 1 ch turn

Round 46 :

43 sc into sc 1 ch turn

Round 47 :

sc into sc(43)

Round 48 :

42 sc into sc 1 ch turn

Round 49 :

sc into sc(42)

Round 50 :

41 sc into sc 1 ch turn

Round 51 :

sc into sc(41)

Round 52 :

40 sc into sc 1 ch turn

Round 53 :

sc into sc(40)

Round 54 :

39 sc into sc 1 ch turn

Round 55 :

sc into sc(39)

Round 56 :

38 sc into sc 1 ch turn

Round 57 :

sc into sc(38)

Round 58 :

37 sc into sc 1 ch turn

Round 59 :

sc into sc(37)

Round 60 :

36 sc into sc 1 ch turn

Round 61 :

sc into sc(36)

Round 62 :

35 sc into sc 1 ch turn

Round 63 :

sc into sc(35)

Round 63-34 :

sc into sc 1 ch turn

Round 64 :

sc into sc(34)

Round 65-33 :

sc into sc 1 ch turn

Round 66 :

sc into sc(33)

Round 67-32 :

sc into sc 1 ch turn

Round 68 :

sc into sc(32)

Round 69-31 :

sc into sc 1 ch turn

Round 70 :

sc into sc(31)

Round 71-30 :

sc into sc 1 ch turn

Round 72 :

sc into sc(30)

Round 73-29 :

sc into sc 1 ch turn

Round 74 :

sc into sc(29)

Round 75-28 :

sc into sc 1 ch turn

Round 76 :

sc into sc(28)

Round 77-27 :

sc into sc 1 ch turn

Round 78 :

sc into sc(27)

Round 79-26 :

sc into sc 1 ch turn

Round 80 :

sc into sc(26)

Round 81-25 :

sc into sc 1 ch turn

Round 82 :

sc into sc(25)1 ch turn

Round 83-24 :

sc into sc 1 ch turn

Round 84-22 :

sc into cr(22 cr)

Round 85-88 :

-(4 ring)cr into cr fo.

β€” Back :

Round 1-81 :

ch.turn

Round 2 :

80 ch into sc 1 ch turn

Round 3-7 :

-(5 times)sc into sc(80)1 ch turn

Round 8-37 :

(30 times)cr into cr(80)2 ch turn

Round 39-4 :

cr into sc 72 cr into cr(72)2 ch turn

Round 40-56 :

(17 times)cr into cr(72)2 ch turn

Round 57-58 :

-(2 times)22 cr into cr 2 ch turn fo.

β€” BEAR - head :

Round 1-6 :

sc in a mr

Round 2 :

6 sc inc(12)

Round 3 :

(6 times)1 sc into sc next inc(18)

Round 4 :

(6 times)2 sc into sc next inc(24)

Round 5 :

(6 times)3 sc into sc next inc(30)

Round 6 :

(6 times)4 sc into sc next inc(36)

Round 7 :

(6 times)5 sc into sc next inc(42)

Round 8 :

(6 times)6 sc into sc next inc(48)

Round 9-13 :

(5 ring)sc into sc(48)fo.Leave a long thread end to sew.

β€” BEAR - ears :

Item Name (P1) :

A COLOR - make 2

Round 1-6 :

sc in a mr

Round 2 :

6 sc inc(12)

Round 3 :

(6 times)1 sc into sc next inc(18)

Round 4 :

(6 times)2 sc into sc next inc(24)

Round 5-10 :

(6 ring)sc into sc(24)

Round 11 :

Straighten it. sink the needle into both layers. 11 sc fo.

Info :

Leave a long thread end to sew.

β€” BEAR - nose :

Item Name (P1) :

A COLOR - make 2

Round 1-6 :

sc in a mr

Round 2 :

6 sc inc(12)

Round 3 :

(6 times)1 sc into sc next inc(18)

Round 4 :

(6 times)2 sc into sc next inc(24)

Round 5 :

(6 times)3 sc into sc next inc(30)

Round 6-9 :

(4 ring)sc into sc(30)fo.Fill the nose. Leave a long thread end to sew.

Assembly Instructions

  • Sew the two Front panels to the Back at the sides and shoulders using mattress stitch or whipstitch, matching rounds and edges for an even seam.
  • Position each bear head on the front panel where pictured and sew securely through the vest fabric and head base using the long tail left from FO.
  • Attach ears to the top sides of each head, aligning them evenly and sewing through both ear layers to keep shape; pin before stitching.
  • Sew the nose pieces into the center lower face of each head, stuff lightly before closing and secure with hidden stitches.
  • Add button eyes or sew on safety eyes between the rounds indicated; place eyes symmetrically before fastening to avoid uneven placement.
  • Weave in all ends and secure with knots; block the vest gently if desired to even out stitches and shape the garment.

Important Notes

  • πŸ’‘Use stitch markers to mark the first stitch of each round and key shaping points for consistent stitch counts and alignment.
  • πŸ’‘Leave long tails when finishing small parts so you have enough yarn to sew pieces together without joining a new strand.
  • πŸ’‘Stuff the bear head and nose gradually, checking shape as you go to avoid lumps and to achieve the desired firmness.
  • πŸ’‘Check stitch counts at the end of each round to catch mistakes early and keep shaping symmetrical across both front panels.

This sweet baby vest with bear appliques adds a handmade touch to any wardrobe and makes a lovely gift for little ones. The pattern blends simple garment construction with small amigurumi for an extra-special finish. Enjoy making a cozy wearable keepsake that will spark smiles and warm hugs. 🧢🧸

You ask,

we answer.

FAQs

What size will the finished piece be?

The finished vest fits approximately 12/18 months and measures about 18-19 inches (45-48 cm) across when using the recommended yarn and hook size.

Can I use a different hook or yarn weight?

Yes, you can change yarn weight and hook size, but the final size will change; adjust hook to match your yarn and check gauge if a specific size is required.

Do I need advanced amigurumi skills for the bear parts?

No, the bear parts use basic amigurumi techniques like magic ring, single crochet increases and decreases, making them suitable for intermediate crocheters.

How long will this project take to complete?

Most crocheters finish this project in 5-7 hours, though time varies by experience and how quickly you assemble the appliques.