๐Ÿงถ Beautiful โœจ Detailed ๐Ÿ’ Adorable

Basic Granny Square Pattern

Basic Granny Square Pattern
3.9โ˜… Rating
1-2 Hours Time Needed
3.2K Made This
โœ‚๏ธ

Beginner Friendly Level

Perfect for those just starting their crochet journey, with clear instructions and simple techniques

โฑ๏ธ

Quick Make

Complete in under 2 hoursโ€”lightning fast fun for instant gratification and quick gifts.

๐Ÿก

Cozy Accent

A warm touch for your space that transforms ordinary corners into inviting nooks filled with handmade charm.

About This Basic Granny Square Pattern

This pattern creates a classic granny square you can stop at any round to make smaller squares or continue to make larger motifs. It is very adaptableโ€”use any number of colours and combine rounds in any order for unique looks. The instructions use US terminology and are easy to follow for new crocheters.

Basic Granny Square Pattern crochet pattern - detailed view of completed project

Perfect for blankets, cushion covers, shawls, and scarves, the square pieces sew together easily. Gauge is not critical for this design, so you can experiment with yarn weights and hook sizes.

Why You'll Love This Basic Granny Square Pattern

I absolutely love this pattern because it is timeless and endlessly adaptable; you can make it match any project or colour palette. I enjoy how quickly a single square works up, giving a satisfying sense of progress after just a few minutes. The simple repeat structure makes it meditative and relaxing to crochet. I also love that it welcomes beginners while still offering endless options for more experienced crocheters to mix colours and rounds.

Basic Granny Square Pattern step 1 - construction progress Basic Granny Square Pattern step 2 - assembly progress Basic Granny Square Pattern step 3 - details and accessories Basic Granny Square Pattern step 4 - final assembly and finishing

Switch Things Up

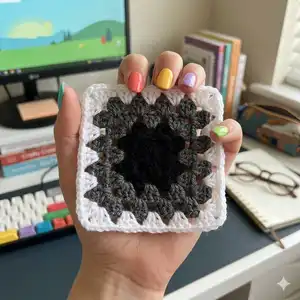
I love to change colours every round to create striped or gradient effects for a fresh look.

You can make giant squares by continuing rounds until you reach your desired size for blankets or throws.

To make tiny motifs for keychains, use finer yarn and a smaller hook for delicate results.

Try adding a contrasting border of single crochet or shell stitches to give each square a polished frame.

I sometimes join squares with slip stitch joins for a flat finish or with single crochet for a decorative ridge effect.

Experiment with jumbo yarn and a large hook for a chunky, cozy blanket that works up quickly.

Add embroidery or sewn-on buttons to the center or corners for a personalised touch.

Mix textured yarns like boucle or wool blends with smooth cottons to add visual interest to your project.

Change the corner space chain count (e.g., ch 3 instead of ch 2) to slightly alter the corner shaping if you prefer a more open or tighter corner.

I often try alternating one round in solid colour and one round in variegated yarn to create surprising colour pops in a finished blanket.

Common Mistakes & How to Fix Them

โœ— Skipping the joining slip stitch when forming the initial ring can make the centre loose; always join ch 4 with a sl st to the first ch to form a secure ring. โœ— Not turning the work as instructed may cause corners to pull to one side; tie off and turn work as directed to prevent corner distortion. โœ— Failing to count your corner clusters leads to uneven sides and shape; count the 3-dc clusters and ch-2 corner spaces at the end of each round. โœ— Using wildly different tension between rounds will create uneven squares; keep a consistent, comfortable tension and change yarns carefully at round ends. โœ— Forgetting to weave in ends before assembling many squares results in a fiddly finish; weave in ends or trim gradually as you go to simplify assembly.

Basic Granny Square Pattern

Make versatile granny squares you can use for blankets, cushions, shawls, or scarves. This classic pattern is simple, adaptable, and lets you mix colours freely. You can make tiny motifs or continue rounds for larger pieces to suit any project. Perfect for beginners wanting a quick, satisfying crochet project.

Beginner Friendly 1-2 Hours

Materials Needed for Basic Granny Square Pattern

โ€” Main Fabric

  • 01
    Yarn - any weight (choose according to desired drape and final size); small amounts of each colour for sample squares
  • 02
    Main colour - approximately 25g for a small 4-round sample square (varies by yarn and hook)
  • 03
    Contrast colours - 10-50g each depending on number of rounds and finished dimensions

โ€” Tools Required

  • 01
    Crochet hook to match yarn (gauge is not important for this pattern)
  • 02
    Darning needle

Progress Tracker

0% Complete

โ€” Basic Granny Square :

Info :

This pattern can be used for making little squares (or larger ones โ€“ simply continue the pattern for as many rounds as desired) to sew together for blankets, cushion covers, shawls, or scarves. Use any number of colours, in any number of combinations.

Infos :

Materials: yarn. Crochet hook to match yarn (gauge is not important for this pattern). Darning needle.

Infos :

Abbreviations: ch chain stitch. sl st slip stitch. dc double crochet. ** repeat instructions between asterisks as many times as directed.

Start :

make slip knot on hook with yarn, ch 4, join with sl st to first ch to form ring

Round 1 :

ch 2 (counts as dc), 2 dc in centre of ring, ch 2 (to make corner), *3 dc in centre of ring, ch 2*, repeat 2 more times, sl st to top of ch 2, tie off, turn work (prevents each corner of square from pulling left, so no blocking of work is needed at the end)

Round 2 :

with sl st, attach yarn to any corner space, ch 2 (counts as dc), 2 dc in same space, *ch 2, 3 dc in same space, ch 1, 3 dc in next space*, repeat 2 more times, ch 2, 3 dc in same space, ch 1, sl st to top of ch 2, tie off, turn work

Round 3 :

with sl st, attach yarn to any corner space, ch 2 (counts as dc), 2 dc in same space, *ch 2, 3 dc in same space, ch 1, 3 dc in next space, ch 1, 3 dc in next space*, repeat 2 more times, ch 2, 3 dc in same space, ch 1, 3 dc in next space, ch 1, sl st to top of ch 2, tie off, turn work

Round 4 :

with sl st, attach yarn to any corner space, ch 2 (counts as dc), 2 dc in same space, *ch 2, 3 dc in same space, ch 1, 3 dc in next space, ch 1, 3 dc in next space, ch 1, 3 dc in next space*, repeat 2 more times, ch 2, 3 dc in same space, ch 1, 3 dc in next space, ch 1, 3 dc in next space, ch 1, sl st to top of ch 2, tie off, and weave in all ends

Assembly Instructions

  • Sew squares together using mattress stitch or whipstitch; align corresponding rounds and join through the back loops for a neat seam.
  • Pin squares in the layout you prefer before sewing to ensure correct placement and even spacing between pieces.
  • Weave in all loose ends securely on the wrong side after joining each square to prevent unraveling during use and washing.
  • If making a blanket, add a final border by working rounds of dc or sc around the assembled squares, working evenly across joins to create a smooth edge.

Important Notes

  • ๐Ÿ’กGauge is not important for this pattern, so you can use a hook that matches your yarn for the desired drape and size.
  • ๐Ÿ’กTurn work and tie off between rounds as directed to prevent corners from pulling to one side and to avoid blocking.
  • ๐Ÿ’กWeave in ends as you go or immediately after finishing each square to simplify assembly and achieve a tidy finish.

This simple granny square pattern is perfect for making colourful blankets, cushions, scarves, and more. Mix and match colours to create unique combinations that reflect your style and home decor. Keep going round after round to make larger pieces or stop for cute motifs. ๐Ÿงถ๐Ÿก

You ask,

we answer.

FAQs

What size will the finished square be?

Size depends on your yarn weight and hook; a 4-round sample square using light worsted yarn will typically be around 8-10 cm, but sizes vary.

Can I use different yarn weights for this pattern?

Yes, you can use any yarn weight; just select a matching hook and expect the finished square size to change with yarn thickness.

Do I need to block the squares after finishing?

Blocking is usually not necessary because the pattern instructs turning the work to prevent corner distortion, but you may block for a neater finish if desired.

How do I join multiple squares together?

Pin your layout, then join squares using mattress stitch, whipstitch, or single crochet joining methods, ensuring you align corners and seam evenly.