🧢 Beautiful ✨ Detailed πŸ’ Adorable

Basic Crochet Basket Pattern

Basic Crochet Basket Pattern
4.0β˜… Rating
2-3 Hours Time Needed
2.2K Made This
βœ‚οΈ

Beginner Friendly Level

Perfect for those just starting their crochet journey, with clear instructions and simple techniques

⏱️

Bite-Sized Project

Finishes in 2-4 hoursβ€”perfect for an afternoon of creative relaxation.

🏑

Cozy Accent

A warm touch for your space that transforms ordinary corners into inviting nooks filled with handmade charm.

About This Basic Crochet Basket Pattern

This Basic Crochet Basket pattern creates a rectangular storage basket using simple half treble and double crochet stitches. The pattern uses chunky aran yarn and a very large hook for a quick, sturdy project. The finished basket is practical and stylish β€” perfect for home organization or as a handmade gift. Written in clear step-by-step form to make the process smooth and enjoyable.

Basic Crochet Basket Pattern crochet pattern - detailed view of completed project

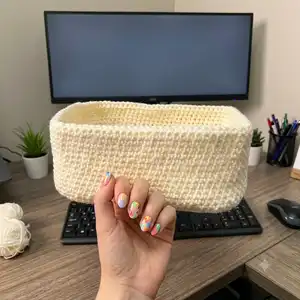
Youll work a flat base in rows and then join to work the sides in rounds for clean edges and a neat finish. Measurements and gauge are provided so you can match the size or adjust as needed.

Why You'll Love This Basic Crochet Basket Pattern

I absolutely love this pattern because it turns simple stitches into a highly useful, attractive item you can use every day. I enjoy how quickly the basket grows with chunky yarn and a large hook, giving a big payoff for minimal effort. The rectangular shape is versatile β€” it fits shelves, desks, and counters with ease. Sewing the sides together is satisfying, and the finished texture has a lovely handmade look that always gets compliments.

Basic Crochet Basket Pattern step 1 - construction progress Basic Crochet Basket Pattern step 2 - assembly progress Basic Crochet Basket Pattern step 3 - details and accessories Basic Crochet Basket Pattern step 4 - final assembly and finishing

Switch Things Up

I love customizing this basket by changing the yarn color to match my home decor, so feel free to pick bold or neutral shades.

I sometimes use two strands held together with a slightly smaller hook to create a tighter fabric and a sturdier basket.

Want a smaller version? I make a mini by reducing the base chain and working fewer dc along each side.

For a larger, more structured basket I switch to a thicker rope yarn and increase the hook size slightly for a chunky finish.

I like adding a contrasting edge row in a bright color to give the basket a pop and a polished rim.

If I want handles, I leave a gap in the dc round and work a sturdy handle span or add crocheted straps sewn to the inside.

I also enjoy stitching decorative stripes by changing colors every few rounds to make a patterned storage piece.

To make the basket more rigid, I sometimes insert a cardboard or plastic base cut to size before sewing the sides closed.

I occasionally embroider simple motifs onto the side or attach small appliques for personalization and gifting.

For a modern look, I experiment with neutral ombre yarns or variegated yarn to create subtle color shifts without changing skeins.

I recommend trying different stitch textures tooβ€”switching a few rounds to hdc or dc can change the drape and appearance of the sides.

Most of all, I encourage you to experiment; this simple pattern is a great canvas for your own creative touches and customization ideas.

Common Mistakes & How to Fix Them

βœ— Not checking gauge before starting can result in a basket that is the wrong size; make a 10cm x 10cm swatch to check you have 10 htr and 7 rows and adjust hook if needed. βœ— Skipping the instruction to turn at the end of base rows will make the base uneven and lopsided; always turn at the end of each base row to keep edges straight. βœ— Uneven tension when working the dc along the base edges can make the sides ruffle or pull; place stitches evenly and count them (18, 30, 18, 30) as you work the first round. βœ— Fastening off too short a tail makes sewing the sides difficult and insecure; leave a long thread when fastening off for easier, stronger sewing to the base. βœ— Failing to fold and line up the sides precisely before sewing will create an uneven shape; fold sides in half and pin or hold them to ensure the htr row and dc row meet exactly.

Basic Crochet Basket Pattern

Make a sturdy, rectangular crochet basket using chunky aran yarn and a large hook. This pattern guides you through a simple base worked in rows and easy sides worked in rounds, perfect for practical storage and quick makes. Youll enjoy the clean lines and textured stitches that create a durable, attractive finished basket. Ideal for gifting or organizing your space, this pattern is straightforward and satisfying.

Beginner Friendly 2-3 Hours

Materials Needed for Basic Crochet Basket Pattern

β€” Main Fabric

  • 01
    Paintbox Simply Aran (aran weight) in Cream - 3 x 100g

β€” Tools Required

  • 01
    Crochet hook size 10mm
  • 02
    Tapestry needle

Progress Tracker

0% Complete

β€” Base :

Row 1 :

Chain 31, htr in 2nd chain from hook. Htr to end (30 sts). Turn.

Row 2 :

Htr in each stitch to the end. Turn.

Row 3 :

Repeat Row 2 until base measures 25cm.

β€” Sides (working in rounds) :

Round 1 :

Working along 1st short side, dc 18 sts evenly along the edge, dc 30 along long edge, dc 18 sts evenly along 2nd short side, 30 dc along long edge. (96 dc)

Round 2 :

Continue working in rounds until sides measure 28cm or double the required height. Fasten off leaving a long thread to sew.

Info :

Fold sides in half and secure along the base where htr row and dc row meet.

Info :

Shape and enjoy!

Assembly Instructions

  • After finishing the sides, fasten off leaving a long tail; use this tail to sew the folded side seam to the base where the htr row meets the dc row.
  • Fold each side in half precisely so the corner edges align, then secure with pins or clips before sewing for accurate placement and neat corners.
  • Use a tapestry needle and the long tail to sew through both layers, joining side seam to base securely with a whipstitch or mattress stitch for strength.
  • Weave the remaining yarn ends into the inside of the basket using a tapestry needle so they are hidden and the finish looks tidy.
  • Mold and shape the basket after sewing by smoothing edges with your hands; allow the yarn to relax so the sides sit evenly.

Important Notes

  • πŸ’‘Check your gauge (10cm x 10cm = 10 htr and 7 rows) before starting to ensure the finished size matches the pattern.
  • πŸ’‘Work the dc stitches evenly along each edge when joining the sides to avoid puckering or ruffling along the rim.
  • πŸ’‘Leave a long tail when fastening off the sides so you have enough yarn to sew the pieces together securely.
  • πŸ’‘Fold and line up seams before sewing; pin or clip in place to keep everything symmetrical and tidy.
  • πŸ’‘Use consistent tension throughout to maintain even sides and a professional-looking finish.

This Basic Crochet Basket pattern is a quick, practical project that produces a beautiful storage piece for your home. Perfect for organizing small items or gifting to friends, the chunky texture and clean lines make it both useful and stylish. Try it in different colors to match your decor and enjoy making something functional with simple stitches. 🧢🏑

You ask,

we answer.

FAQs

What size will the finished basket be?

The finished basket measures approximately 30cm x 25cm x 14cm when made with the recommended yarn and 10mm hook.

Can I change the size of the basket?

Yes, you can alter the size by changing the base chain length and repeating the base rows until you reach your desired base measurements; adjust the number of dc along each side proportionally.

What yarn and hook are recommended?

Use Paintbox Simply Aran (aran weight) in cream, 3 x 100g, and a 10mm crochet hook as recommended for best results and gauge.

Do I need to block the basket?

Blocking is not necessary; shape the basket by hand after sewing and allow the yarn to relax for a neat finish.