🧢 Beautiful ✨ Detailed πŸ’ Adorable

Baby Sneakers Crochet Pattern

Baby Sneakers Crochet Pattern
4.0β˜… Rating
5-7 Hours Time Needed
2.6K Made This
βœ‚οΈ

Intermediate Level

Ideal for those with basic crochet experience, featuring slightly more advanced stitches and techniques to expand your skills.

⏱️

Weekend Treat

Takes 5-7 hours, making it an enjoyable project to finish over a couple of days.

✨

Stylish Touch

An elegant detail to elevate any look, combining traditional techniques with contemporary design sensibilities.

About This Baby Sneakers Crochet Pattern

This pattern teaches you how to crochet baby sneaker-style booties in four sizes: 0 months, 0-3 months, 3-6 months and 6-12 months. You will learn to work a shaped sole, build up the sidepiece, form a shaped toe and create a bootie tongue and upper part. The instructions use common US crochet terminology and include stitch counts for every size.

Baby Sneakers Crochet Pattern crochet pattern - detailed view of completed project

Perfect for intermediate crocheters who want a wearable, finished accessory with clean edges and professional-looking details. The pattern includes suggested yarns, hook sizes, gauge and finishing tips for a polished result.

Why You'll Love This Baby Sneakers Crochet Pattern

I absolutely love this pattern because it turns simple stitches into a beautifully structured baby sneaker that looks professional. I enjoy the shaping techniques used for the sole and toe β€” they give the booties a real shoe-like form that lasts. I love that the pattern includes multiple sizes so you can make a perfect fit for any baby. I also appreciate how easily it can be customized with different colors, laces, tags or buttons to suit your style.

Baby Sneakers Crochet Pattern step 1 - construction progress Baby Sneakers Crochet Pattern step 2 - assembly progress Baby Sneakers Crochet Pattern step 3 - details and accessories Baby Sneakers Crochet Pattern step 4 - final assembly and finishing

Switch Things Up

I love customizing these booties with colorwork: change the MC and CC to create two-tone or striped sneakers that match any outfit.

I often make a smaller or larger version by changing yarn weight and hook size; for a chunkier sneaker use bulky yarn and a larger hook.

I sometimes embroider initials or a small motif on the toe before adding the tag for a personalized gift touch.

Swap the laces for satin ribbon, cord, or leather-look string to change the style from sporty to classic instantly.

For extra grip, I add a small patch of fabric glue mixed with fine sand to the sole or sew on a non-slip fabric patch.

Turn them into slip-on moccasins by omitting the laces and adjusting the fold of the upper part for a cleaner edge.

I like to add a soft felt lining to make the booties warmer and more comfortable for cooler months.

Create a themed set by using holiday colors or applique shapes like stars, hearts or animals to the sidepiece or toe.

If you want a higher ankle, repeat round 3 of the sidepiece one or two extra times for additional height.

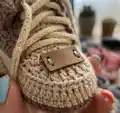
Try decorative buttons, wooden tags or an embroidered patch on the toe to make each pair unique and gift-ready.

Common Mistakes & How to Fix Them

βœ— Skipping the gauge check will change the final size and fit; always make a gauge swatch and adjust hook size accordingly. βœ— Not counting stitches after increases or decreases causes uneven shaping; count stitches at the end of each round to stay accurate. βœ— Working too loosely on the sole will make it floppy; maintain a firmer tension on the sole rows for structure. βœ— Failing to weave in ends before assembly makes finishing messy; weave in ends as you go to keep a neat result. βœ— Attaching the sidepiece in the wrong orientation leads to twisted seams; always check RS/WS and orient the sidepiece correctly before joining.

Baby Sneakers Crochet Pattern

Make a pair of stylish baby sneakers with this easy-to-follow crochet pattern. You will create a sturdy sole, comfortable sidepiece, a shaped toe and a neat bootie tongue for a perfect fit. The pattern includes sizes from newborn to 6-12 months and clear step-by-step instructions. Perfect for gifting or keeping those tiny toes warm and adorable.

Intermediate 5-7 Hours

Materials Needed for Baby Sneakers Crochet Pattern

β€” Main Fabric

  • 01
    Vita cotton Lily 100% mercerized cotton, 1.75oz (50g) / 137 yds (125m) β€” 2 hanks in different colors (MC and CC)
  • 02
    Suggested substitute yarn: Scheepjes Catona (fingering/light) β€” quantities similar to 50g per color
  • 03
    Suggested substitute yarn: Schachenmayr Catania (cotton) β€” quantities similar to 50g per color

β€” Tools Required

  • 01
    Crochet hook C/2 or D/3 (2.5mm or 3mm) OR size to obtain gauge
  • 02
    Smaller crochet hook or tapestry needle for finishing
  • 03
    Scissors
  • 04
    Shoe laces or satin ribbon (I use cord 4mm)
  • 05
    Brooch, tag, or button for decoration (optional)
  • 06
    Measuring tape

Progress Tracker

0% Complete

β€” Sole :

Info :

With MC ch 16/19/22/26.

Rnd 1 :

2dc in the 4th st from the hook, dc in next 11/14/17/21 sts, 6dc in the last st, cont to work along the opposite side of the chain, dc in next 11/14/17/21 sts, 3dc in the last st. Finish with sl st in ch. (34/40/46/54 sts)

Rnd 2 :

ch1 (counts as 1 sc), sc in the same st, sc in next st, 2sc in next st, sc in next 4/5/6/7 sts, hdc in next 2 sts, dc in next 5/7/9/12 sts, 2dc in each of next 6 st, dc in next 5/7/9/12 sts, hdc in next 2 sts, sc in next 4/5/6/7 sts, 2sc in next st, sc in next st, 2sc in next st. Finish with sl st in ch. (44/50/56/64 sts)

Rnd 3 :

ch3 (counts as 1 dc), dc in the same st, [dc in next st, 2dc in next st] 2 times, dc in next 11/14/17/21 sts, [2dc in next st, dc in next st] 6 times, dc in next 11/14/17/21 sts, [2dc in next st, dc in next st] 2 times, 2dc in next st. Finish with sl st in ch. (56/62/68/76 sts)

Info :

Fasten off and cut yarn. The sole is ready.

β€” Sidepiece :

Rnd 1 :

With CC cont to work starting from BOR with RS facing you, sc, inserting the hook not in the st but under the post of dc of the previous rnd of the sole. RS is inside the bootie. Work as follows: ch1 (counts as sc), sc in next 55/61/67/75 post of dc. Finish with sl st in ch. (56/62/68/76 sts)

Rnd 2 :

ch3 (counts as dc), dc in next 55/61/67/75 sts. Finish with sl st in ch. (56/62/68/76 sts)

Rnd 3 :

ch1 (counts as sc), sc in next 55/61/67/75 sts. Finish with sl st in ch. (56/62/68/76 sts)

Info :

Fasten off and cut yarn. The sidepiece is ready. *If the baby's foot is roly poly or has a high arches, I recommend repeat round 3 1-2 more times to make higher sidepiece.

β€” Toe :

Info :

Toe worked back and forth in rows, shaping with decreases.

Row 1 (WS) :

count 14/15/16/18 sts starting from the BOR, join CC yarn at 15th/16th/17th/19th st, ch2, dc in next st, dc2tog 13/15/17/19 times.

Row 2 (RS) :

ch2, dc in next st, dc2tog 6/7/8/9 times.

Row 3 (WS) :

ch2, dc6tog / dc7tog / dc8tog / dc9tog. Fasten off and cut yarn. Toe is ready.

β€” Bootie tongue :

Info :

The bootie tongue is worked in the same way for all sizes. Continue to work back and forth in rows, using CC.

Row 1 :

join yarn at st, indicated on the pic. Ch3 (counts as dc), 6 dc in horizontal sts of the toe, dc in the st, indicated on the pic. 21, 6 dc in next horizontal sts of the toe. Work the last dc in the st, indicated on the pic. 23. (15 sts). Turn.

Row 2-8 :

ch3 (counts as dc), dc in next 14 sts (15 sts). Turn. Fasten off and cut yarn. The bootie tongue is ready.

β€” The upper part :

Row 1 :

join MC at the st, indicated on the pic.26, 3 ch (counts as dc), dc in next st. Then cont to work as follows: dc in next 28/30/32/36 sts. Work dc in next 2 sts, indicated on the pic. 28. (32/34/36/40 sts). Turn.

Row 2-10 :

ch3 (counts as dc), dc in next 31/33/35/39 sts (32/34/36/40 sts). Turn. Fasten off and cut yarn. The upper part is ready.

Info :

Weave in ends using a tapestry needle or a crochet hook. Decorate the toe with a tag, a brooch or a button if desired. Fold three rows of the upper part and insert laces as it's show on the picture. Rep the same for the 2nd bootie. The baby booties are ready!

Assembly Instructions

  • Weave in all loose ends using a tapestry needle or a small crochet hook to create a clean interior and exterior finish.
  • Fold three rows of the upper part down and insert laces or ribbon through the folded edge as shown in the pictures to create the sneaker look.
  • Decorate the toe with a tag, brooch or button centered on the toe top using strong thread or by sewing securely in place.
  • Repeat all steps to make the second bootie, ensuring mirror placement of tongue and laces for a matched pair.
  • If desired, pin the sidepiece and upper part before final sewing to confirm alignment and symmetrical placement.

Important Notes

  • πŸ’‘Check your gauge: 26 dc x 13 rows = 4" (10cm) to ensure the correct finished size.
  • πŸ’‘Work the sidepiece RS inside the bootie as instructed to get a neat edge and correct orientation.
  • πŸ’‘If the baby has high arches or round feet, add 1-2 extra repeats of round 3 on the sidepiece for a taller side.

These baby sneakers are a wonderful handmade gift that combines practicality and charm. They are quick to crochet and endlessly customizable with colors, laces and little tags. Make a pair for a new baby, a baby shower gift, or a keepsake to treasure. πŸ§ΆπŸ‘Ά

You ask,

we answer.

FAQs

What size will the finished piece be?

The pattern includes sizes for 0 months, 0-3 months, 3-6 months and 6-12 months; foot length guidance is provided in the pattern.

Can I use different yarn weights for this pattern?

Yes, you can change yarn weight but this will affect final size; adjust the hook size and check gauge to match the measurements.

Do I need prior crochet experience for this pattern?

This pattern is rated intermediate and assumes familiarity with dc, sc, hdc, basic increases and decreases, and working in rounds and rows.

How long does this project typically take to complete?

Most crocheters finish a single pair in about 5-7 hours, depending on experience and whether you make two identical booties back-to-back.