๐Ÿงถ Beautiful โœจ Detailed ๐Ÿ’ Adorable

Baby Sneaker Booties Crochet Pattern

Baby Sneaker Booties Crochet Pattern
4.4โ˜… Rating
2-4 Hours Time Needed
2.7K Made This
โœ‚๏ธ

Intermediate Level

Ideal for those with basic crochet experience, featuring slightly more advanced stitches and techniques to expand your skills.

โฑ๏ธ

Bite-Sized Project

Finishes in 2-4 hoursโ€”perfect for an afternoon of creative relaxation.

๐Ÿงฃ

Snug Essential

Everyday comfort with practical charm, designed for both functionality and style through changing seasons.

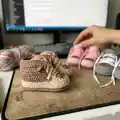
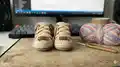
About This Baby Sneaker Booties Crochet Pattern

This pattern creates a pair of baby sneaker booties in four sizes (0 months, 0-3 months, 3-6 months, 6-12 months). It includes the sole, sidepiece, toe shaping, tongue, and upper part with full stitch counts for each size. Techniques used include dc, hdc, sc, working under post stitches, and basic shaping with decreases. Photos are provided to guide placement and shaping throughout the project.

Baby Sneaker Booties Crochet Pattern crochet pattern - detailed view of completed project

The pattern is written in US terminology and recommends Vita Cotton Lily or similar mercerized cotton for a neat finish. Complete assembly and finishing tips are included so you can add laces, tags, or buttons for a finished sneaker look.

Why You'll Love This Baby Sneaker Booties Crochet Pattern

I absolutely love this pattern because the sneaker style is unique and stylish for baby footwear, combining practicality with cute details. I enjoy how the pattern gives clear stitch counts for four sizes so you can make the perfect fit every time. The constructionโ€”working the sole, sidepiece, toe, tongue, and upperโ€”feels satisfying as each component comes together to form a complete shoe. I also love that it is easy to personalize with colors, little tags, or buttons to make each pair special.

Baby Sneaker Booties Crochet Pattern step 1 - construction progress Baby Sneaker Booties Crochet Pattern step 2 - assembly progress Baby Sneaker Booties Crochet Pattern step 3 - details and accessories Baby Sneaker Booties Crochet Pattern step 4 - final assembly and finishing

Switch Things Up

I love to change up the colors to create different looks โ€” try a two-tone sneaker with contrasting tongue and sole for a sporty feel.

I often switch yarn to a softer baby-friendly cotton blend for extra softness; using a slightly thicker yarn and larger hook will make a chunkier version.

I sometimes replace laces with satin ribbon or tiny toggles for a dressier finish that is easier to take on and off.

You can stitch a small patch or embroidered initial on the toe instead of a tag for a personalized touch that kids parents will love.

If you want a non-slip sole, consider stitching a thin suede or felt sole underneath or adding dots of fabric paint to the bottom.

I like to make tiny matching accessories like a headband or hat in the same colors to create a gift set thats cohesive and charming.

To make the booties more durable, try reinforcing the toe and heel with a second color row inside the sole before assembling.

I sometimes add a tiny strip of Velcro under the folded upper for an easier secure closure instead of lacing for very young infants.

For a vintage look, use muted or natural tones and add a small wooden button on the side instead of modern sneaker laces.

Dont be afraid to experiment with stitch variations โ€” swapping some dc rows for hdc will change the texture and drape of the upper nicely.

Common Mistakes & How to Fix Them

โœ— Skipping the gauge check leads to incorrect sizing; always make a gauge swatch and adjust hook size to match the stated gauge before starting. โœ— Not counting stitches after shaping rounds causes uneven edges and incorrect stitch counts; count your stitches at the end of every round or row and mark BOR. โœ— Inserting stitches into the wrong loop or post makes the sidepiece sit incorrectly; make sure to insert the hook under the post of the dc from the previous round as instructed. โœ— Overstuffing or uneven folding of the upper part can distort the toe and opening; fold three rows evenly and insert laces gently, checking symmetry before securing. โœ— Pulling yarn too tightly during decreases can pucker the toe; maintain consistent, moderate tension and ease yarn through decreases for smooth shaping.

Baby Sneaker Booties Crochet Pattern

Make adorable baby sneaker-style booties with this detailed crochet pattern. Youll create a soft, wearable pair with clear step-by-step instructions, full stitch counts for four sizes, and helpful photos for guidance. Perfect for gifting, baby showers, or adding a handmade touch to a newborn wardrobe. The pattern uses mercerized cotton and can be easily customized to match any color palette.

Intermediate 2-4 Hours

Materials Needed for Baby Sneaker Booties Crochet Pattern

โ€” Main Fabric

  • 01
    Vita Cotton Lily 100% mercerized cotton, 1.75oz (50g) / 137 yds (125m) - 2 hanks in different colors (Main Color MC and Contrasting Color CC)
  • 02
    Suggested substitute yarn: Scheepjes Catona - similar fingering/cotton substitute
  • 03
    Suggested substitute yarn: Schachenmayr Catania - similar cotton substitute

โ€” Tools Required

  • 01
    Crochet hook C/2 (2.5mm) or D/3 (3.0mm) OR size to obtain gauge
  • 02
    Scissors
  • 03
    Tapestry needle or smaller crochet hook for weaving ends
  • 04
    Shoe laces or satin ribbon (author uses cord 4mm)
  • 05
    Brooch, tag, or button for decoration (optional)
  • 06
    Measuring tape

Progress Tracker

0% Complete

โ€” Sole :

Round 1 :

With MC ch 16/19/22/26. 2dc in the 4th st from the hook, dc in next 11/14/17/21 sts, 6dc in the last st, cont to work along the opposite side of the chain, dc in next 11/14/17/21 sts, 3dc in the last st (pic.1). Finish with sl st in ch (pic.2). (34/40/46/54 sts)

Round 2 :

ch1 (counts as 1 sc), sc in the same st, sc in next st, 2sc in next st, sc in next 4/5/6/7 sts, hdc in next 2 sts, dc in next 5/7/9/12 sts, 2dc in each of next 6 st, dc in next 5/7/9/12 sts, hdc in next 2 sts, sc in next 4/5/6/7 sts, 2sc in next st, sc in next st, 2sc in next st. Finish with sl st in ch. (44/50/56/64 sts)

Round 3 :

ch3 (counts as 1 dc), dc in the same st, [dc in next st, 2dc in next st] 2 times, dc in next 11/14/17/21 sts, [2dc in next st, dc in next st] 6 times, dc in next 11/14/17/21 sts, [2dc in next st, dc in next st] 2 times, 2dc in next st. Finish with sl st in ch.(Pic.4). (56/62/68/76 sts). Fasten off and cut yarn. The sole is ready.

โ€” Sidepiece :

Info :

With CC cont to work starting from BOR with RS facing you, sc, inserting the hook not in the st but under the post of dc of the previous rnd of the sole. RS is inside the bootie. (pic.6-7)

Round 1 :

Work as follows: ch1 (counts as sc), sc in next 55/61/67/75 post of dc. Finish with sl st in ch. (56/62/68/76 sts)

Round 2 :

ch3 (counts as dc), dc in next 55/61/67/75 sts. Finish with sl st in ch. (56/62/68/76 sts)

Round 3 :

ch1 (counts as sc), sc in next 55/61/67/75 sts. Finish with sl st in ch. (56/62/68/76 sts). Fasten off and cut yarn. The sidepiece is ready.

Info :

*If the baby's foot is roly poly or has a high arches, I recommend repeat round 3 1-2 more times to make higher sidepiece.

โ€” Toe :

Info :

Toe worked back and forth in rows, shaping with decreases.

Row 1 (WS) :

count 14/15/16/18 sts starting from the BOR, join CC yarn at 15th/16th/17th/19th st, ch2, dc in next st, dc2tog 13/15/17/19 times.

Row 2 (RS) :

ch2, dc in next st, dc2tog 6/7/8/9 times.(Pic.15)

Row 3 (WS) :

ch2, dc6tog/ dc7tog/ dc8tog/ dc9tog.(Pic.16-18). Fasten off and cut yarn. Toe is ready.

โ€” Bootie tongue :

Info :

The bootie tongue is worked in the same way for all sizes. Continue to work back and for in rows, using CC.

Row 1 :

join yarn at st, indicated on the pic.19. Ch3 (counts as dc), 6 dc in horizontal sts of the toe, dc in the st, indicated on the pic. 21, 6 dc in next horizontal sts of the toe. Work the last dc in the st, indicated on the pic. 23. (15 sts). Turn.

Row 2-8 :

ch3 (counts as dc), dc in next 14 sts (15 sts). Turn. Fasten off and cut yarn. The bootie tongue is ready.

โ€” The upper part :

Row 1 :

join MC at the st, indicated on the pic.26, 3 ch (counts as dc), dc in next st. Then cont to work as follows: dc in next 28/30/32/36 sts. Work dc in next 2 sts, indicated on the pic. 28. (32/34/36/40 sts). Turn.

Row 2-10 :

ch3 (counts as dc), dc in next 31/33/35/39 sts (32/34/36/40 sts). Turn. Fasten off and cut yarn. The upper part is ready.

Info :

Weave in ends using a tapestry needle or a crochet hook. Decorate the toe with a tag, a brooch or a button if desired.

Info :

Fold three rows of the upper part and insert laces as it's show on the picture.

โ€” Finishing :

Info :

Rep the same for the 2nd bootie. The baby booties are ready!

Assembly Instructions

  • Weave in all ends using a tapestry needle or small crochet hook, burying tails neatly inside the sole and upper parts.
  • Decorate the toe by sewing on a tag, brooch, or button centered on the toe area as shown in the pictures.
  • Fold three rows of the upper part evenly and insert laces or ribbon through the folded section to create the sneaker look.
  • Make a matching pair by repeating the entire process for the second bootie, mirroring placement and folds for symmetry.
  • If desired, pin the tongue and upper part in place before inserting the laces to ensure consistent placement between both booties.

Important Notes

  • ๐Ÿ’กTake time to check your gauge (26 dc x 13 rows = 4" / 10cm) before starting to ensure the correct finished size.
  • ๐Ÿ’กMeasure the babys foot and refer to the provided foot length chart to choose the right size for a proper fit.
  • ๐Ÿ’กWork the sidepiece by inserting your hook under the post of the dc of the sole (not into the stitch) so the RS sits inside the bootie.
  • ๐Ÿ’กIf the babys foot is roly-poly or has a high arch, repeat sidepiece Round 3 one or two extra times to make a higher sidepiece.

These cute baby sneaker booties are a stylish and practical handmade gift for newborns and infants. They combine classic crochet techniques with a modern sneaker look thats easy to personalize with colors and accessories. Make a matching pair for a baby shower, or create several colorways for a sweet gift set. ๐Ÿงถ๐Ÿ‘ถ

You ask,

we answer.

FAQs

What sizes are included in the pattern?

The pattern includes four sizes: 0 months, 0-3 months, 3-6 months, and 6-12 months with foot lengths listed for each size.

What yarn and hook sizes are recommended?

The pattern recommends Vita Cotton Lily 100% mercerized cotton (50g / 137 yds) and crochet hook C/2 (2.5mm) or D/3 (3.0mm); adjust hook to obtain gauge.

Is this pattern suitable for beginners?

This pattern is rated intermediate because it uses working under post stitches, shaping decreases, and multiple components to assemble.

How long will it take to make a pair?

Most crocheters complete a pair in about 2-4 hours, depending on experience and how many custom details you add.