🧶 Beautiful ✨ Detailed 💝 Adorable

Baby Shoes Ivelle Amigurumi Pattern

Baby Shoes Ivelle Amigurumi Pattern
4.4★ Rating
2-3 Hours Time Needed
4.0K Made This
✂️

Intermediate Level

Ideal for those with basic crochet experience, featuring slightly more advanced stitches and techniques to expand your skills.

⏱️

Bite-Sized Project

Finishes in 2-4 hours—perfect for an afternoon of creative relaxation.

👶

Tiny Treasure

Small, sweet, and gift-worthy creations that fit perfectly in the palm of your hand with detailed charm.

About This Baby Shoes Ivelle Amigurumi Pattern

This pattern creates a pair of tiny crochet baby shoes (Ivelle) with a separate sole (bag base) and shoe body sections. You will work rounds in the round, change colours for the sole, and finish with a slip-stitch edging. The design uses UK crochet terms and a 4mm hook for a firm, cuddly fabric.

Baby Shoes Ivelle Amigurumi Pattern crochet pattern - detailed view of completed project

Follow the step-by-step rounds for colour 1 (sole) and colour 2 (shoe) and repeat to make the second shoe. The finished shoes make lovely newborn gifts and photography props.

Why You'll Love This Baby Shoes Ivelle Amigurumi Pattern

I absolutely love this pattern because it turns simple stitches into a sweet, wearable keepsake in just a few hours. I enjoy the clean shaping of the sole and how a few carefully placed decreases create the shoe form. The colour-change round adds a professional touch that really makes the shoes pop. It's rewarding to make a matching pair quickly, and I love gifting them to new parents and friends.

Baby Shoes Ivelle Amigurumi Pattern step 1 - construction progress Baby Shoes Ivelle Amigurumi Pattern step 2 - assembly progress Baby Shoes Ivelle Amigurumi Pattern step 3 - details and accessories Baby Shoes Ivelle Amigurumi Pattern step 4 - final assembly and finishing

Switch Things Up

I love how easy it is to customise these baby shoes by changing colours; try a pastel sole with a bright cuff for a modern look.

To make a smaller keychain version, use a finer yarn and a smaller hook—this shrinks the shoe proportionally.

If you want a chunkier, more cuddly shoe, swap to a bulkier yarn and a larger hook to get a plush, cozy texture.

I often embroider small motifs or initials on the front after finishing to personalise each pair for the baby.

Try adding a thin ribbon or crocheted tie threaded through the ankle row for a different closure style and decorative touch.

I sometimes add a contrasting round of slip stitch around the sole edge to create a tidy, finished look that really stands out.

For photo prop shoes, block lightly by pinning to shape while damp and allow to dry—this helps the shoe keep a neat silhouette.

If you want non-slip soles, stitch on small grips or use fabric paint dots on the underside to give gentle traction for crawling infants.

To create sibling sets, change only the sole colour to tie the set together while keeping each shoe unique with different body colours.

I recommend experimenting with yarn textures like cotton for warmer weather or acrylic blends for softness—each yarn changes the final feel and fall of the shoe.

Common Mistakes & How to Fix Them

✗ Forgetting that the pattern uses UK terms can cause stitch confusion; double-check the abbreviations and conversions before you start so your stitches match the written rounds. ✗ Skipping the note about the starting chain not counting as a stitch will change stitch counts; always begin rounds as instructed and close with a slip stitch in the first stitch. ✗ Not working R4 in the back loop only will remove the subtle ridge detail; make sure you insert your hook in the back loop for that round to get the intended edge. ✗ Changing colour without securing ends neatly can create loose ends; fasten off and weave in ends or carry yarn carefully to keep a tidy finish. ✗ Failing to count stitches after increases or decreases will throw off later rounds; count at the end of each round to ensure correct totals and correct mistakes immediately.

Baby Shoes Ivelle Amigurumi Pattern

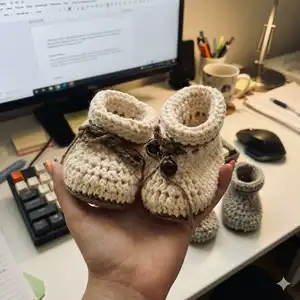
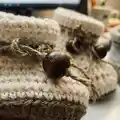
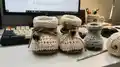
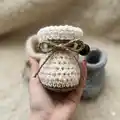
Create sweet, handmade baby shoes with this clear crochet pattern so you can make a charming gift or keepsake. The pattern uses UK crochet terms and includes full round-by-round instructions for both the sole and shoe sections, plus colour-change details. Perfect for making matching pairs in any colour palette to suit your style.

Intermediate 2-3 Hours

Materials Needed for Baby Shoes Ivelle Amigurumi Pattern

— Main Fabric

  • 01
    Eucalyps / Somen yarn (2 x 100g) - use Colour 1 for sole and Colour 2 for shoe body as shown
  • 02
    Colour 1 - yarn for bag base / sole (use a contrasting or matching colour)
  • 03
    Colour 2 - yarn for shoe (main body) - small amount required per shoe

— Tools Required

  • 01
    Crochet hook size 4.0mm
  • 02
    Scissors
  • 03
    Yarn needle for sewing and weaving in ends
  • 04
    Stitch marker (optional but recommended to mark round start)
  • 05
    Pins (optional for blocking or positioning)

Progress Tracker

0% Complete

— Decrease / Reduction :

Info :

Decrease: 2 htc crocheted together : crochet one htc, but you will leave 3 loops on your needle. You will not finish the htc. Crochet another htc, now you will have 5 loops on your needle. Finish your stitch.

— The bag base (colour 1) :

R1 :

9 ch, 3 htc in 2e ch from crochet hook, 1 htc in next 6 ch, 6 htc in last stitch, 1 htc in next 6 stitches, 3 htc in last stitch, close round with a ss (=24).

Info :

Every next round you will start with a ch, this will not count as a stitch. Close round with a sl st in first stitch.

R2 :

1 ch, *2 htc in same stitch* 3x, *1 htc* 6x, *2 htc in same stitch* 6x, *1 htc* 6x, *2 htc* 3x, close round with a sl st (=36).

R3 :

1 ch, *2 htc in same stitch, 1 htc in next stitch* 3x, *1 htc* 6x, *2 htc in same stitch, 1 htc in next stitch* 6x, *1 htc* 6x, *2 htc in same stitch, 1 htc in next stitch* 3x, close round with sl st (=48).

Info :

Change colour.

— Shoe (colour 2) :

R4 :

1 htc (in back loop) in every stitch (=48).

R5 :

*1 htc* 12x; *1 htc, 2 htc crocheted together* 8x; *12 htc* (=40).

R6 :

*1 htc* 12x; *1 htc, 1 htc, 2 htc crocheted together* 4x; *1 htc* 12x (=36).

R7 :

*1 htc* 12x; *1 htc, 2 htc crocheted together* 4x; *12 htc* (=32).

R8 :

*1 htc* 12x; *2 htc crocheted together* 4x; *1 htc* 12x (=28).

R9 :

*1 htc* 12x; *2 htc crocheted together* 2x; *1 htc* 12x (=26).

R10-14 :

htc in every stitch (=26).

R15 :

Change colour to the colour of the shoes sole Crochet roundabout in slipstitch in the opposite direction. Fasten off. Crochet the second baby shoe.

— Schoenzooltje (kleur 1) :

T1 :

9l, 3hst in de 2e l vanaf de haaknaald, 1hst in volg. 6l, 6hst in laatste stk, 1hst in volg 6stk, 3hst in laatste stk sluit met een hv (=24).

Info :

Elk van de volgende toeren begin je met een l, deze telt niet mee als steek. Sluit de toer met een hv in de eerste steek.

T2 :

1l, *2hst in zelfde steek* 3x, *1hst* 6x, *2hst in zelfde steek* 6x,*1hst* 6x,*2hst* 3x, sluiten met een hv (=36).

T3 :

1l, *2hst in zelfde steek, 1hst in volg.* 3x, *1hst* 6x, *2hst in zelfde steek, 1hst in volg.* 6x, *1hst* 6x, *2hst in zelfde steek, 1hst in volg.* 3x, sluiten met een hv (=48).

Info :

Kleur wisselen.

— Schoentje (kleur 2) :

T4 :

1hst in elke steek. (Je steekt deze toer in de achterste lus van het v-tj. Zo krijg je een randje (=48).

T5 :

*1hst* 12x; *1hst, 2hst samen afhaken* 8x; *12hst* (=40).

T6 :

*1hst* 12x; *1hst, 1hst, 2hst samen afhaken* 4x; *1hst* 12x (=36).

T7 :

*1hst*12x; *1hst, 2hst samen afhaken* 4x *12hst*(=32).

T8 :

*1hst*12x; *2hst samen afhaken* 4x; *1hst*12x (=28).

T9 :

*1hSt*12x; *2hst samen afhaken* 2x; *1hst*12x (=26).

T10-14 :

hst in elke stk (=26).

T15 :

Wisselen naar kleur van het zooltje hv haken (andere kant op haken) en afhechten. Haak nu het tweede schoentje.

— Schuhsohle (farbe A) :

R1 (DE) :

9Lftm, 3 hStb in 2. Lm ab der Häkelnadel, 1 hStb in die nächste M, 6 hStb in den letzten M, 1 hStb in die nächste 6 M, 3 hStb in den letzten M, schlie en mit einem Km (=24).

Info :

Jede Runde anfangen mit einem Lftm (zählt nicht als LM) Mit 1 Km in die 1. Masche zur Runde schlie en.

R2 (DE) :

1 Lftm, *2 hStb in dieselbe Masche* 3x, *1 hStb* 6x, *2 hStb in dieselbe Masche* 6x,*1 hStb* 6x,* 2 hStb in dieselbe Masche* 3x, schlie en mit einem KM (=36).

R3 (DE) :

1 Lftm, *2 hStb in dieselbe Masche, 1 hStb in die naechste* 3x, *1 hStb* 6x, *2 hStb in dieselbe Masche, 1 hStb in die naechste* 6x, *1 hStb* 6x, *2 hStb in dieselbe Masche, 1 hStb in die naechste* 3x, schlie en mit einem Km (=48).

Info :

Farbwechsel.

— Schuh (farbe B) :

R4 (DE) :

1 hStb in jd M. (nur ins hintere Maschenglied arbeiten) (=48).

R5 (DE) :

*1hStb*12x; *1hStb, 2 hStb.abm.* 8x; *12 hStb* (=40).

R6 (DE) :

*1 hStb* 12x; *1 hStb, 1 hStb, 2 hStb.abm.* 4x; *1 hStb* 12x (=36).

R7 (DE) :

*1 hStb* 12x; *1 hStb, 2 hStb.abm.* 4x *12 hStb* (=32).

R8 (DE) :

*1hStb*12x; *2 hStb.abm.* 4x; *1 hStb*12x (=28).

R9 (DE) :

*1hStb*12x; *2 hStb.abm.* 2x; *1hStb*12x (=26).

R10-14 (DE) :

hStb in jd M. (=26).

R15 (DE) :

Farbwechsel (farbe A). Rundum Km häkeln in der Gegenrichtung und abketten. Häkeln Sie jetzt einen zweiten babyschuh.

Assembly Instructions

  • Change to the sole colour (colour 1) and crochet a roundabout in slip stitch in the opposite direction to create the sole edging, then fasten off.
  • Close rounds by working a slip stitch into the first stitch as instructed so the join is neat and lies flat along the sole.
  • Make the second shoe by repeating all rounds exactly as for the first, including the colour change at the end and finishing with slip stitches.
  • Weave in all yarn ends securely with a yarn needle and trim any excess to prevent loose threads and to present a neat finished pair.

Important Notes

  • 💡This pattern uses UK crochet terms; check the abbreviations before you start to avoid stitch confusion.
  • 💡Every next round begins with a chain that does not count as a stitch; always close the round with a slip stitch into the first stitch.
  • 💡Round 4 of the shoe is worked into the back loop only to create a small ridge; insert your hook in the back loop as instructed.
  • 💡Change colour for the sole only after the specified round and finish the colour change with slip stitches in the opposite direction.

This Baby Shoes Ivelle pattern makes adorable tiny shoes that are perfect for newborn photos and thoughtful handmade gifts. The clear round-by-round instructions guide you through sole shaping, shoe body, and a neat slip-stitch edging. Try different colour combinations to create personalized pairs for family and friends. 🧶👣

You ask,

we answer.

FAQs

What size will the finished piece be?

The finished baby shoes size will depend on your yarn and hook tension; with the recommended yarn and 4.0mm hook the sample fits a newborn/0-3 month size range.

Can I use different yarn weights for this pattern?

Yes, you can use different yarn weights, but this will affect the final size; choose an appropriate hook for your yarn and adjust stitch counts if needed.

Do I need prior crochet experience for this pattern?

This pattern is rated intermediate, so basic knowledge of increases, decreases and working rounds is recommended for best results.

How long does this project typically take to complete?

Most crocheters complete one pair in about 2-3 hours, though time may vary depending on experience and breaks.

Does the pattern use UK or US terms?

The pattern uses UK terms; consult the abbreviation list for conversions (for example UK dc = US sc).