🧢 Beautiful ✨ Detailed πŸ’ Adorable

Baby On A Walk Amigurumi Pattern

Baby On A Walk Amigurumi Pattern
4.4β˜… Rating
5-7 Hours Time Needed
1.4K Made This
βœ‚οΈ

Intermediate Level

Ideal for those with basic crochet experience, featuring slightly more advanced stitches and techniques to expand your skills.

⏱️

Weekend Treat

Takes 5-7 hours, making it an enjoyable project to finish over a couple of days.

🧸

Cute Companion

An adorable friend to cherish, handcrafted with love to bring comfort and joy for years to come.

About This Baby On A Walk Amigurumi Pattern

This pattern creates a small amigurumi baby with a removable hooded jumpsuit and a tiny coordinating stroller. It includes full stitch-by-stitch instructions for the body, head, limbs, clothing, and a mini stroller frame. Youll learn simple shaping techniques, embroidery for facial features, and how to add wire reinforcement for the stroller.

Baby On A Walk Amigurumi Pattern crochet pattern - detailed view of completed project

Perfect for making a personalized gift or keepsake, the pattern uses sport weight yarn and a tiny 1.5 mm hook for fine detail. Clear photos accompany many steps so you can match the finished look closely.

Why You'll Love This Baby On A Walk Amigurumi Pattern

I absolutely love this pattern because it combines a classic amigurumi construction with charming outfit details that make the doll feel alive. I enjoy the tiny challenges of working small and adding embroidered facial features β€” they bring so much personality. The jumpsuit and hood pieces let me experiment with color and finishing techniques, and I always find the stroller assembly to be a delightful engineering puzzle. This pattern is versatile too: Ive made versions in different colorways and each one feels like a new character.

Baby On A Walk Amigurumi Pattern step 1 - construction progress Baby On A Walk Amigurumi Pattern step 2 - assembly progress Baby On A Walk Amigurumi Pattern step 3 - details and accessories Baby On A Walk Amigurumi Pattern step 4 - final assembly and finishing

Switch Things Up

I love how easy it is to customize the color palette for this little baby β€” swap the jumpsuit yellow for pastel blue or soft green to match your nursery theme.

You can change the yarn weight and hook size to create a mini keychain version or a larger cuddly toy; just remember to adjust safety eye size accordingly.

I often add tiny embroidered accessories like a pacifier, a tiny bow, or a crocheted blanket to make each doll unique.

Try different facial expressions by varying eye placement or mouth embroidery to give each baby its own personality.

For the stroller, experiment with wire thickness and cover color to create a vintage or modern look; wrapping the wire in floral fabric can also add a sweet touch.

I sometimes add felt details for cheeks or inner ears for a softer finish and easier shaping options if you dont want to embroider.

To make the doll more poseable, you can insert thin flexible wire into the arms before stuffing; this allows gentle posing while maintaining a soft feel.

If you enjoy miniatures, try making a whole set of clothes β€” hats, booties, and a tiny blanket β€” using the same stitches and adapting sizes.

Use a small amount of pastel chalk for cheeks and nose toning, sealing lightly with a textile-safe fixative for durability.

Dont be afraid to mix textures: try a fuzzy yarn for hair or a cotton blend for the jumpsuit to create tactile contrast and interest.

Common Mistakes & How to Fix Them

βœ— Skipping the row marker during rounds causes lost stitch count; place a marker at the start of every round to keep consistent counts. βœ— Forgetting to stuff as you go makes shaping difficult later; stuff gradually during shaping to achieve even curves and avoid lumps. βœ— Changing colors without securing ends can lead to loose tails; weave in or tack down color ends as soon as you change yarn to prevent unraveling. βœ— Not inserting the wire into stroller parts before stuffing makes assembly awkward; insert and adjust wire lengths during crocheting as instructed to get proper structure.

Baby On A Walk Amigurumi Pattern

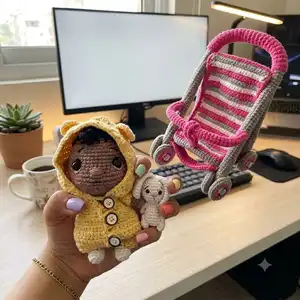
Make a sweet pocket-sized baby doll with a removable jumpsuit and coordinating stroller. This pattern walks you through crocheting the body, head, limbs, clothing and a tiny stroller with clear step-by-step rounds. Youll enjoy personalizing colors, facial embroidery, and tiny details to create a charming handmade gift.

Intermediate 5-7 Hours

Materials Needed for Baby On A Walk Amigurumi Pattern

β€” Main Fabric

  • 01
    Sport weight 4ply yarn Yarn Art Jeans (50g /160m) - N01 White (multiple grams)
  • 02
    Sport weight 4ply yarn Yarn Art Jeans - N49 Gray (stroller frame and parts)
  • 03
    Sport weight 4ply yarn Yarn Art Jeans - N53 Black (details, hair, embroidery)
  • 04
    Sport weight 4ply yarn Yarn Art Jeans - N59 Bright Pink (stroller accent)
  • 05
    Sport weight 4ply yarn Yarn Art Jeans - N67 Yellow (jumpsuit and hood)
  • 06
    Sport weight 4ply yarn Yarn Art Jeans - N71 Light Brown (skin, hair accents)
  • 07
    Sport weight 4ply yarn Yarn Art Jeans - N74 Light Pink (toning)
  • 08
    Pink pastel for toning facial cheeks and nose

β€” Tools Required

  • 01
    Crochet hook size 1.5 mm
  • 02
    Safety eyes 12 mm (2 pieces)
  • 03
    Wire ~ 90-100 cm (for stroller internal frame)
  • 04
    11 Buttons (for jumpsuit closure)
  • 05
    Scissors
  • 06
    Sewing pins
  • 07
    Stuffing material, fiberfill
  • 08
    Needle for sewing pieces and embroidery
  • 09
    Plastic sheet (from a stationery folder) for stroller reinforcement

Progress Tracker

0% Complete

β€” Body :

Round 1 :

6sc in MR

Round 2 :

6inc (12)

Round 3 :

(1sc, inc) *6 (18)

Round 4 :

(2sc, inc) *6 (24)

Round 5 :

(3sc, inc) *6 (30)

Round 6 :

(4sc, inc) *6 (36)

Round 7-11 :

36sc (5 rounds) (36)

Round 12 :

Change color to Light Brown. BLO 36sc (36)

Round 13 :

(4sc, dec) *6 (30)

Round 14 :

30sc (30)

Round 15 :

(3sc, dec) *6 (24)

Round 16-17 :

24sc (2 rounds) (24)

Round 18 :

(2sc, dec) *6 (18)

Round 19 :

18sc (18)

Info :

Stuff with fiberfill in the process.

β€” Head :

Round 20 :

18inc (36)

Round 21 :

(1sc, inc) *18 (54)

Round 22 :

(8sc, inc) *6 (60)

Round 23-27 :

60sc (5 rounds) (60)

Round 28 :

18sc, (2sc, dec) *6, 18sc (54)

Round 29 :

(7sc, dec) *6 (48)

Round 30-34 :

48sc (5 rounds) (48)

Round 35 :

(6sc, dec) *6 (42)

Info :

Insert the eyes between rounds 29-30 at a distance of 12-14 sc.

Round 36 :

(5sc, dec) *6 (36)

Round 37 :

(4sc, dec) *6 (30)

Round 38 :

(3sc, dec) *6 (24)

Info :

Stuff the head with fiberfill.

Round 39 :

(2sc, dec) *6 (18)

Round 40 :

(1sc, dec) *6 (12)

Round 41 :

6dec (6)

Info :

Fasten off, cut the yarn, weave in the ends.

β€” Ears (make 2) :

Item Name (P1) :

With Light Brown yarn. 6sc in MR, leave a long tail for sewing.

Info :

Sew the ears to the head.

β€” Curl :

Round 1 :

With Black yarn: Chain16, Start in the second chain from the hook: 15inc (30) leave a long tail for sewing.

Info :

Sew the curl to the head (see photo reference).

β€” Arms (make 2) :

Round 1 :

With Light Brown yarn. 7sc in MR. Place row marker here.

Round 2-11 :

7sc (10 rounds) (7)

Info :

Stuff with fiberfill in the process. Fasten off, cut the yarn, weave in the ends.

Info :

Fasten the arms with a thread mount. Attach the arms using a long needle and thread (look at the pictures below).

β€” Legs (make 2) :

Round 1 :

With White yarn. Chain 6. Start in the second chain from the hook: inc, 3sc, 3sc in the last chain, 4sc (12). Place row marker here.

Round 2 :

2inc, 3sc, 3inc, 3sc, inc (18)

Round 3 :

18sc (18)

Round 4 :

4sc, 6dec, 2sc (12)

Round 5 :

(2sc, dec) *3 (9)

Info :

Stuff with fiberfill in the process.

Round 6 :

9sc (9)

Round 7 :

Change color to Light Brown. BLO 9sc (9)

Round 8-11 :

9sc (4 rounds) (9)

Info :

Fasten off, cut the yarn, weave in the ends.

β€” Jumpsuit :

Round 1 :

With Yellow yarn. Work in rows. Chain 31. From the second chain on the hook: 30sc, turn (30)

Round 2 :

ch1, 5sc, ch6 (skip 6sc, start from the next stitch), 8sc, ch6 (skip 6sc, start from the next stitch), 5sc, turn (30)

Round 3 :

ch1, (4sc, inc) *6 turn (36)

Round 4 :

ch1, 36sc, turn (36)

Round 5 :

ch1, (5sc, inc) *6 turn (42)

Round 6 :

ch1, 42sc, turn (42)

Round 7 :

ch1, (6sc, inc) *6 turn (48)

Round 8-14 :

ch1, 48sc, turn (7 rows) (48)

Round 15 :

ch1, (6sc, dec) *6, turn (42)

Round 16 :

ch1, 42sc, turn (42)

Round 17 :

ch1, (5sc, dec) *6 turn (36)

Round 18-19 :

ch1, 36sc, turn (2 rows) (36)

Info :

Cut the yarn. Fold the resulting piece of jumpsuit so that the cut is in the middle.

β€” Sleeve (make 2) :

Round 1 :

Crochet the holes under the sleeves. Attach the yellow yarn to the bottom corner, work in rounds with turns. ch1, 14sc, sl st, turn (14)

Round 2-4 :

ch1, 14sc, sl st, turn (3 rows) (14)

Info :

Cut the yarn.

Item Name (P1) :

Sew buttons on one side of the "cut" at an equal distance (I got 3 pieces).

Item Name (P2) :

Opposite the buttons, make loops, crochet with the edge of the "cut". Attach the yellow yarn: [4sl st on the edge, ch 8 (loops for buttons)]*3, 2sl st. Cut the yarn.

β€” Hood :

Round 1 :

Return to round 1 of the jumpsuit and work in rows with Yellow yarn: ch2, 10dc, 10dc-inc, 10sc, turn (40)

Round 2 :

ch2, dc2tog , 36dc, dc2tog, turn (38)

Round 3 :

ch2, dc2tog , 34dc, dc2tog, turn (36)

Round 4 :

ch2, dc2tog , 32dc, dc2tog, turn (34)

Round 5-12 :

ch2, 34dc, turn (8 rows) (34)

Info :

Leave a long tail for sewing. Fold the hood in half and sew up the edges carefully.

Round 13 :

Attach the Yellow yarn and crochet around: 50sc. Cut the yarn and fasten off.

Round 14 :

Ears on the hood (make 2) With Yellow yarn. 6sc in MR. Place row marker here.

Round 15 :

6inc (12)

Round 16 :

(1sc, inc) *6 (18)

Round 17 :

18sl st, leave a long tail for sewing.

Info :

Sew the ears to the hood, put a jumpsuit on the doll.

β€” Bunny Body :

Round 1 :

With White yarn. 6sc in MR. Place row marker here.

Round 2 :

6inc (12)

Round 3 :

(1sc, inc) *6 (18)

Round 4 :

Crochet the paws and the tail: 4sc on the body, the left paw: ch5, from the second chain on the hook: 3hdc in the last chain, 3sl st; 8sc on the body; the right paw: ch5, from the second chain on the hook: 3hdc in the last chain, 3sl st; 4sc on the body, the tail: 4-dc Bobble st, 1sc on the body (18)

Round 5 :

18sc (18)

Info :

Stuff with fiberfill in the process.

Round 6 :

(1sc, dec) *6 (12)

Round 7 :

12sc (12)

Round 8 :

Crochet the paws: 3sc on the body, the left paw: ch5, from the second chain on the hook: 4sl st; 5sc on the body; the right paw: ch5, from the second chain on the hook: 4sl st; 4sc on the body (12)

Round 9 :

6dec (6)

β€” Bunny Head :

Round 10 :

6inc (12)

Round 11 :

(1sc, inc) *6 (18)

Round 12-16 :

18sc (5 rounds) (18)

Round 17 :

(1sc, dec) *6 (12)

Round 18 :

Crochet the ears: 2dec on the head, the left ear: ch13, from the second chain on the hook: 2hdc, 6dc, 3hdc, sc; 2dec on the head; the right ear: ch13, from the second chain on the hook: 2hdc, 6dc, 3hdc, sc; 2dec on the head (6)

Info :

Stuff with fiberfill. Fasten off, cut the yarn, weave in the ends. Embroider the nose with pink thread. Embroider the eyes, mouth and eyebrows with black thread.

β€” Baby Stroller - Front part :

Info :

Recommendations: Before starting crocheting, read the diagrams of the main parts of the stroller; The wire is inserted into all parts in advance; The parts are stuff with fiberfill in the process; The length of the wire is adjusted depending on the length of the resulting parts; The bends of the parts are corrected during the assembly process; Wrap the ends of the wire carefully with adhesive tape.

Round 1 :

With Gray yarn. 10sc in MR. Place row marker here. In the process of crocheting, insert a wire into the part and stuff it evenly with fiberfill.

Round 2-43 :

10sc (42 rounds) (10)

Round 44-73 :

BLO 10sc (30 rounds) (10)

Round 74-115 :

10sc (42 rounds) (10)

Info :

Fasten off, cut the yarn, weave in the ends. Return to round 44 of the front part and work crocheting in a circle with Bright Pink yarn through back loops rnd 44-73: 300sc. Cut the yarn.

Assembly Instructions

  • Attach the head to the body by positioning the neck (finished rounds 20-41) into the opening at the top of the body and sew securely with a whipstitch, weaving the thread through several rounds for a firm join.
  • Position and sew the arms on either side of the body using the thread-mount method shown: use a long needle and thread, pass through body and arm several times to secure and create stability.
  • Fasten the legs with a thread mount: align both legs at the bottom front, then attach using a long needle and thread passing through the middle of the body so each leg sits evenly.
  • Sew the hood and ears to the jumpsuit and attach the jumpsuit onto the finished doll; sew buttons on one side of the jumpsuit cut and create crochet loops on the opposite side for closures.
  • Insert and adjust wire inside stroller parts while crocheting, stuff evenly with fiberfill, wrap wire ends with tape, and assemble stroller parts following the base design diagram.

Important Notes

  • πŸ’‘Use a row marker at the start of every round to keep track of the beginning and maintain correct stitch counts.
  • πŸ’‘Insert the wire into stroller parts during crocheting and stuff as you go so the wire and fiberfill sit smoothly inside the crocheted tube.
  • πŸ’‘Stuff the head and body gradually while working decreases so you can shape the doll properly without overstuffing and distorting the rounds.
  • πŸ’‘Weave in and secure color changes and yarn tails as you work to prevent loose ends or unraveling later in assembly.

This Baby On A Walk amigurumi pattern brings a tiny handmade friend to life with a hooded jumpsuit and a mini stroller for display or play. Make a charming gift, personalize colors, and practice neat finishing and embroidery skills. Share the finished baby with loved ones and enjoy the satisfying process of making every small detail. πŸ§ΆπŸ‘Άβœ¨

You ask,

we answer.

FAQs

What size will the finished piece be?

The finished doll measures approximately 10-12 cm (4-5 inches) tall using the recommended sport weight yarn and 1.5 mm hook; the stroller measures about 14-16 cm tall and 9-11 cm wide.

Can I use different yarn weights for this pattern?

Yes, you can substitute yarn weights but the final size will change; choose an appropriate hook for your yarn and test gauge so parts fit together as intended.

Do I need prior crochet experience for this pattern?

This pattern is rated intermediate; basic amigurumi skills, reading rounds, increases and decreases, and simple embroidery are recommended for best results.

How long does this project typically take to complete?

Most crocheters complete this project in 5-7 hours, though time may vary based on experience, customization, and assembly complexity.

How do I secure the stroller wire ends safely?

Wrap the exposed wire ends carefully with adhesive tape before covering with crocheted parts or stuffing to prevent sharp edges and ensure safety.