Make a sweet handmade baby dress with this detailed crochet pattern. You will work a neat waistband, a full skirt with optional lace detail, and a pretty bib with frilled straps. The pattern is written in US terms and includes size-specific stitch counts so you can follow the exact instructions for your chosen size.
Progress Tracker
0% Complete
— Waistband :
Info :
This pattern is written using US crochet terms, if you wish to use UK terms then please see the abbreviations information below
Starting Chain :
Using the 3.5mm hook, start with a chain of 81, (85, 89, 97, 105, 113).
Row 1 :
(RS) HDC into 2nd chain from the hook, HDC in each stitch along chain. (80, 84, 88, 96, 104, 112) sts. Chain 3 and turn.
Info :
The Ch3 at the end of the round is creating the button loop and does not count as a stitch.
Row 2 :
(WS) *HDC, SC. Repeat from * until the end of the round. Chain 1 and turn. (80, 84, 88, 96, 104, 112) sts.
Info :
The chain 1 does not count as a stitch.
Row 3 :
*HDC, SC. Repeat from * until the end of the round. Be careful not to work into the Ch 3 we have created for our button loop. Chain 3 and turn. (2nd button loop created) (80, 84, 88, 96, 104, 112) sts.
Row 4 :
*HDC, SC. Repeat from * until the end of the round. Chain 1 and turn. (80, 84, 88, 96, 104, 112) sts.
Row 5 :
Sizes 0-3, 3-6 and 6-12 only – HDC each stitch until the end of the round. (80, 84, 88) sts. Join with a Sl St to the top of the first HDC. See Photo A and B below. Ch1 and turn. Follow instructions for Round 1 of skirt.
Row 5 :
Sizes 2-3 4-6 7-8 only – *HDC, SC. Repeat from * until the end of the round. Be careful not to work into the Ch 3 we have created for our button loop. Chain 3 and turn. (3rd button loop created) (96, 104, 112) sts.
Row 6 :
Sizes 2-3 4-6 7-8 only – *HDC, SC. Repeat from * until the end of the round. Chain 1 and turn. (96, 104, 112) sts.
Row 7 :
Sizes 2-3 4-6 7-8 only – HDC each stitch until the end of the round. (96, 104, 112) sts. Join with a Sl St to the top of the first HDC. See Photo A and B below. Ch1 and turn. Follow instructions for Round 1 of skirt.
— Skirt :
Info :
We will now create the skirt. Switch your hook to a 4mm. (we will complete the remainder of the dress using the 4mm hook)
Round 1 :
Sizes 0-3 and 3-6 6-12 2-3 7-8 only. Work 4HDC into the first stitch. *Skip a stitch, work 4HDC into the same stitch. Repeat from * until you have 3 sts remaining. Skip the first stitch, work 5HDC 4HDC 3HDC 1HDC 4HDC into the next stitch. Skip the last stitch. Join with a Sl St to the top of the first HDC. Ch1 long/loosely and turn. 161, 168, 175, 189, 224 sts. It is important that you have the correct number of stitches at the end of this round.
Round 1 :
Size 4-6 only – Work 5HDC into the first stitch. *Skip a stitch, work 4HDC into the same stitch. Repeat from * until you have 3 sts remaining. Skip the first stitch, work 5HDC into the next stitch. Skip the last stitch. Join with a Sl St to the top of the first HDC. Ch1 long/loosely and turn. 210 sts. It is important that you have the correct number of stitches at the end of this round.
Info :
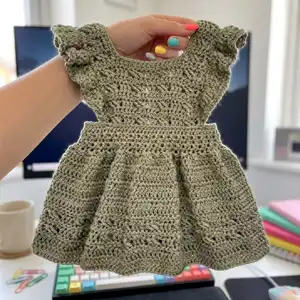
The remainder of the skirt can be worked in two ways, you can work rounds of DC and add a couple of rows of detail to the bottom of the skirt (as seen in my sage green sample) or, you can complete the skirt using the detailed stitch (as seen in my pink sample).
Info :
To complete skirt in DC work DC rounds until you have the desired length. If you wish to add rounds of detail then finish a DC round on the wrong side. Start the detail on the right side.
DC Round :
Work a DC into each stitch, join with a Sl St to the top of the first DC. Ch1 long/loosely and turn. (161, 168, 175, 189, 210, 224) sts.
— Skirt Detail :
Info :
If you choose to make the whole skirt detailed then start with Detail Round 1. For reference the detail rounds (1 and 2) measure approx. 2cm in height.
Detail Round 1 :
Work a DC into the first stitch. (This is the first full stitch, not the base of the chain) Skip 2 sts and work a TR into each of the next 2 sts. Now go back and work a TR into the first skipped stitch. Work a TR into the second skipped stitch. (The 3rd and 4th trebles will sit in front of the 1st and 2nd trebles) From now on we will refer to this stitch as CRTR (Crossed Treble) and it will always be worked over 4 sts.
Detail Round 1 :
After completing your first CRTR work *DC 3, CRTR. Repeat from * until you have 2 sts remaining. Work a DC into each of these stitches. join with a Sl St to the top of the first DC. Ch1 and turn. (161, 168, 175, 189, 210, 224) sts.
Detail Round 2 :
Work a HDC into each stitch, Ch1 long/loosely and turn. (161, 168, 175, 189, 210, 224) sts.
Info :
Repeat rounds 1 and 2.
Final row :
Work a round of HDC on the right side of the skirt to finish/neaten the bottom hem. Fasten off.
— Front Bib :
Info :
Lay the dress flat with the front facing. Mark out 26, 26, 30, 34, 38, 42 sts across the top of the waistband ensuring you have these central. You will have 27, 29, 29, 31, 33, 35 sts on each side between the marked stitch and the end of the waist band.
CRTR :
Skip 2 sts and work a TR into each of the next 2 sts. Now go back and work a TR into the first skipped stitch. Work a TR into the second skipped stitch. (The 3rd and 4th trebles will sit in front of the 1st and 2nd trebles) From now on we will refer to this stitch as CRTR (Crossed Treble) and it will always be worked over 4 sts.
Row 1 :
0-3 and 3-6 months only. With the front of the dress facing you, attach yarn to the stitch marked on the right. Ch1 and DC into this stitch. Work a *CRTR. DC 3. CRTR. DC 2. CRTR. DC 3. CRTR and then work a DC into the last stitch. Ch1 and turn. 26 26 sts When working the rows on the bib it helps to keep the first and last stitch of the rows marked.
Row 1 :
6-12 months only. With the front of the dress facing you, attach yarn to the stitch marked on the right. Ch1 and DC into this stitch. Work a *CRTR. DC 2. CRTR. DC 2. CRTR. DC 2. CRTR. DC 2. CRTR and then work a DC into the last stitch. Ch1 and turn. 30 sts When working the rows on the bib it helps to keep the first and last stitch of the rows marked.
Row 1 :
2-3 years only. With the front of the dress facing you, attach yarn to the stitch marked on the right. Ch1 and DC into this stitch. Work a *CRTR. DC 3. CRTR. DC 3. CRTR. DC 3. CRTR. DC 3. CRTR and then work a DC into the last stitch. Ch1 and turn. 34 sts When working the rows on the bib it helps to keep the first and last stitch of the rows marked.
Row 1 :
4-6 years only. With the front of the dress facing you, attach yarn to the stitch marked on the right. Ch1 and DC into this stitch. Work a *CRTR. DC 2. CRTR. DC 3. CRTR. DC 2. CRTR. DC 3. CRTR. DC 2. CRTR. and then work a DC into the last stitch. Ch1 and turn. 38 sts When working the rows on the bib it helps to keep the first and last stitch of the rows marked.
Row 1 :
7-8 years only. With the front of the dress facing you, attach yarn to the stitch marked on the right. Ch1 and DC into this stitch. Work a *CRTR. DC 2. CRTR. DC 3. CRTR. DC 2. CRTR. DC 3. CRTR. DC 2. CRTR. and then work a DC into the last stitch. Ch1 and turn. 42 sts When working the rows on the bib it helps to keep the first and last stitch of the rows marked.
Row 2 :
All sizes. HDC into each stitch. Ch1 long/loosely and turn. 26, 26, 30, 34, 38, 42, sts
Row 3 :
DC into the first stitch and then repeat from * in Row 1 for the size you are making. 26, 26, 30, 34, 38, 42, sts
Row 4 :
HDC into each stitch. Ch1 long/loosely and turn. 26, 26, 30, 34, 38, 42, sts
Repeat :
Repeat rows 3 and 4 - 2, 3, 3, 4, 5, 6 times. At the end of the last HDC row Ch1 long/loosely and turn.
— Straps :
Info :
We are now going to create our straps.
Row 1 :
DC into the first stitch. CRTR. DC. Ch1 and turn. 6sts.
Row 2 :
HDC in each of the 6 sts, Ch1 long/loosely and turn.
Info :
Continue to complete rows 1 and 2 until your strap (as worn) sits approx. 5, 6, 6, 6, 7, 7 cms above the bib and meets the waistband.
Info :
Now work another 4 rows of HDC. These HDC rows will sit and be attached behind the waistband. When you have your strap completed, fasten off leaving a long tail for sewing to the back.
Info :
Now for the second strap: With the RS facing you, count in 6sts from the left side, and attach yarn. Ch 1 and repeat process as we did for the 1st strap. Ensure you complete the same number of rows on this strap. Fasten off leaving a long tail for sewing to the back. Do not attach the straps until later.
— Edging :
Info :
We will now complete a row of edging.
Edging :
Leaving a long tail, Ch4. (This creates our last button loop) With the RS facing insert hook and join yarn to the first stitch on the top of the waistband with a Sl St. Ch1 and SC into this stitch. Continue to work a SC into each stitch.
Edging :
Now continue to work a SC into each stitch all around the edge of the top section of the dress. When working up the side of the bib and straps work 2 SC into the end of each DC row and work a SC into the end of each HDC row. When working around the corners at the end of the straps, work 3 SC into each of the corner stitches. This will ensure that the end of the strap lays flat once attached. Finish the edging row at the opposite end of the waistband. Fasten off.
— Frills (for straps) :
Info :
Now we will add the frills to the straps. First of all we need to pin the straps in place and place some markers which will help us to place the frills correctly. Please follow the photo sequence below.
Info :
The first row is worked from the right side of the romper. The left strap (as worn) starts in the marked stitch near the base of the bib. The right strap (as worn) starts at the marked stitch near the end of the strap.
Row 1 :
Leaving a long tail for sewing later, attach yarn, Ch1 and SC into the marked stitch. Now working into the FL (Front Loop Only) of each stitch, work 2xHDC into each stitch until you reach the first marker. (Pink markers in photos). Remove marker and work 3xHDC into this stitch and each stitch until you reach the next marker. Remove marker and work 3xHDC into this stitch. Now work 2xHDC into each stitch until you reach your last marker. Remove marker and work a SC into this last stitch. Ch1 and turn. (from now on we will work through both loops until the frill is complete)
Row 2 :
Work a DC into the first stitch followed by a SC into the next stitch. Continue to work a DC and then a SC alternately along the row. Ch 1 and turn.
Row 3 :
Work a SC into the first 3 sts. Work a HDC into each of the next 3 sts. Work a DC into each stitch until you have 6sts remaining. Work a HDC into the first 3 sts and then work a SC into the last 3 sts. Ch 1 and turn.
Row 4 :
Work a SC into the first stitch followed by a DC into the next stitch. Continue to work a SC and then a DC alternately along the row. Fasten off.
Info :
When you have completed both frills, we will attach them to the straps and then attach the straps to the back of the dress. See photos below.
Attach frill :
Count 3 stitches from the end of the frill and using a yarn needle attach end of frill to the side of the strap. Secure the frill end onto the strap by working into the side of the 3 stitches. When secure, Fasten off. Repeat this for the remaining ends. The frills to the front should be attached just above the waistband.
— Finishing / Assembly :
Nearly done :
Attach the final button loop to the side of the waistband. Use the tail at the end of the chain 4 to attach.
Sew straps :
You can now sew your straps carefully to the back of the dress. Pin securely in place and then turn the dress inside out. Sew down the edge of the strap, across the bottom, opposite edge and along the top to ensure that they are secure.
Finish :
Weave in all your ends and sew on some pretty buttons.
Info :
You are finished!! I hope you enjoyed making this dress
This charming baby dress pattern gives you a beautiful handmade garment that looks special and wears well. It is designed to be approachable while offering lovely textured details like the CRTR stitch and frilled straps. Perfect for gifts, special occasions, or everyday wear—crochet one in colors you love and make memories! 🧶🌸