🧢 Beautiful ✨ Detailed πŸ’ Adorable

Baby deer Amigurumi Pattern

Baby deer Amigurumi Pattern
4.6β˜… Rating
5-7 Hours Time Needed
4.1K Made This
βœ‚οΈ

Intermediate Level

Ideal for those with basic crochet experience, featuring slightly more advanced stitches and techniques to expand your skills.

⏱️

Weekend Treat

Takes 5-7 hours, making it an enjoyable project to finish over a couple of days.

🧸

Cute Companion

An adorable friend to cherish, handcrafted with love to bring comfort and joy for years to come.

About This Baby deer Amigurumi Pattern

This pattern shows you how to crochet a lovable baby deer amigurumi with a tiny sweater and antlers. You'll work in continuous rounds and change colors for the sweater detail. The pattern includes clear stitch counts, placement notes for eyes and nose, and assembly guidance.

Baby deer Amigurumi Pattern crochet pattern - detailed view of completed project

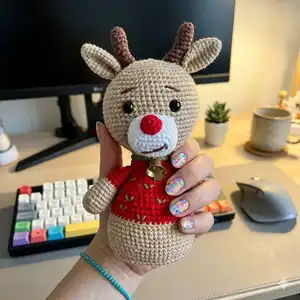
Pieces are crocheted separately and sewn together for neat shaping. Finished size is approximately 15 cm when using the recommended yarn and hook.

Why You'll Love This Baby deer Amigurumi Pattern

I absolutely love this pattern because it brings a sweet, handcrafted character to life with simple stitches and playful details. I enjoyed designing the tiny sweater and embroidered accents that make each deer unique. The pattern balances straightforward shaping with small assembly steps that feel rewarding. I hope you feel the same joy making and gifting this little deer as I did creating it.

Baby deer Amigurumi Pattern step 1 - construction progress Baby deer Amigurumi Pattern step 2 - assembly progress Baby deer Amigurumi Pattern step 3 - details and accessories Baby deer Amigurumi Pattern step 4 - final assembly and finishing

Switch Things Up

I love how easy it is to customize this pattern by changing colors; try pastel shades for a soft nursery toy or bright hues for a playful gift.

I often switch yarn weight and a larger hook to create a chunkier, cuddlier deer that works great as a pillow buddy.

I sometimes add embroidered freckles, spots or different sweater motifs to make each deer unique and personal.

I recommend trying safety eyes of different sizes or embroidered eyes for a baby-safe option; each choice changes the personality of the face.

I occasionally add a tiny scarf, crocheted hat, or felt accessories for seasonal variations like a holiday reindeer.

I like to experiment with variegated yarn for the sweater to give a subtle color variation without extra embroidery.

I also add wire inside the antlers if I want them to be posable; secure the wire ends well in stuffing to prevent poking out.

I sometimes make a mini version as a keychain by using thinner yarn and proportionally smaller eyes and bells.

I recommend trying different stitches for the sweater section (like HDC or textured stitches) to create interesting fabric effects.

I always test placement of eyes and nose with pins before making them permanent; small adjustments can dramatically change expression.

Common Mistakes & How to Fix Them

βœ— Skipping stitch counts during increases and decreases causes misshapen rounds; count your stitches at the end of each round to verify accuracy. βœ— Forgetting to change color exactly where indicated will disrupt the sweater line; mark the round where the color change should happen and switch yarn at the start of that round. βœ— Not stuffing as you go leads to lumps or uneven shape; stuff gradually during rounds and mold evenly for a smooth finish. βœ— Ignoring placement notes for eyes and nose will alter the face expression; follow the specified row numbers and measure stitch spacing before securing eyes.

Baby deer Amigurumi Pattern

Create an adorable baby deer amigurumi with this detailed pattern. You will follow clear round-by-round instructions to crochet the body, head, limbs, ears, nose and antlers. The pattern uses simple stitches and color changes to give a charming sweatered deer look. Perfect for gifting or adding to your handmade toy collection.

Intermediate 5-7 Hours

Materials Needed for Baby deer Amigurumi Pattern

β€” Main Fabric

  • 01
    Beige yarn suitable for your hook (YarnArt Jeans brand recommended)
  • 02
    White yarn suitable for your hook (YarnArt Jeans brand recommended)
  • 03
    Brown yarn suitable for your hook (YarnArt Jeans brand recommended)
  • 04
    Green yarn suitable for your hook (YarnArt Jeans brand recommended)
  • 05
    Red yarn suitable for your hook (YarnArt Jeans brand recommended)

β€” Tools Required

  • 01
    Crochet hook 1.80-2.00 mm
  • 02
    Needle
  • 03
    Fiberfill (stuffing)
  • 04
    8 mm safety eyes (2 pieces)
  • 05
    Little bell

Progress Tracker

0% Complete

β€” Body :

Info :

baby deer Start with beige color.

Round 1 :

15 ch, starking from 2nd ch inc, 12 sc, 3 sc in 1 stitch (work on the other side of tihe chain) 13 sc. (30)

Round 2 :

2 inc, 12 sc, 3 inc, 12 sc, inc. (36)

Round 3 :

(sc, inc) 2 times, 13 sc, (inc, inc) 3 times, 12 sc, inc. (42)

Round 4 :

(2 sc, inc) 2 times, 14 sc, (inc, 2 sc) 3 times,12 sc, inc. (48)

Round 5 :

BLO sc around. (48)

Round 6 :

sc around. (48)

Round 7 :

(7 sc, inc) 6 times. (54)

Round 8-13 :

sc around. (54)

Info :

change color (red)

Round 14 :

sc around. (54)

Round 15 :

(7 sc, dec) 6 times. (48)

Round 16-17 :

sc around. (48)

Round 18 :

(6 sc,dec) 6 times. (42)

Round 19-20 :

sc around. (42)

Round 21 :

(5 sc, dec) 6 times. (36)

Round 22-23 :

sc around. (36)

Round 24 :

(4 sc, dec) 6 times. (30)

Round 25-26 :

sc around. (30)

Round 27 :

(3 sc, dec) 6 times. (24)

Round 28-29 :

sc around. (24)

Info :

change color (beige)

Round 30 :

(3sc, inc) 6 times. (30)

Round 31 :

(4 sc, inc) 6 times.(36)

Round 32 :

(5 sc, inc) 6 times.(42)

Round 33 :

(6 sc,inc) 6 times. (48)

Round 34 :

(7 sc,inc) 6 times. (54)

Round 35 :

(8 sc,inc) 6 times. (60)

Round 36-48 :

sc around. (60)

Round 49 :

(8 sc,dec) 6 times. (54)

Round 50 :

(7 sc,dec) 6 times. (48)

Round 51 :

(6 sc,dec) 6 times.(42)

Round 52 :

(5 sc,dec) 6 times.(36)

Round 53 :

(4 sc,dec) 6 times. (30)

Round 54 :

(3 sc,dec) 6 times. (24)

Round 55 :

(2 sc,dec) 6 times. (18)

Round 56 :

(sc,dec) 6 times. (12)

Round 57 :

(dec) 6 times.

Info :

Attach the eyes to the 43rd and 44th rows, 9 stitches apart.

β€” Arms :

Info :

Start with beige color.

Round 1 :

6 sc into a magic ring. (6)

Round 2 :

(inc) 6 times. (12)

Round 3 :

(sc,inc) 6 times. (18)

Round 4 :

BLO sc around. (18)

Round 5-7 :

sc around. (18)

Round 8 :

(4 sc,dec) 3 times. (15)

Round 9-10 :

sc around. (15)

Info :

change color (red)

Round 11 :

sc around. (15)

Round 12 :

(3 sc,dec) (12)

Info :

Crochet the two edges together at the same time.

β€” Ears :

Info :

Start with beige color.

Round 1 :

6 sc into a magic ring. (6)

Round 2 :

(sc,inc) 3 times. (9)

Round 3 :

sc around. (9)

Round 4 :

(2 sc,inc) 3 times. (12)

Round 5 :

sc around. (12)

Round 6 :

(3 sc,inc) 3 times. (15)

Round 7-12 :

sc around. (15)

Info :

Crochet the two edges together at the same time.

β€” Nose :

Info :

Start whit white color.

Round 1 :

1. 6 ch, starking from 2nd ch inc, 3 sc, 3 sc in 1 stitch (work on the other side of the chain) 4 sc . (12)

Round 2 :

2 inc, 3 sc,3 inc, 3 sc, inc. (18)

Round 3 :

( sc, inc) 2 times, 4 sc, (inc) 3 times, 3 sc, inc. (24)

Round 4 :

BLO sc. (24)

Round 5-7 :

sc around. (24)

Info :

Round 1.6 sc into q magic ring. (6) Round 2. (inc) 6 times.

β€” Horns :

Info :

Start with brown color.

Round 1 :

6 sc into a magic ring.(6)

Round 2 :

(sc, inc) 3 times. (9)

Round 3-5 :

sc around. (9)

Round 6 :

10. 3 sc, inc, 4 sc, dec. (9)

Assembly Instructions

  • Attach the eyes to the head at rows 43 and 44, placing them 9 stitches apart for correct placement.
  • Sew the nose between rows 32 and 39, centering it on the face and securing firmly with hidden stitches.
  • Sew the sleeves (arms) between rows 25 and 26, spacing them evenly on either side for a natural pose.
  • Sew the ears between rows 50 and 51, angling slightly outward and securing the base neatly.
  • Plant the antlers between rows 53 and 55, sewing each horn firmly through several stitches for stability.

Important Notes

  • πŸ’‘Remember to fill in the pieces as you go to maintain consistent shape and make finishing easier.
  • πŸ’‘The size of the doll will vary depending on the yarn used; using the same yarn produces approximately 15 cm finished size.
  • πŸ’‘Use stitch markers to keep track of the beginning of rounds and any color change rows for accuracy.
  • πŸ’‘Stuff gradually and evenly and pin parts in place before sewing to ensure correct positioning.

This sweet Baby Deer amigurumi is designed to bring a touch of handmade charm to any shelf or gift box. It features a tiny sweater, embroidered details, and poseable little antlers for personality. Make one for a friend, a nursery, or your own collection β€” and enjoy the cozy process of creating. 🧢🧸

You ask,

we answer.

FAQs

What size will the finished piece be?

The finished amigurumi measures approximately 15 cm tall when using the recommended YarnArt Jeans yarn and a 1.8-2.0 mm hook.

Can I use different yarn weights for this pattern?

Yes, you can use different yarn weights, but this will affect the final size and stitch tension. Adjust hook size accordingly and expect a change in finished dimensions.

Do I need prior crochet experience for this pattern?

This pattern is rated intermediate, so basic knowledge of single crochet, increases, decreases, working in BLO/FLO, and sewing pieces together is recommended.

How long does this project typically take to complete?

Most crocheters complete this project in 5-7 hours, though time may vary based on experience level and working pace.