🧢 Beautiful ✨ Detailed πŸ’ Adorable

Anatomical Heart Amigurumi Pattern

Anatomical Heart Amigurumi Pattern
4.6β˜… Rating
5-7 Hours Time Needed
3.7K Made This
βœ‚οΈ

Intermediate Level

Ideal for those with basic crochet experience, featuring slightly more advanced stitches and techniques to expand your skills.

⏱️

Weekend Treat

Takes 5-7 hours, making it an enjoyable project to finish over a couple of days.

🧸

Cute Companion

An adorable friend to cherish, handcrafted with love to bring comfort and joy for years to come.

About This Anatomical Heart Amigurumi Pattern

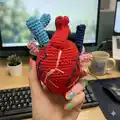
This pattern teaches you to crochet a small anatomical heart complete with arteries and veins. It features continuous-round construction and several small tubular details to sew onto the heart. Photos and clear round-by-round instructions help guide your shaping and assembly.

Anatomical Heart Amigurumi Pattern crochet pattern - detailed view of completed project

Designed to be worked with cotton yarn and a small hook for tight stitches. Ideal for makers who enjoy detailed, dimensional projects with a mix of shaping and finishing.

Why You'll Love This Anatomical Heart Amigurumi Pattern

I absolutely love this pattern because it combines simple amigurumi shaping with educational anatomical details that make the finished piece special and meaningful. I enjoy how each small tube and arch adds personality and realism to the heart. The pattern encourages careful assembly and finishing, which always results in a satisfying, polished toy. Making this project feels like crafting and learning at the same time, and I love gifting the finished hearts to curious friends and students.

Anatomical Heart Amigurumi Pattern step 1 - construction progress Anatomical Heart Amigurumi Pattern step 2 - assembly progress Anatomical Heart Amigurumi Pattern step 3 - details and accessories Anatomical Heart Amigurumi Pattern step 4 - final assembly and finishing

Switch Things Up

I love customizing this pattern by changing yarn colors and scales; try pastel colors for a softer look or bright contrasting yarns for a playful study model.

To make a larger heart, use a thicker yarn and a larger hook β€” the proportions stay the same while the finished size increases dramatically.

If you want a tiny keychain version, use finer yarn and a 1.5 mm hook to reduce the size and add a small metal keyring loop where the aortic arch meets the heart.

I often embroider extra vessel lines using a contrasting thread to make the anatomy pop; use backstitch or chain-stitched lines for clear veins.

For a weighted, more substantial model, add a small bag of rice inside the base before closing to help it sit upright on a shelf.

Try adding felt labels or a small stitched tag to identify parts like the aorta or pulmonary artery if the piece will be used as a teaching aid.

I sometimes vary the tube lengths slightly to create a more organic, less symmetrical look, which gives the final heart more character.

If you prefer less sewing, create fewer small details and focus on the main arch and two major tubes, then embroider the rest.

To make a soft ornament, attach a small loop at the top and hang it as a quirky Valentine's or science-themed decoration.

I recommend practicing the magic ring and invisible decrease on scrap yarn before starting to ensure even shaping and clean closures for the heart body.

Common Mistakes & How to Fix Them

βœ— Skipping stitch markers when working continuous rounds causes you to lose the start of each round; place a marker at the first stitch of every round and move it up as you work. βœ— Understuffing or overstuffing the heart results in a misshapen body; stuff gradually, shaping as you go and stopping when the form looks smooth and round. βœ— Pulling the magic ring too aggressively can distort the first rounds; pull the tail gently to close and adjust again after a round or two to make the centre neat. βœ— Not hiding tails or leaving long ends can make assembly messy; weave in or hide tails as directed after finishing each tube before sewing details in place.

Anatomical Heart Amigurumi Pattern

Make a charming anatomical heart amigurumi you can hold in your hand. This pattern guides you through crocheting the heart body plus arteries and veins with clear step-by-step rounds and photos. You will learn small-tube construction, simple shaping, and how to sew the details for a realistic look. Perfect as a unique gift, educational model, or a fun crochet challenge.

Intermediate 5-7 Hours

Materials Needed for Anatomical Heart Amigurumi Pattern

β€” Main Fabric

  • 01
    50 g / 160 m cotton yarn (example: YarnArt Jeans or Alize Cotton Gold) - red for main heart (approx 50g)
  • 02
    Small amounts of navy/blue yarn for pulmonary arteries and vena cava (approx 10-20g)
  • 03
    Small amounts of light blue or cyan for pulmonary trunk (approx 10g)
  • 04
    Small amounts of orange or pink for pulmonary veins (approx 10-20g)
  • 05
    Small amounts of white or light yarn for embroidered arteries (approx 5g)

β€” Tools Required

  • 01
    Crochet hook size 1.75 - 2.5 mm (choose depending on brand and tension)
  • 02
    Polyester stuffing
  • 03
    Scissors
  • 04
    Sewing needle (yarn/ tapestry needle) for assembly and embroidery
  • 05
    Stitch markers

Progress Tracker

0% Complete

β€” Heart :

Info :

Keep stuffing the heart as you go.

Round 1 :

6 sc in MR. Pull tail tightly to close: grab the yarn tail and pull down. You will need to hold your stitches still to get the ring to close.

Info :

As you do this, the turning chain and the last stitch of the round will come closer together. I often will pull mine tight again after another round or two just to make sure it’s closed tightly.

Info :

We are working in a continuous spiral, so do not join the round with a slip stitch. Start the next round in the first stitch of Round 2.

Round 2 :

6 inc (12)

Round 3 :

(1 sc, inc) x 6 (18)

Round 4 :

(2 sc, inc) x 6 (24)

Round 5 :

(3 sc, inc) x 6 (30)

Round 6-7 :

30 sc

Round 8 :

(4 sc, inc) x 6 (36)

Round 9 :

36 sc

Round 10 :

(5 sc, inc) x 6 (42)

Round 11 :

42 sc

Round 12 :

(6 sc, inc) x 6 (48)

Round 13 :

48 sc

Round 14 :

(7 sc, inc) x 6 (54)

Round 15-18 :

(4 rounds): 54 sc

Round 19 :

(7 sc, dec) x 6 (48)

Round 20-22 :

(3 rounds): 48

Round 23 :

(6 sc, dec) x 6 (42)

Round 24-25 :

(2 rounds) 42

Round 26 :

(4 sc, dec) x 7 (35)

Round 27 :

35 sc

Round 28 :

(3 sc, dec) x 7 (28)

Round 29 :

(3 sc, dec) x 5, 3sc (23)

Round 30 :

(sc, dec) x 7, 2sc (16)

Round 31 :

(1 sc, dec) repeat to the end. Sew up a hole with needle – just grab Β«Front loop onlyΒ» in this Round. Pull tail tightly to close. Fasten off, cut yarn.

β€” AORTA (red) :

Item Name (Big aortic arch) :

Big (1 detail: aortic arch) R1: 12 sc in MR. Don't pull tail. We don't need to close the hole.

Info :

We are working in a continuous spiral, so do not join the round with a slip stitch. Start the next round in the first stitch of Round 2.

Item Name (Big aortic arch) :

R2-R24: 12 sc, slip stitch. Fasten off, leaving a tail for sewing.

Item Name (Small aortic details) :

Small (3 details: - Brachiocephalic artery, - Left common carotid artery, - left subclavian artery) R1: 6 sc in MR. Pull tail tightly to close: grab the yarn tail and pull down. You will need to hold your stitches still to get the ring to close.

Item Name (Small aortic details) :

R2-R4: 6 SC, slip stitch. Fasten off, leaving a tail for sewing. Sew 3 small details to the big detail (aortic arch). Hide tail. Cut yarn.

Assembly :

Sew aortic arch to the heart.

β€” PULMONARY ARTERIES (navy) :

Item Name (Big pulmonary artery) :

Big (1 detail) R1: 10 sc in MR. Pull tail. Don't join.

Item Name (Big pulmonary artery) :

R2-R16: 10 SC, SS. Hide tail. Cut yarn. Sew small detail to the center big detail. Hide tail. Cut yarn.

Item Name (Small pulmonary detail) :

Small (1 details) R1: 8 sc in MR. Don't pull tail. We don't need to close the hole.

Item Name (Small pulmonary detail) :

R2-R8: 8 SC, SS. Sew small detail to the center big detail. Hide tail. Cut yarn.

β€” SUPERIOR VENA CAVA (blue) :

Item Name (Big superior vena cava) :

Big (1 detail) R1: 12 sc in MR. Don't pull tail. We don't need to close the hole.

Item Name (Big superior vena cava) :

R2-R10: 12 SC, SS. Hide tail. Cut yarn.

β€” PULMONARY VEINS (orange or pink) :

Item Name (Left pulmonary veins) :

2 LEFT PULMONARY VEINS (orange or pink): R1: 6 sc in MR. Don't pull tail. We don't need to close the hole. Start the next round in the first stitch of Round 2.

Item Name (Left pulmonary veins) :

R2-R4: 6 SC, SS. Hide tail.

Item Name (Right pulmonary veins) :

2 RIGHT PULMONARY VEINS (orange or pink): R1: 6 sc in MR. Don't pull tail. We don't need to close the hole. Start the next round in the first stitch of Round 2.

Item Name (Right pulmonary veins) :

R2-R4: 6 SC, SS. Hide tail.

β€” Small details & Assembly :

Infos :

Sew 2 details to the left side. Sew 2 details to the right side. Embroider arteries on the heart.

Assembly Instructions

  • Sew the aortic arch (big red detail) to the top of the heart, aligning the centre of the arch with the front seam and secure with several stitches so it sits firmly.
  • Attach the three small aortic branches to the aortic arch (brachiocephalic, left common carotid, left subclavian) and hide tails before final placement.
  • Sew the superior vena cava and pulmonary arteries to the top and back of the heart as shown in the photos, arranging the tubes to match the reference images and securing with hidden stitches.
  • Position and sew the two left and two right pulmonary veins to the sides of the heart, leaving small gaps for natural placement; hide and weave in tails.
  • Embroider the surface arteries and veins on the heart using contrast yarn, following the photo references for placement and line direction.
  • Pin all parts first to double-check placement then sew firmly with a yarn needle, reinforcing with extra stitches where pieces meet for durability.

Important Notes

  • πŸ’‘Crochet continuously in rounds, unless otherwise specified, and use a stitch marker to mark the first stitch of each round.
  • πŸ’‘Stuff pieces gradually and shape as you go; overstuffing can distort the shape while understuffing makes the piece floppy.
  • πŸ’‘Hide and weave in tails after finishing each detail to make assembly neat and avoid loose ends showing on the finished piece.

This anatomical heart amigurumi is both educational and adorable β€” a perfect handmade gift or study model. It combines shaping, tubular details, and simple surface embroidery to create a striking finished piece. Enjoy making every little artery and vein; the final result is delightfully tactile and memorable. 🧢❀️

You ask,

we answer.

FAQs

What size will the finished piece be?

The finished amigurumi measures approximately 4-5 inches (10-12 cm) tall when using the recommended yarn and hook size.

Can I use different yarn weights for this pattern?

Yes, you can use different yarn weights, but this will affect the final size. Adjust the hook size and be aware smaller hooks give tighter stitches and better stuffing containment.

Do I need prior crochet experience for this pattern?

This pattern is rated intermediate, so basic knowledge of single crochet, increases and decreases, and working in continuous rounds is recommended.

How long does this project typically take to complete?

Most crocheters finish this project in 5-7 hours, depending on experience, how many details you sew on, and how careful you are with finishing.

How should I attach the small tubes and arches?

Pin each tube in place first, then sew securely with a yarn needle using the tail left from each piece; hide ends inside the heart where possible.