๐Ÿงถ Beautiful โœจ Detailed ๐Ÿ’ Adorable

Amigurumi Holiday Lights Amigurumi Pattern

Amigurumi Holiday Lights Amigurumi Pattern
4.6โ˜… Rating
2-3 Hours Time Needed
2.7K Made This
โœ‚๏ธ

Beginner Friendly Level

Perfect for those just starting their crochet journey, with clear instructions and simple techniques

โฑ๏ธ

Bite-Sized Project

Finishes in 2-4 hoursโ€”perfect for an afternoon of creative relaxation.

๐ŸŽ

Tiny Treasure

Small, sweet, and gift-worthy creations that fit perfectly in the palm of your hand with detailed charm.

About This Amigurumi Holiday Lights Amigurumi Pattern

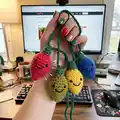
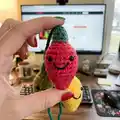
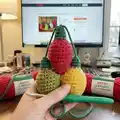
This pattern creates adorable amigurumi holiday light bulbs you can string into a festive garland. Each bulb is crocheted in the round using simple single crochet increases and decreases. The bulbs are small, quick to make, and fun to customize with different colors and faces. They make charming handmade gifts or playful seasonal decorations.

Amigurumi Holiday Lights Amigurumi Pattern crochet pattern - detailed view of completed project

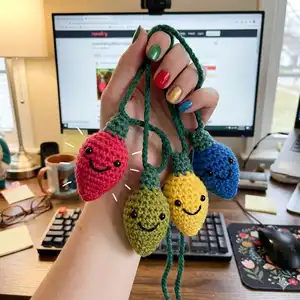
The pattern uses worsted weight yarn and a G hook to produce firm, neat stitches. Optional safety eyes or embroidered faces let you personalize each bulb for a whimsical look.

Why You'll Love This Amigurumi Holiday Lights Amigurumi Pattern

I absolutely love this pattern because it turns a classic holiday motif into a tiny, handmade treasure that is fast to make. I enjoy how simple stitchwork creates charming, rounded bulbs that look delightful in any color. I also like that the pattern invites personalizationโ€”eyes, embroidery, and color choices let you make each bulb unique. Making a whole strand is satisfying and provides an instant festive display.

Amigurumi Holiday Lights Amigurumi Pattern step 1 - construction progress Amigurumi Holiday Lights Amigurumi Pattern step 2 - assembly progress Amigurumi Holiday Lights Amigurumi Pattern step 3 - details and accessories Amigurumi Holiday Lights Amigurumi Pattern step 4 - final assembly and finishing

Switch Things Up

I love customizing these bulbs by changing yarn colors to match my holiday palette; try metallic or variegated yarns for a playful effect.

I sometimes make mini versions using sport or fingering weight yarn and a smaller hook to create tiny keychain charms or tree ornaments.

I also experiment with different caps by using short rows or surface slip stitch for a decorative topper on each bulb.

I often replace safety eyes with embroidered faces for a softer, child-safe version perfect for nurseries or toddler gifts.

I like to stitch on tiny details like freckles, blush, or eyelashes with embroidery thread to give each bulb a unique personality.

I recommend switching hook sizes and yarn weights if you want a chunky, oversized bulb for a statement garland or a miniature set for a dollhouse scene.

I sometimes add a small loop at the top using a few extra chains so each bulb can hang individually on hooks or branches.

I enjoy mixing bulb shapes by altering rounds of increases and decreases to make longer or rounder bulbs for visual variety along the strand.

I occasionally use felt backing for embroidered faces to give more stability to facial details and create a neat finish.

I find a combination of safety eyes and light embroidery looks charmingโ€”try different placements to change the expression and mood of each bulb.

Common Mistakes & How to Fix Them

โœ— Skipping the magic ring or making an incorrect starting loop can leave a visible hole at the top of the bulb; make a tight 3-stitch magic ring to start and pull it closed securely. โœ— Not counting stitches after increases or decreases leads to an uneven shape and incorrect stitch count; count at the end of each round to stay accurate and use a stitch marker at the start of each round. โœ— Overstuffing the bulb causes lumps and distorts the shape; stuff gradually and evenly, checking the silhouette as you add small amounts of Polyfil. โœ— Adding safety eyes too late can make placement awkward and asymmetrical; attach safety eyes between the recommended rounds before stuffing so they sit flat and even. โœ— Switching color for the cap without securing yarn properly can lead to gaps or loose ends; switch to the new color and crochet a few stitches holding both tails before weaving them in to secure.

Amigurumi Holiday Lights Amigurumi Pattern

Create a strand of cheerful amigurumi holiday light bulbs with this easy-to-follow crochet pattern. Youll make cute, palm-sized bulbs that are perfect for garlands, gifts, or festive decor. The pattern uses simple single crochet stitches and clear shaping instructions so you can make a set in no time. Perfect for adding a handmade touch to your holiday decorations.

Beginner Friendly 2-3 Hours

Materials Needed for Amigurumi Holiday Lights Amigurumi Pattern

โ€” Main Fabric

  • 01
    G Hook
  • 02
    Worsted weight yarn in desired colors
  • 03
    Polyfil
  • 04
    Black embroidery thread (optional)
  • 05
    Safety Eyes (optional)

โ€” Tools Required

  • 01
    G Hook (US G, approximately 4.0 mm)
  • 02
    Polyfil stuffing
  • 03
    Tapestry/embroidery needle
  • 04
    Safety Eyes (optional)
  • 05
    Black embroidery thread (optional)
  • 06
    Scissors

Progress Tracker

0% Complete

โ€” Directions :

Info :

Make a 3 stitch magic ring

Round 1 :

Inc around (6)

Round 2 :

*sc 2, inc 1. Repeat from * (8)

Round 3 :

*sc 1, inc 1. Repeat from * (12)

Round 4 :

*sc 2, inc 1. Repeat from * (16)

Round 5 :

*sc 3, inc 1. Repeat from * (20)

Round 6-8 :

sc around (20)

Round 9 :

*sc 3, dec 1. Repeat from * (16)

Round 10 :

*sc 2, dec 1. Repeat from * (12)

Info :

Attach safety eyes if desired. Stuff with Polyfil.

Round 11 :

dec around (6)

Round 12 :

switch to green yarn, sc around (6)

Round 13 :

sc around (6)

Info :

Break off yarn, weave in ends.

Info :

Embroider eyes and mouth if desired.

Infos :

To string together bulbs, begin a chain with desired color and chain through the top of a bulb every 10 inches or spaced however far apart you wish.

Assembly Instructions

  • Attach safety eyes between rounds 8-9 (or as desired) before stuffing so they sit evenly and securely.
  • Stuff each bulb firmly but evenly with Polyfil, adding small amounts at a time to maintain a smooth rounded shape.
  • Break yarn and weave in ends securely after finishing round 13 to prevent unraveling and to keep a neat finish.
  • To make a garland, start a chain with the color you want for the strand and thread the chain through the top of each bulb, spacing bulbs about every 10 inches or to your preference.
  • Embroider eyes and a mouth with black embroidery thread if not using safety eyes, making small, even stitches for a clean expression.

Important Notes

  • ๐Ÿ’กUse stitch markers to mark the beginning of each round for accurate stitch counts and seamless shaping.
  • ๐Ÿ’กAttach safety eyes before stuffing to ensure correct placement and a secure fit.
  • ๐Ÿ’กWeave in ends neatly and bury tails inside the bulb where possible to keep the outside smooth and tidy.
  • ๐Ÿ’กStuff gradually and check the bulb shape as you go to avoid lumps and maintain a uniform roundness.

Craft a cozy, colorful strand of holiday cheer with these tiny amigurumi bulbs that sparkle with personality. Add them to mantels, doorways, or wrap them around a small tree for instant handmade charm. Perfect for gifting or keeping as a cheerful seasonal accent. ๐Ÿงถโœจ๐ŸŽ

You ask,

we answer.

FAQs

What size will the finished piece be?

Each finished bulb measures approximately 2-3 inches tall depending on yarn and tension when using worsted weight yarn and a G (4.0 mm) hook.

Can I use different yarn weights for this pattern?

Yes, you can use different yarn weights, but this will affect the final size; use a suitable hook size for your yarn and expect larger or smaller bulbs accordingly.

Do I need prior crochet experience for this pattern?

This pattern is beginner friendly and uses basic single crochet increases and decreases, but familiarity with magic rings and basic shaping will be helpful.

How long does this project typically take to complete?

Most crocheters complete a single bulb in about 10-20 minutes, and a full garland can take around 2-3 hours depending on how many bulbs you make and finishing steps.